Cables crossed the wrong way can happen to the best of us. Here's a famous mess up, right on the cover of Vogue Knitting!

The good news is, there is a way to fix miscrossed cables which makes them good as new. With this fix, cables crossed the wrong way will be structurally identical to cables knitted correctly in the first place. In other words, this is a "real structural" fix, worked right into the original fabric. The trick involves letting down a giant ladder and then re-working it to correct order.
Preliminaries:
If you've come to this post because you have a miscrossed cable, consider knitting a swatch to practice on before you let stitches loose in your garment. The further down the miscross is, the better an idea this is. It's not that this trick is so hard--it isn't--but releasing columns and knitting them back up again evenly is a skill which quickly improves with every repetition, and some awkward moments pop up along the way.
If a refresher in laddering down columns would be handy, I've done a one minute video. (Please skip the ads!) The video shows letting down one stitch-column, but the process is the same for letting down multiple stitches.
Required tools for this trick are two slim dpn's, a few sizes smaller than those which originally knit the cables. These dpn's are illustrated in green on the diagrams below. Choose grabby bamboo or wooden ones if you've got them.
The set up:
The trick here is to release only one of the cable arms--the one which is miscrossed. All the stitch columns of that cable arm are undone to below the miscross, then the released stitches are knit back up again with slim dpn's, using the released strands as the "running yarn" (running yarn = the yarn which would normally be running back to the ball, meaning, the yarn you knit with).
It may seem that all those fluffy released loops will never come together again in correct order, but, once you understand what you are looking at, the fabric itself tells you what you are to do. Once you know what to do, you can do it, with the help of a trick here and there.
 |
| Oops! |
Here is a photo of a miscrossed cable. It should have been a LFC (left front cross) but it was mistakenly knit as a RFC (right front cross) instead.
Below is an "anatomically correct" diagram of the same miscross. The miscross is highlighted in yellow. This diagram doesn't look all that much like a cable, but instead shows what the stitches look like if you could flatten them without the distortion created by the cable cross, a sort of an x-ray of the cable's bones.
In this diagram, the orange stitches are one arm, and the blue, the other.
 |
| The two cable arms are illustrated in blue and orange. Like these intertwining snakes, the arms should take turns being in front, but due to mistake, orange is in front on all three crosses. All the crosses should slant to upper left (left front cross) but because the middle cross was knit wrong, it slants to upper right (right front cross) |
 |
| The dpn is inserted into the right arm of the stitches, per closeup |
The dpn is inserted into the right arm of the stitches. Inserted there, it prevents unraveling too far and also makes sure all the unraveling stops at the same row. The photo shows what that looks like on the real-live cable, at a distance and close up.
The next step is to unravel all the stitches in that cable arm until the dpn stops you from going further. Below is the x-ray version in a diagram. Not only has the cable been x-rayed in this diagram, but it has also been selectively shrink-er-ized. The blue strands (which, recall, were originally three stitches) have been represented much shorter than they would actually appear. However, they are in the right place, and represent what the skeleton of the cable would look like, if you could only see it for all the loopy fluff. Important to note is how the loose strands change sides at the cross.
 |
| This "x-ray" of the cable shows the strands much shorter, relatively, then they actually appear, hence "shrink-er-ized" |
As you see from the diagram, there are six loose strands for each full repeat because illustrated is a six-row cable, but however many rows your cable is, there will be one strand per row. The dark blue strands (stands 6, highlighted yellow) are those which will be crossed and knit into on the following row (made with strand 1). (For further details, this immediately previous TECHknitting post has a lot more information about which strand is actually doing the crossing.)

As to exact placement of the dpn: in this photo, the dpn is actually inserted three rows below the cross (the stitches knit by using strand 3). In the first diagram, the dpn went two rows below the strand to be crossed (strand 4). In the second diagram it went one row below (strand 5). The point of all this variation is to show that it doesn't matter much whether you stop the unraveling at 1, 2 or 3 rows below the cross, so fear not about exact placement. As long as all the stitches caught are in the same row, just put your dpn in and have at it.
Having inserted the dpn and run down all the stitches in the columns up to that point, we are now ready to knit back up again. You have the stitches from the stop-row already on your dpn. Make sure they are laying in correct orientation (right arm forward). Take a second dpn and begin knitting up, using each strand above in turn as the running yarn.
Assuming you have a cable with three stitches per arm, then on the first stitch (1) no problem because there is enough slack in the strand that you can tension the yarn with a finger or two, and knit it in a somewhat normal way. The second stitch (2), more problem, because the yarn strand is much shorter. Yet, you can usually manage some way, partly because you are re-knitting with a much smaller needle than when you originally knit, so there is extra slack available.
 |
| Stitches 1 and 2 have been needle-knit, stitch 3 is ready to be peg-knit by using the left needle to lift it over the strand parked to its left |
On that last stitch (3) instead of trying to pull the strand through the stitch, as we needle-knitters do, we will borrow a trick from our loom-knitting sisters, and peg-knit that stitch instead.
The right needle becomes the peg, the left needle, the lifter, as follows.
- First, with stitch 3 in the photo, change its orientation to be left arm forward.
- Next, use the left needle to lift the too-short-to-hold strand also onto the left tip of the right needle, parking it just to the left of stitch 3. It will look like a yarn-over (yo) and should also be oriented left arm forward.
- Once the strand is parked, use the tip of the left needle to poke into the leading (left) arm of stitch 3, as shown on the photo.
- Finally, lift the stitch 3 over the parked strand.
- To be clear,
- we're now lifting a stitch over a strand (peg-knitting) using the left needle
- -->instead of<-- ■
- drawing a strand through a stitch (needle knitting) using the right needle
- Ta da! Via peg-knitting, we get a new stitch without having to hold, hunt for, or yank on the strand, and without hunting for the crochet hook or wrist-twisting.
Once you've lifted stitch 3 over the strand, all the newly-made stitches are on your right needle. Switch that needle with its load of stitches to other hand and slide the stitches into the ready-to-work position on the needle tip. Now is the time to check whether you have distributed the yarn evenly among the stitches. If not, pick at the new-made loops until the distribution looks even. Place the now-empty needle in your right hand, and continue knitting each strand in the same way.
Once you have knit your way to strand 6, you'll notice on the X-ray diagram, that strand 1--the strand which is to be knit into strand 6--is already waiting on the other side of the cable. In this matter, re-knitting is not like original cable knitting: there is no need to count rows. The fabric itself tell you when you reach the cross. The next strand (1) is already patiently waiting for you, on the other side of the other (never-unraveled) cable arm.
Which way to knit the strand-6 loops on your needle with the yarn from strand 1 depends on which way the cable should cross: in front (top) or behind (underneath).
TOP: If you want the cable arm to cross over on top, you have only to knit the strand-6 loops on your needle in the ordinary way. The only difference is that you are reaching up and across to use the yarn from strand 1. In our situation, we do want the cross to go on top--that will transform the original mistake from a RFC (right front cross) to a LFC (left front cross). Reaching up and across to knit this row will be a bit tight because you are dragging that strand over the existing cable arm, but you have the advantage that you see what you're doing because you are working on the front fabric face. After this cross-over row using strand 1, you would knit your way up the strands in the same way as regular knitting progresses: from bottom to top, strands 2-6.
BEHIND: Before I get into how to knit a cable which should cross behind, here's something to think about. If you caught your cable mis-twist in time so there is only the ONE miscrossed cable, then drop whichever arm should cross on TOP, because the top arm is always easier to re-latch. You have only to reach over the existing cable arm for strand 1, then rework the remaining strands per usual--again, you can see what you're doing, so even if it is a bit tight, it's all visible.
If, however, your miscross is several cables down, then you'll end up releasing cables which have an arm required to cross behind the stitches in the other, existing cable arm. This is the situation we have on the sample, because the miscross wasn't found for so many rows. Specifically, this cross-behind would be like the higher cross in our cable diagram.
Re-knitting a cross-behind is awkward, and you can't always see what you're doing, but the concept, at least, is not difficult. The hardest thing, really, is getting the loaded knitting needle to the back of the work, working it around the back of the stitches from the other cable arm, and then returning it, still with its load of stitches, to the front of the work once more.
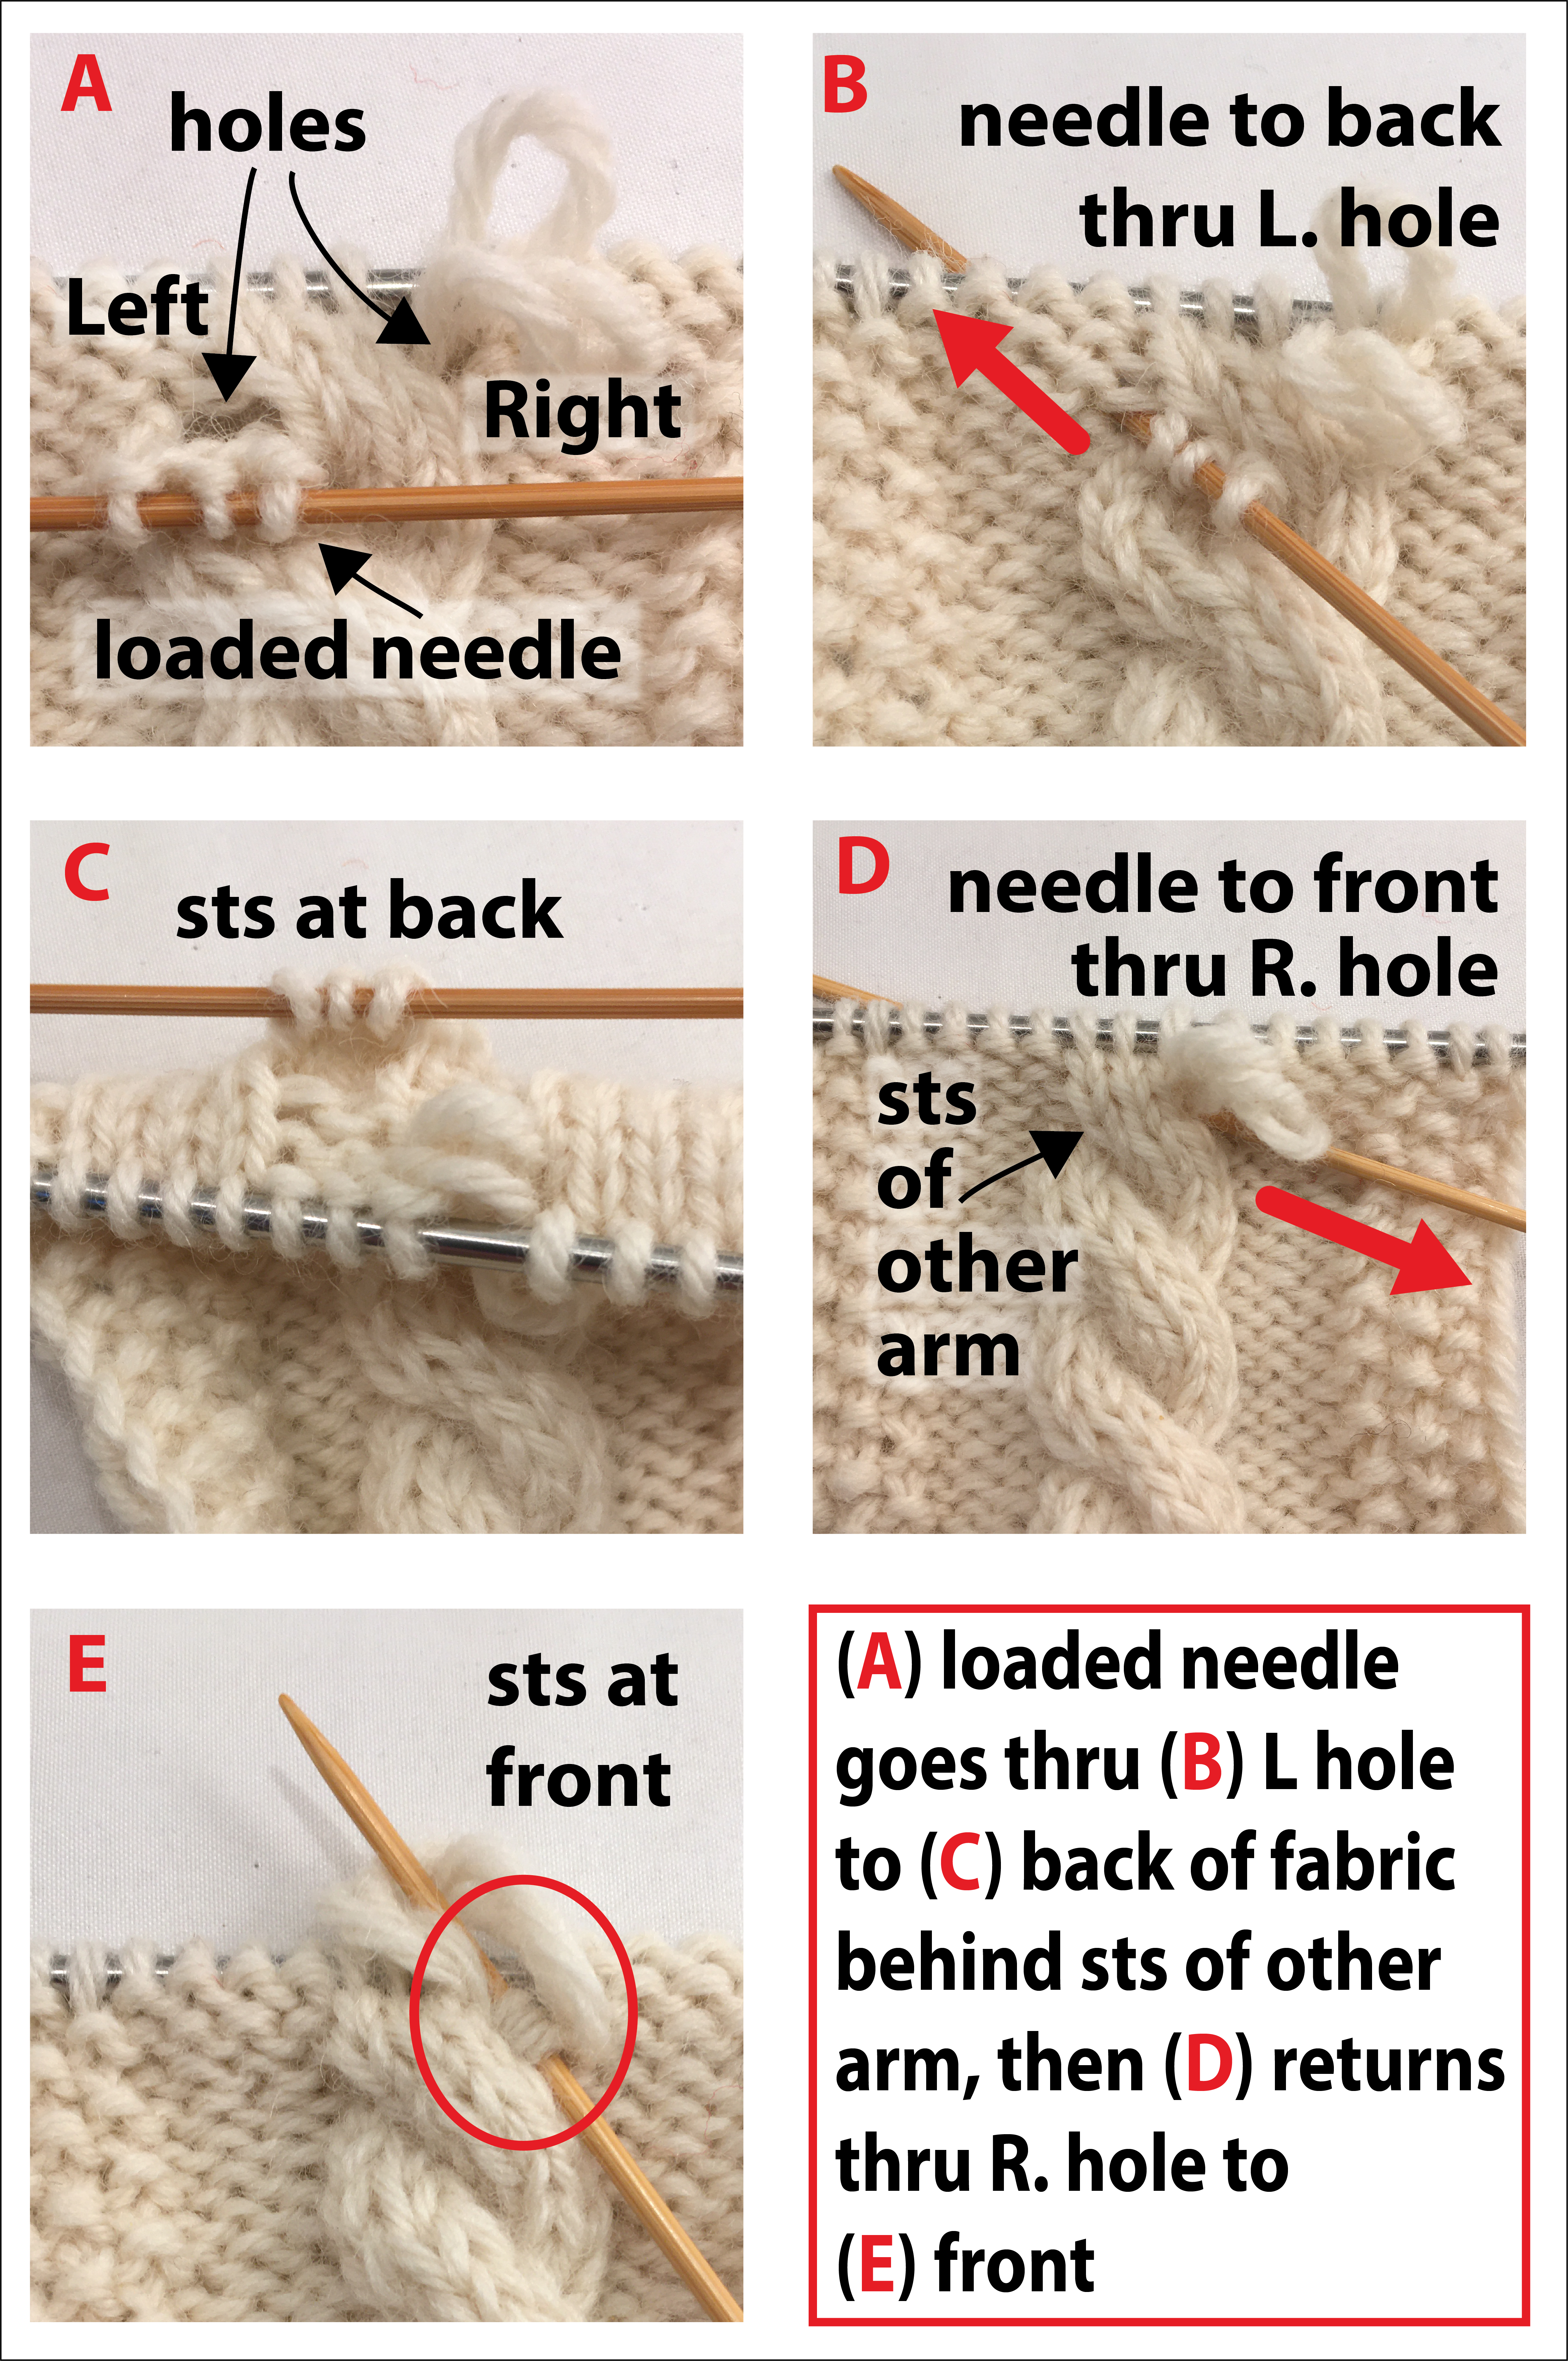 |
| Re-knitting a cross-behind |
A) If you look at your work when you come to a cross-behind, there will be two substantial holes to the left and right of the other cable arm (other cable arm = existing cable arm = the one that was never unraveled).
B) Slide the needle through the left hole to the back of the work, making sure not to lose the stitches on the way. You'll have to work the needle through the hole by sliding it back and forth a bit.
C) Once you succeed, the needle, with its load of stitches, will be on the fabric back. In the illustration, the knitted fabric is folded towards you, getting it out of the way in order to show the loaded needle behind the back fabric face.
D) Passing behind the stitches of the existing cable arm, slide the needle towards the front of the fabric through the right hole. Again you will have to slide the needle back and forth to get such a long object through such a small hole. Again, don't lose the stitches.
E) The stitches have been crossed behind and returned to the fabric front. As you see, the stitches protrude below the strands, which are are also to the fabric front, now packed tight behind the loaded needle. Now all that remains is to sort out the strands, then knit with them in proper order. The first row is awkward and tight, and, as mentioned, a bit hard to see. Luckily, it will permanently live behind the cross, so it will never, ever show. The second row is easier to knit, and by the third row, you've emerged into daylight and the knitting is no more difficult that that of a front-cross.
All the crosses illustrated here are LFC (left front cross) and all the directions of "left hole" and "right hole" are geared towards that. If you are trying to make the upper arm into a RFC (right front cross) you must reverse the holes. Also, the illustrations all show a 6-row cable. If your cable has more or fewer rows, substitute the highest number of strands (rows) for the term "strand 6."
 |
| Before and after: All's well that ends well |
One last thing before we end this subject. Are you wondering whether this fix will work on traveling cables, like the Vogue Knitting cover mess-up at the top of this post? The answer is yes. Traveling cables maintain their column-connection to the cable stitches above and below, even as they travel across the fabric. There is a lot more detail about this in my posts about a new method for knitting Celtic knots, a series which starts here.
In the meanwhile, the very next post shows a different method to correct cables by using an I-cord. The I-cord fix is an optical one, not a "real structural" one like the re-knitting shown here. However, the I-cord fix looks good and is also much quicker than unlatching and re-knitting, especially if the mistaken cross is far down in the work. Plus, no cross-behinds. So, if you have a miscrossed cable somewhere, check out this link before deciding which way to do the correction.
Til next time, good knitting
--TK