The previous post showed making (warp knit!) lanyard cords with a crochet hook, suitable as drawstrings for hoodies and the like. In this post, we'll look at starting and ending these cords. There are lots of choices!
 |
| From easiest to most complex, lots of choices |
Of these endings, some are simple knots, some involve crochet, some are a form of macramé. But these are by no means the only options. Knots and macramé are crafts in themselves, and many decorative knots have been developed over the centuries. This post barely scratches the surface.
1 a and b: cord-end knotted, with tassel-end
 |
1a: Using the overhand knot, knot the end of the cord, leaving the strands protruding and unknotted. 1b: same, but also work an overhand knot on the ends of each individual strands. |
 | |
|
This option works on all the cords: flat, as well as 2-, 3- and 4-strand. It is the quickest.
2a, b and c: ends worked in through a knot or winding
 |
2a: cord knotted, tails worked in 2b: same as a, but on an I-cord 2c: winding instead of knotting, also shown on an I-cord |
Knotted or wound-around, on a lanyard or even on an I-cord.
 |
First, secure the cord end with an overhand knot as for option 1. Left: thread each strand-end in turn onto a needle, Right: work the end into the cord through the knot (no tassels). Tension the strand slightly and cut near the cord. |
2b: Same, but on an I-cord. Many people leave their I-cords plain on the ends, the only finishing being to work in the end. However, IMHO, adding an overhand knot is an improvement: it protects the cord-end and gives you a little knob to grab when tightening the cord.
2c, winding: On an I-cord, you have only one strand to work in at each end. So, you can simply wind the strand tightly around the end several times. Then, using a threaded needle, plunge the strand-end through the core of the cord (and therefore, also through the tight winding). On lanyard, you can wind one strand around, then work the other strands into the tail through the winding, just as you would work tails in through a knot.
Working a threaded needle through a knot or winding requires force so watch out! Don't pierce your fingers! Consider wearing a thimble.
Like option 1, to use this at the beginning of a cord, start the cord with a twist, then come back afterwards and work the knot or winding, leaving the strands a sufficient length before starting the cord.
This option works best on hollow-center cords (i.e.: I-cord, or 3- and 4- stranded lanyard). This option is my personal favorite: it never, ever wears out and remains fresh over the years (decades!)
3a and b: half-hitch knots over the strands
Option 3 is very quick: a series of half hitch knits in contrasting colors, leaving the strands as tassels. These endings taper the cord because only the strands are knotted: this leads the cord-end to elongate. In other words, the base of the cord is not part of the knot. This means that, unlike the other "endings" in this series, you can also start the cord with these knots, a good option if you want to start working the lanyard from a completely secure base. You can leave the tassel-strands plain or comb them out for a feathery look. (You can also knot them as for option 1b, but that is not shown.)
 |
| Half-hitches, 3a: three left are sequential. 3b, (right) is alternating from both sides over the center red "filler cords" |
On a three-stranded cord, (three left cords, option 3a) each strand takes a turn being worked over the ends as a half-hitch. On a four-stranded cord (right, option 3b) the cords are divided into pairs: the inner pair remains as a "filler cord" (red in photo) while the outer pair (yellow and black) alternate being knotted from opposite sides, in half-hitches around the filler.
A half-hitch knot is nothing more than an overhand knot (shown above, option 1) but this time, worked around the other strands.
 |
| Half-hitch |
Here is a useful animation: as you watch, imagine the metal knob as the other strands of the tassel.
One note. Skinny knots pulled tightly are not easy to undo. Consider practicing tension in knot-making around some plain strands of yarn before committing to knotting an ending onto a lanyard cord.
This option works on all the cords: flat, as well as 2-, 3- and 4-strand. However, it is not very showy in a two-stranded cord.
4: single crochet casing over the strands
 |
| Crocheted casing |
This is a quick ending. It is best worked using one of the strands of the lanyard, so prepare by leaving a long tail (longer than you think!) for that strand at beginning and end.
Here is the how-to diagrammed in 7 steps
 |
| step 1 |
1: leave a long tail--shown here as blue. Hold this strand to the back with your non-dominant hand (usually, left) with the long strand uppermost.
 |
| step 2 |
2: Using a crochet hook, and working with the long strand, reach the hook behind the other strands of the tassel and pull a loop to the front (highlighted red).
 |
| step 3 |
3: Retaining the red loop over the barrel of the crochet needle, again reach behind the other strands of the tassel and catch the long strand under the hook of the needle as a second loop (highlighted green). Draw the second loop through the first in the direction of the red arrow.
 |
| step 4 |
4: You now have a loop (highlighted green) over the barrel of the needle, anchored at the bottom by the previous loop (highlighted red). In other words, the red loop is an anchoring loop, formed around the other strands of the tassel and the green loop is a chain stitch, pulled through the red anchor.
 |
| step 5 |
5: Retaining the green highlighted loop around the barrel of the crochet hook, again reach the needle behind the other strands of the tassel and use the hook to pull up a new loop (highlighted purple), However, do NOT pull the purple loop through the green. The purple loop is actually another anchoring loop.
 |
| step 6 |
6. Retaining the green AND the purple loops over the barrel of the crochet needle, catch yet an additional loop over the needle (highlighted orange). There are now three loops over the crochet hook: green, purple and orange. The entire assembly is anchored by the red loop first made, as well as the base of the purple loop.
 |
| step 7 |
7: Finally, pull the orange loop through the green and the purple loops. Like the green loop, the orange loop is a chain stitch, it is not an anchoring stitch.
With this series of maneuvers, you are performing "single crochet" stitches, the bases of which surround the other strands of the tassel. In technical terms, these stitches "encase" the other tassel-strands, so that you have made a "single crochet casing" over the other strands. To make the next stitch, recolor the loop on your needle to green in your mind's eye, and repeat steps 5, 6 and 7.
Again: the structure is a series of anchoring loops (the red as well as the purple loops above) topped with a chain of traveling loops (the green and the orange loops above). In the opening photo, you can see the topping-chain running along the right side of the casing, while the anchoring stitches lay to the left, encasing the other tassel-strands.
If the tension is not what you expected, this casing is very easy to pull out and redo, tighter or looser, using a smaller or larger hook. This is a big advantage over methods requiring knots of any kind.
Finishing: When the casing is as long as you want, and you are happy with the tension, pull the yarn tail through the last loop on the crochet hook. However, this causes the tail to stick up into the air, so, with your crochet hook, reach under the last loop of the last anchoring stitch, and pull the tail through this loop to join the other strands where they emerge from the casing. The tail will now lay in the same orientation (under the loop) as the other strands and form part of the tassel.
Because the casing is made from one of the strands of the cord, this casing cannot slide off the end of the tassel: it is anchored in the cord itself.
To use this at the beginning of a cord, start the lanyard with a twist, as shown in the first post, afterwards working this casing over the beginning of the cord. Again: prepare by purposely leaving one strand long before starting the lanyard.
This option works on all the lanyard cords: flat, as well as 2-, 3- and 4-strand. (Preview: this is the ending for the little fish we will make in the next post, which introduces lanyard cast-on and bind-off. Stay tuned!)
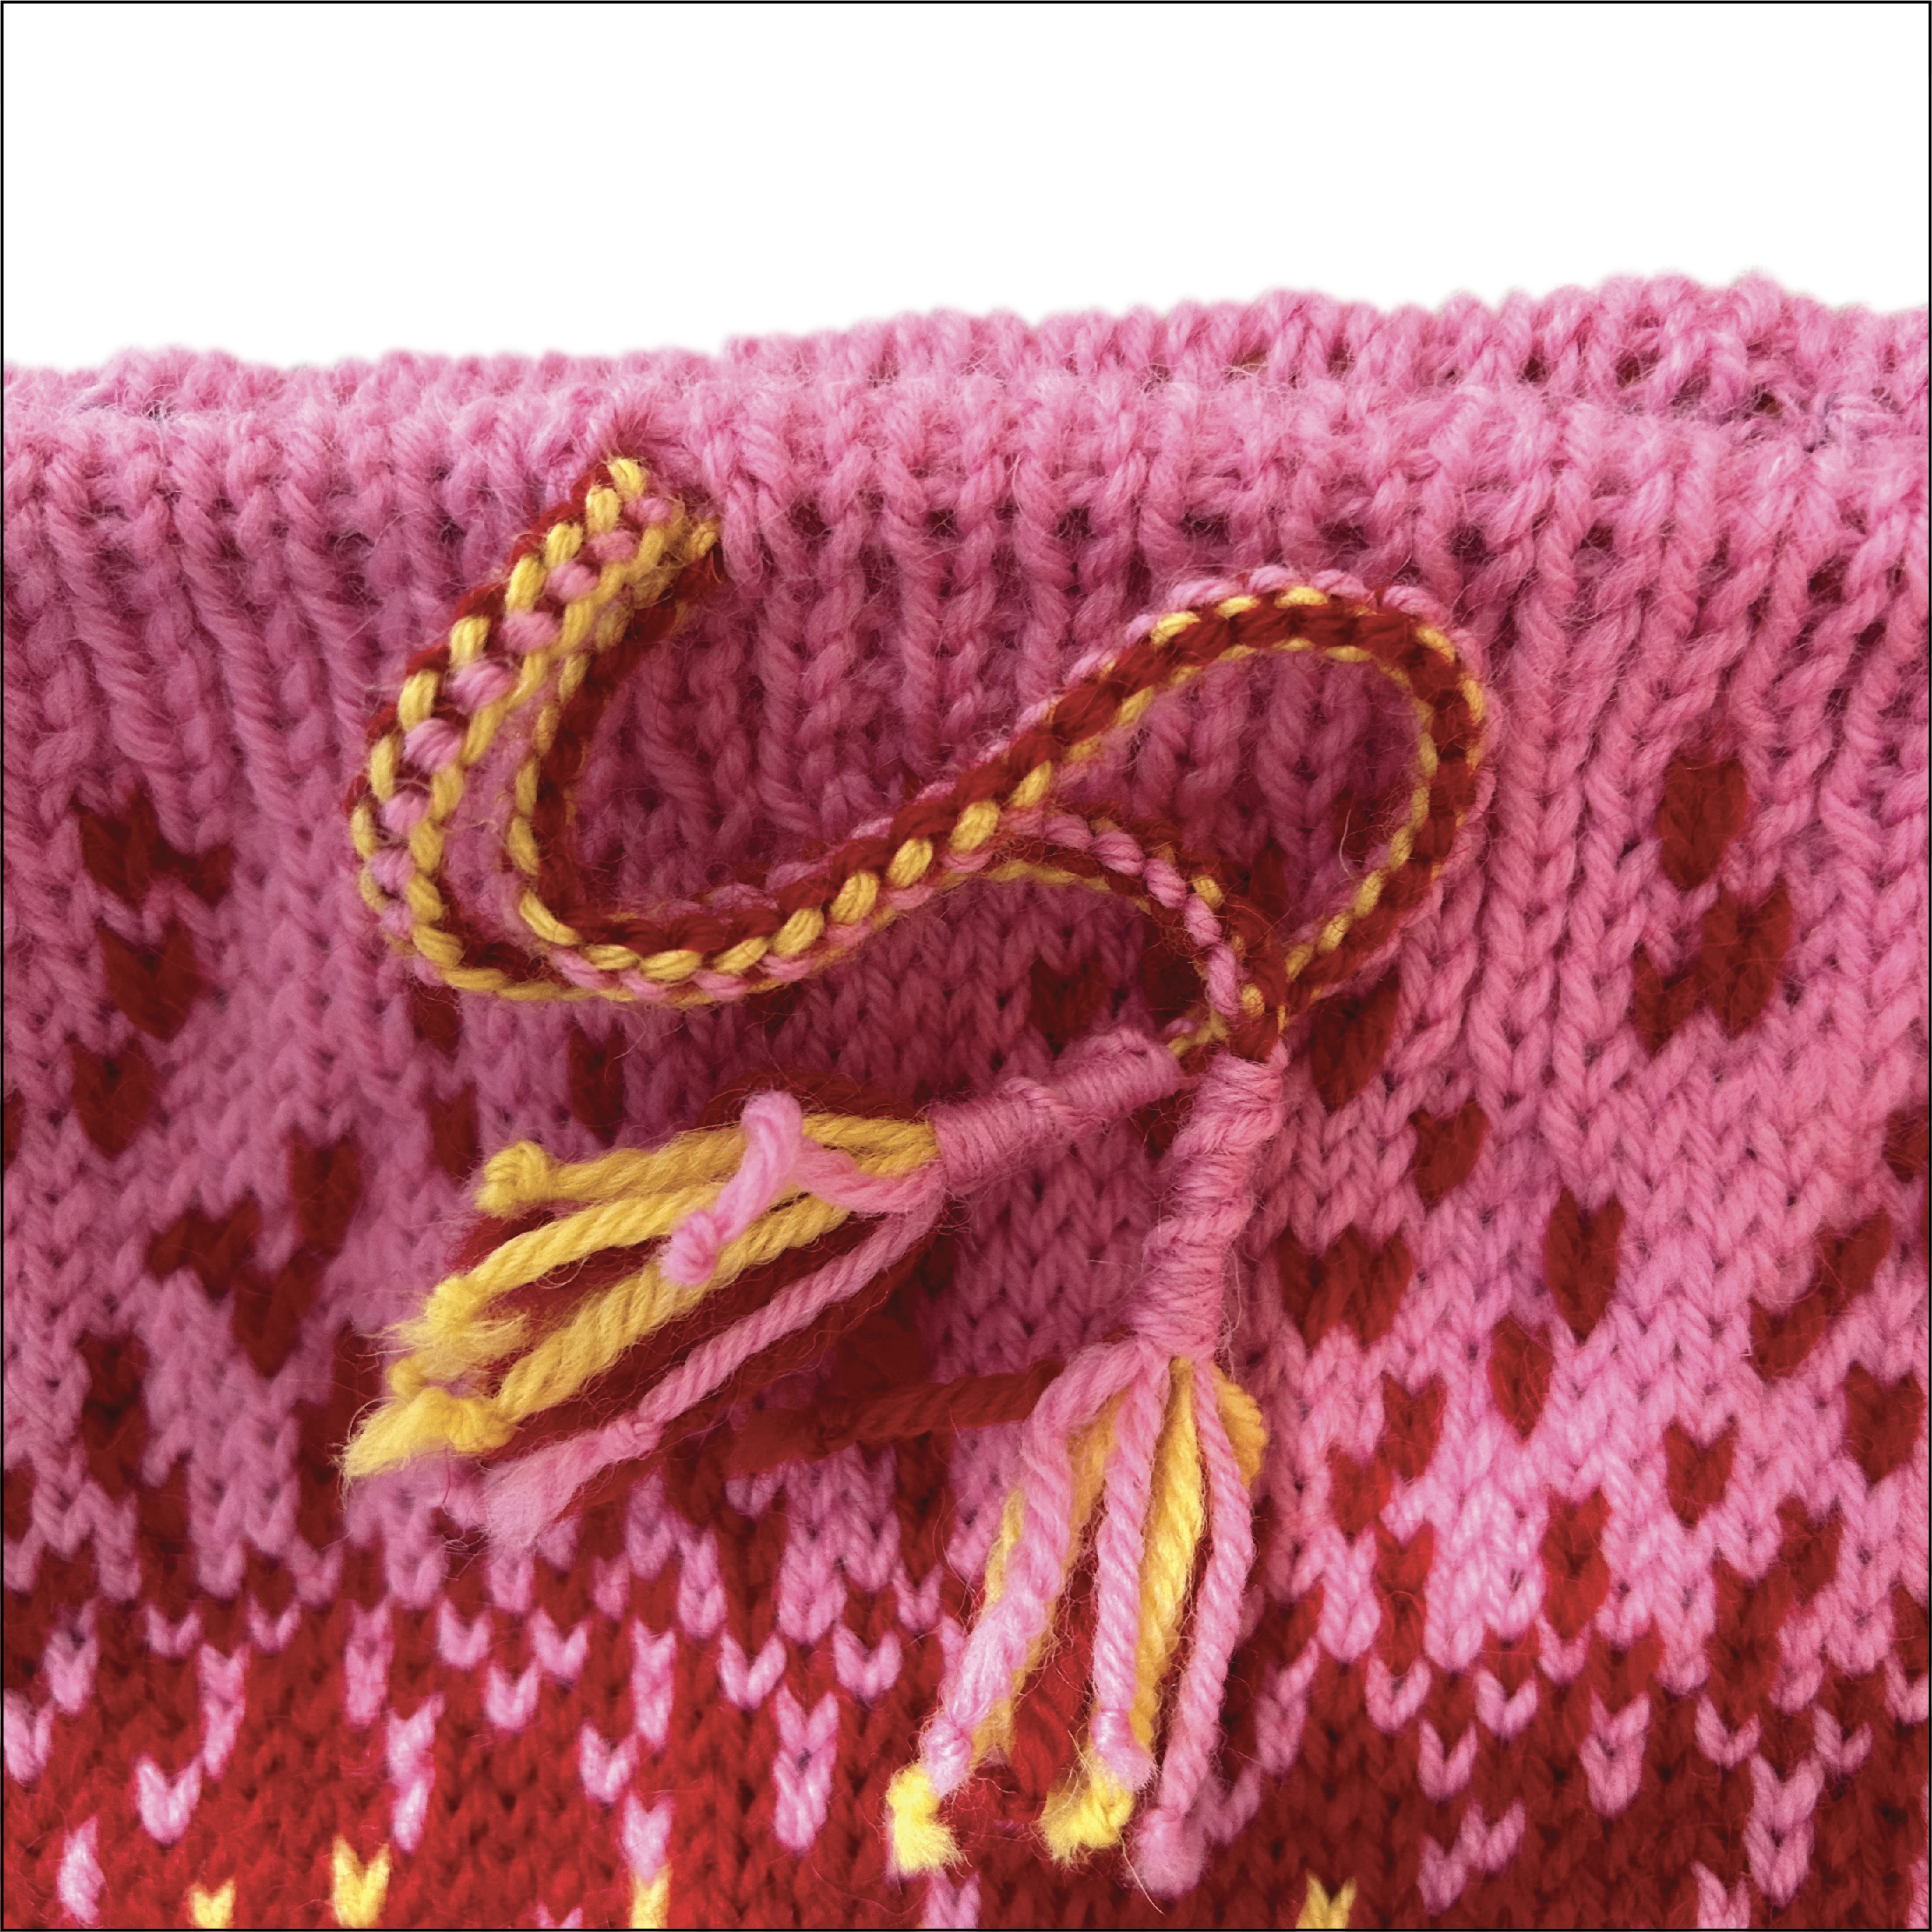
5a and b: macramé endings: gathering knot and spiraling half-hitches
5a: winding a tassel: gathering knot. In this variation, you wind the end of the cord somewhat similar to option 2c, but where that option featured a knot, this option features a tassel. This is a form of macramé called a "gathering knot."
 |
| Gathering knot |
For this trick, you use a separate piece of yarn, in the color you want the winding to be. IRL (photo above) there is a red winding over a four-strand red cord. In the diagram below, we are winding a blue yarn around a four-strand gray tassel-end.
 |
| Four steps of a gathering knot |
- 1. Using your separate piece of yarn (blue) pull down a loop (highlighted in red) then begin winding down, over the loop in a clockwise direction, following the red arrow.
- 2. Wind around several times, evenly and tightly.
- 3. Draw the cord-facing tail (highlighted red) through the beginning loop (also red)--this is at bottom of illustration. Tug up on the tassel tail in the direction of the red arrow.
- 4. This snugs the loop-and-tail assembly, and hides it in the winding.
 |
| Hiding the cord-facing tail in the hollow core, similar to option 2, above |
5b: spiraling half-hitches with tassels, a macramé ending with optional additional strands
 |
| Macramé half-hitch spiral with optional additional strands |
This ending is nothing more than a series of half-hitches tied, always in the same order, over the cord-end. As each knot is tied, it is pushed back in sequence by the pre-existing cord before it. The result is a very pretty spiral.
The tassel above has optional extra strands added for a fuller-looking tassel. The diagrams below demo that idea with an additional purple strand. However, additional strands are optional: you can work this spiral of half-hitches over a cord without adding any extra strands.
 |
| step 1 |
1. Into the last loop of the lanyard (blue), draw the other strand(s) of the lanyard, as well as (optional) additional short strands of yarn (here, shown in purple). For optional additional strands, center them in the loop with one arm to the outside, as shown. Snug up this last loop and leave this blue strand of lanyard-yarn quite long, this "running yarn" is what the tassel-end will come to be wrapped with.
 |
| step 2 |
2. Thread the blue strand onto a needle and work it a short distance up the core of the cord until it emerges at the point where you want the spiral to start--maybe a half-inch or so. Unlike in previous options where a strand was threaded through a cord-core, DO NOT cut the yarn.
 |
| step 3--making a half-hitch |
3. Commence by making a half hitch around the cord-end, at the height the running yarn emerges. This half-hitch and all the others (except the last) are made as shown: following the path of the red arrow, draw the yarn to the back, then behind the tassel, around the bottom, then up in front, and finally, from right to left, under the strand where it emerges from the cord.
 |
| step 4--spiraling half-hitches |
4. Continue in this manner making sequential half hitches around the tassel, always in the same direction. As you snug each knot firmly to its neighbor, the knots will automatically spiral around the cord. You can enhance the angle of the spiral by further twisting the knots around the tassel after every few knots.
 |
| step 5--last half-hitch |
5. To end the series, work the final half-hitch in the other direction. Specifically, bring the strand behind the tassel, around the bottom, but this time, through the previous loop from left to right. In this orientation, the last knot lays over the strand, trapping the strand to lay smooth as part of the tassel. This is the same knot as was used in option 3, above.
Because the casing is made from one of the strands of the cord, this casing cannot slide off the end of the tassel: it is anchored in the cord itself.
To use this at the beginning of a cord, start the lanyard with a twist. Then, afterwards work this macramé series of knots over the beginning of the cord. Purposely leave one strand long before starting.
This option works on all the lanyard cords: flat, as well as 2-, 3- and 4-strand. It is true that a flat cord has no hollow core, but, because the yarn is wound and knotted around the cord-end, the part of the strand threaded onto the needle in step 2 will never show.
* * *
One final note: wherever a yarn-end has to be worked in above, the illustration shows a threaded needle. However, a knit-picker tool works just as well if not better, especially with short ends. I showed a sewing needle because I didn't want you to think you had to run out and buy some new tool. However, IMHO, it is really worthwhile getting and learning to use a knit-picker.
 |
| Knit-picker tool showing closeup of head. IRL, the hook is tiny. |
A knit-picker is a tiny latch hook meant for dragging snags to the back of the fabric in commercially knit polo shirts and the like. They are available in every fabric store. To work tails into a lanyard, work the hook in the open-position through the knot or winding, or up into the hollow core of a cord. Then, grab the tail to be worked-in under the latch, shut the latch and retract the knit picker. This drags the tail along with the retracting hook. In other words, a knit-picker works the opposite direction to a sewing needle and has the advantage of never needing to be threaded. There is more about working ends in with a knit picker at this post, and the idea is the same for working through a knot or winding, or burying an end in a hollow core.
Again: working anything, needle OR knit-picker, through a knot or winding takes force. Do not pierce your finger. Consider a thimble.
* * *
Other posts in this series:
Using Lanyards for colorful cast-on and cast-off (Let's make a fish)
--TK
 |
| Questions? Feedback? Talk to me about this post on TECHknitting Ravelry forum. |