 |
The goal: knitting complex panels
|
When different cables are knit side-by-side, knowing where you are can be a challenge.
Intro to box-and-circle
Back in 2007, I showed a method to track lace knitting via a little trick called
chart-charts. Today,
(has it really been 15 years?) its first cousin: box and circle for keeping track of cables.
SINGLE CABLES
Suppose you want to knit a single cable, up the side of a sweater, perhaps.
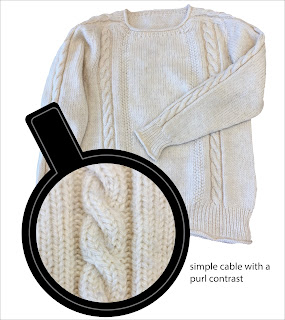 |
suppose you want to knit a
single cable, up the side
of a sweater, perhaps... |
My previous post showed the mechanics of this kind of simple cable: the "cable part," (center columns knit in stockinette) is bordered by a background worked in purl.
If you think about it, most rows in these kind of cables are nothing more than knits and purls, helpfully lined up in continuous columns. And, except for the crossing row, that's all there is. Knit columns and purl columns in regular, repeating sequences along each row.
Distinguishing a knit from a purl in the row below the one you are knitting is called "reading your knitting." It's a skill well worth developing, because once you CAN read your knitting, then all the complicated-looking directions for knitting this kind of simple single cable (except, again for the crossing row) really do simplify down to "knit the knits and purl the purls." And, this is true for both the back and the front of the fabric. That's really it--all those complicated symbols and directions simplify down to this.
It's true that you need the charted or written directions to establish the pattern of which column is a knit, and which a purl. Yet, once the columns are set up, well, you won't need to look at the instructions for cable-knitting, although you will need to for non-cable elements such as shaping, bands & cuffs, and length.
The crossing row is the exception. It is the only part of this sort of classic-looking cable which ISN'T "knit the knits and purl the purls." As shown in the
previous post, this cross is where, by one method or another, one-half (usually) of the central stockinette stitches switch place by crossing over (or under) the other half. In crossing, each group maintains its original internal order. The cross is then locked into place by knitting a new row across the tops of the rearranged stitches. The crossing of groups then repeats at regular intervals, and generally in the same direction. In the cabled sweater shown, the cross is always the same kind--a left front cross--and always at 8-row intervals.
Cable-crossings are the "complicated part" of cable knitting. However, once you've internalized the logic of the cable cross--stitches switching places along a row--the action becomes familiar. The slipping, parking, and knitting all follow a logical and repeating pattern. So, after working however many crossing rows required to burn this into memory, you won't need the chart or directions for how to knit the cross, either.
What remains to keep track of is the interval between cable crosses, and that's what today's post is about.
* * *
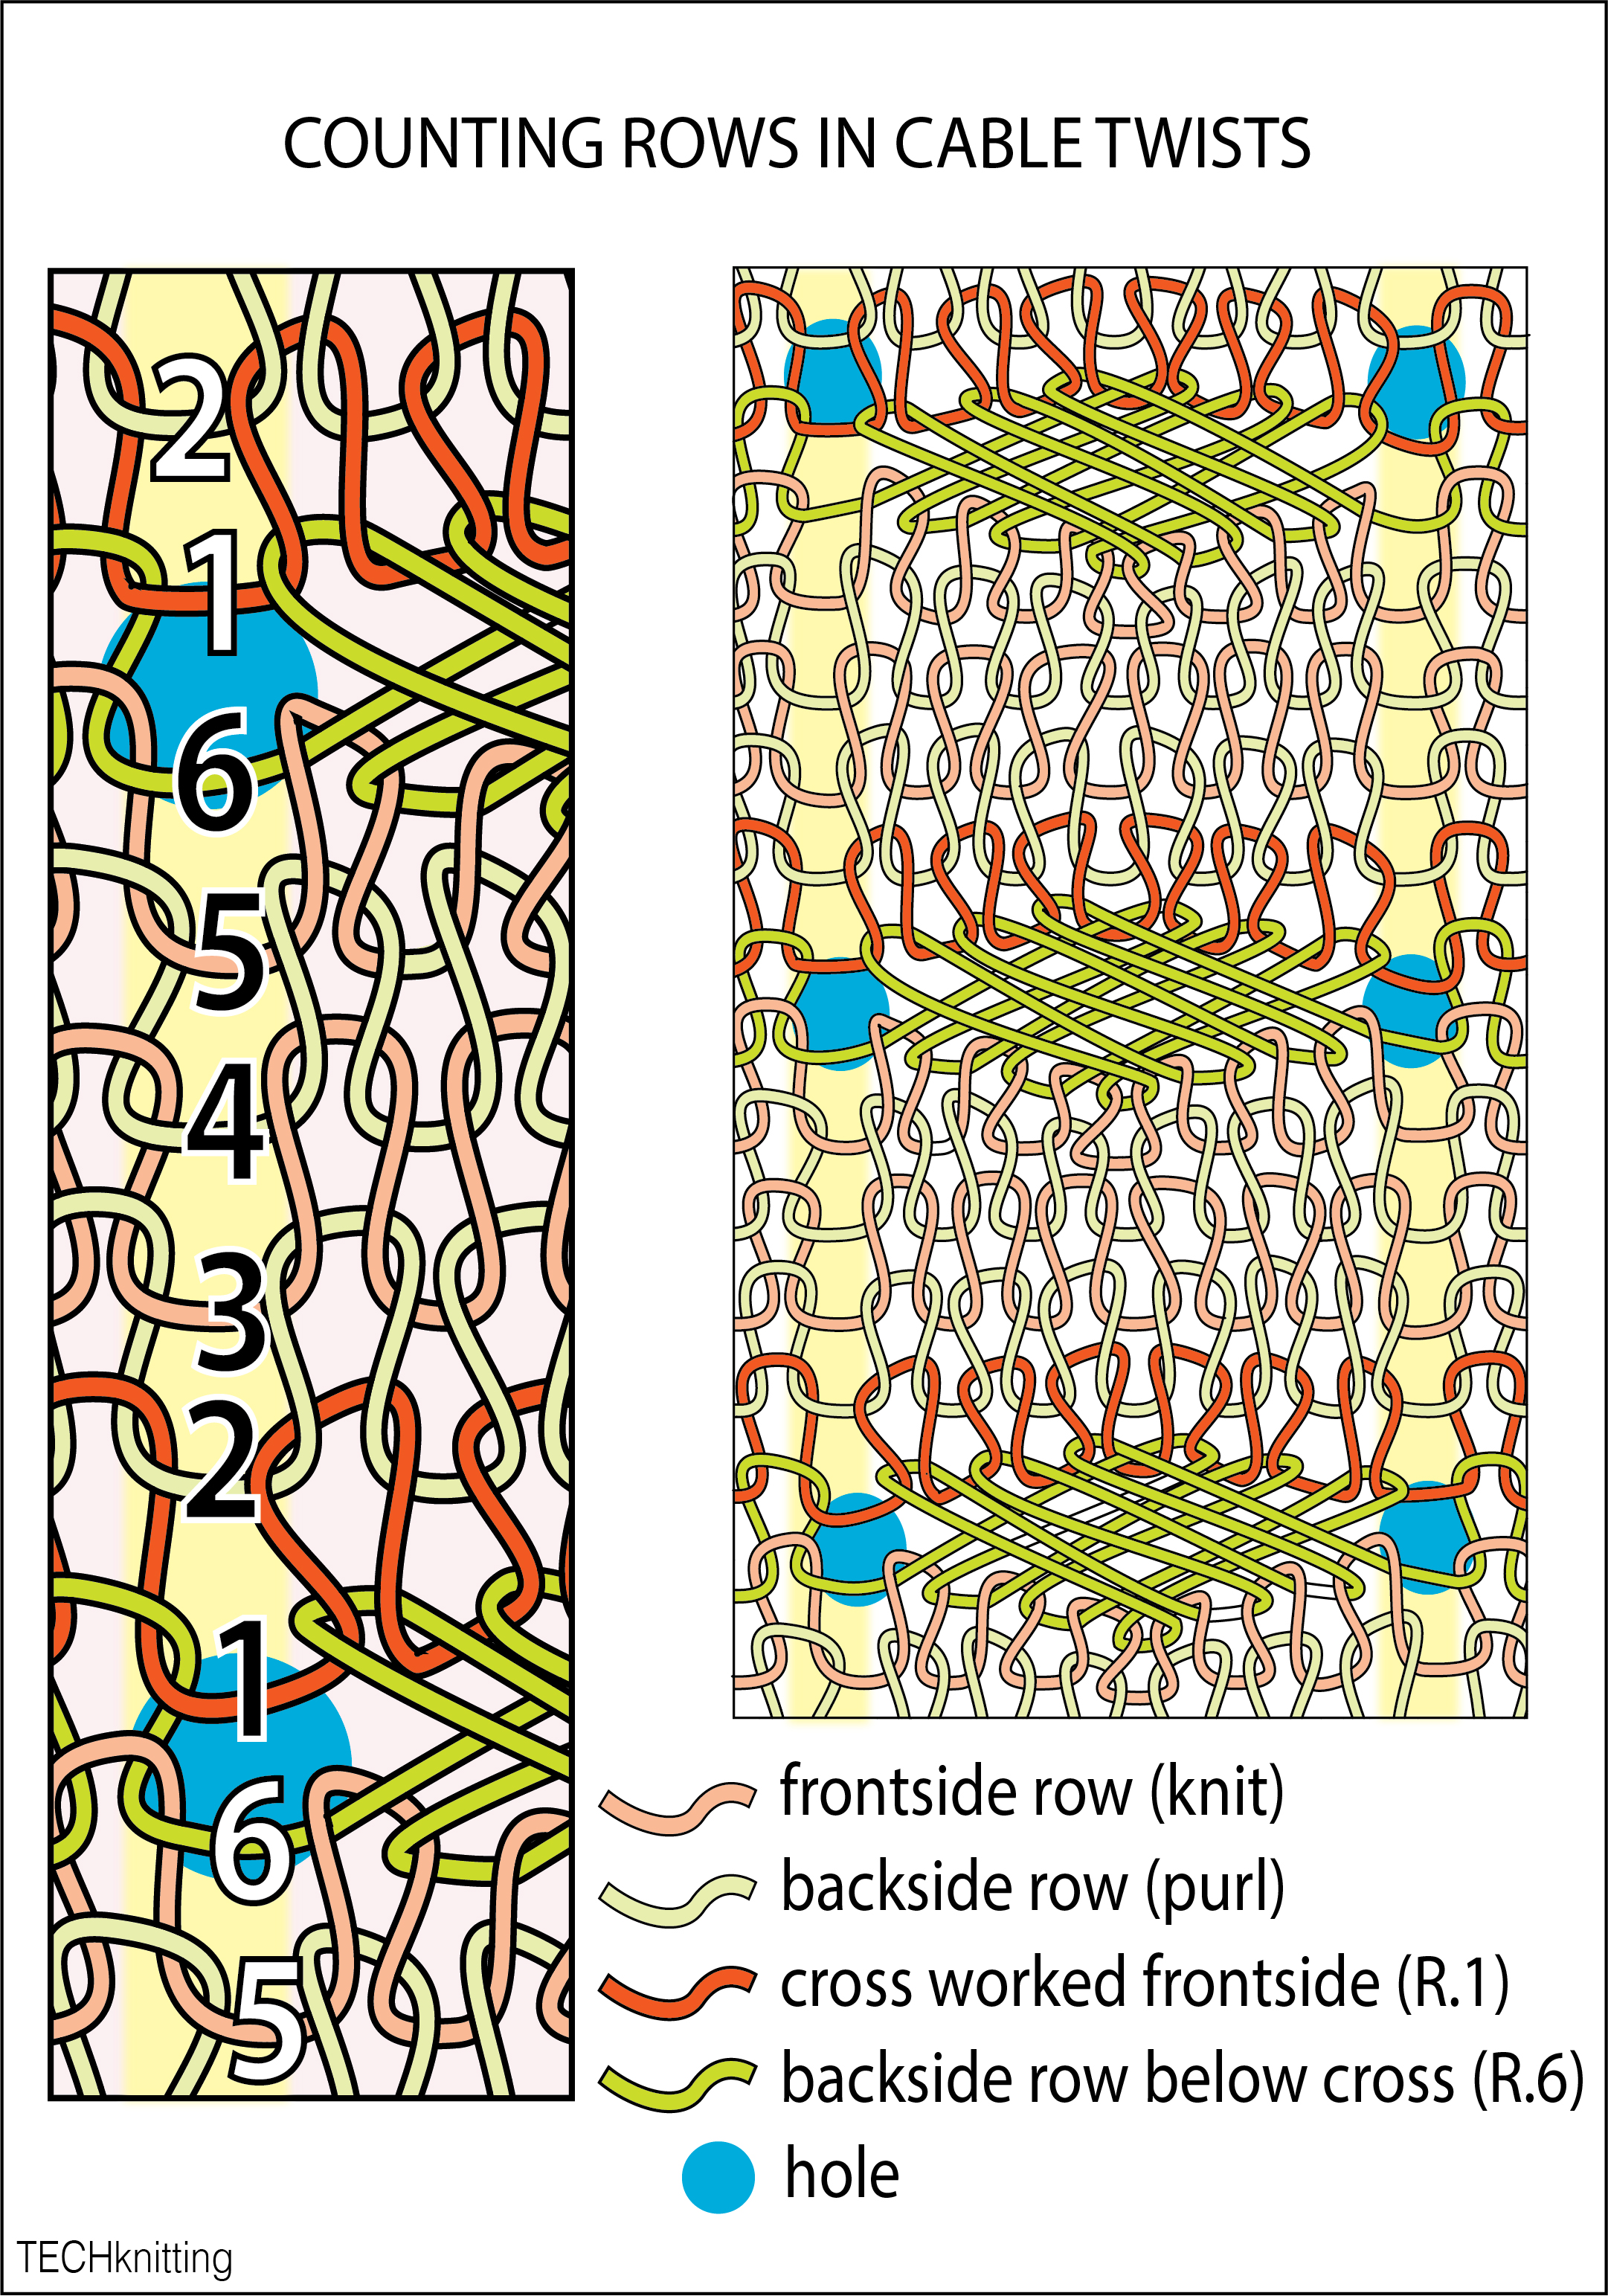
Suppose you're knitting a cable on an eight-row repeat, like the simple off-white cable sweater above. You'd need to keep track of which of the eight rows you are on, with the eighth row being the crossing-row.
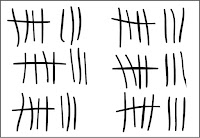
You could keep track with a tally-mark (picket fence) arrangement like this. In this little chart, 6 units of 8 rows have been tallied off: each completed "fence" shows 5 stitches knit, plus the following three single pickets in each group add up to 8 rows knit for each repeat. Every time you came to draw the eighth "picket," you'd know a crossing row was coming up.
Box and circle
Or, if you like to draw diagrams, you could keep track with a little chart made up of boxes and circles, checking off one box or circle for each row you knit.
 |
simple box-and-circle
chart |
The circles would represent all those "plain rows" which make up the bulk of the front and back of the cable: simply knitting the knits and purling the purls. The boxes would be where the cable cross happens. As you get ready to knit each row, you check off a shape (either circle or box). Alternatively, you could check off the shape at the end of every row: the only rule here is consistency.
MULTIPLE CABLES
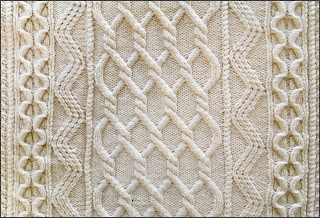
Multiple cables are where box-and-circle really comes into its own. Suppose instead of a single cable, you wanted to knit three cables side by side.
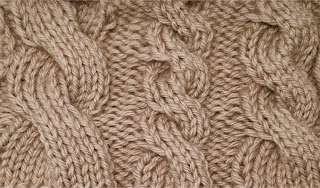 |
three cables side by side
|
Suppose further these cables each cross in a different place, so
- Cable A crosses every 10 rows (10-row repeat)
- Cable B crosses every 6 rows (6-row repeat) and
- Cable C crosses every 8 rows (8-row repeat)
Here are the directions, both written and symbolic, for these cables, where "cn" means cable needle.
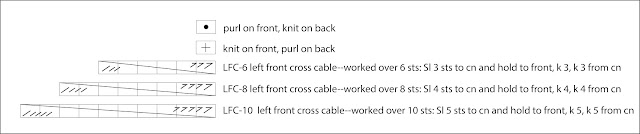 |
| Symbol Key for Cables A, B and C |
 |
Chart for cables A (10 row repeat); B (six row repeat) and C (8-row repeat)
|
 |
Panel chart. Row 1 starts on a wrong side (back fabric face)
|
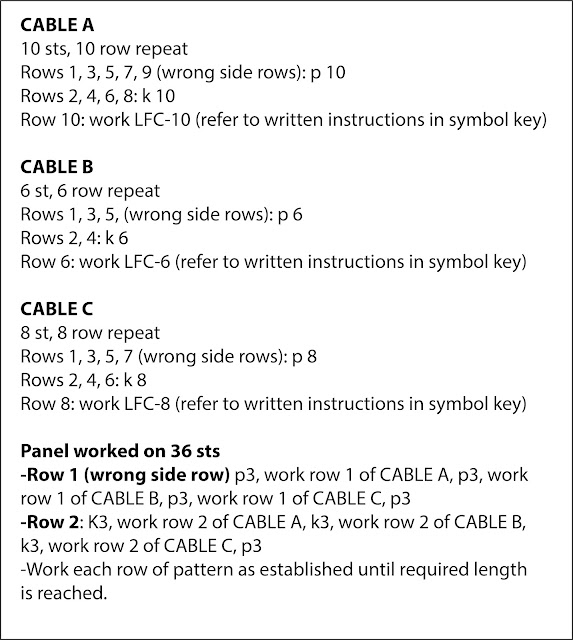 |
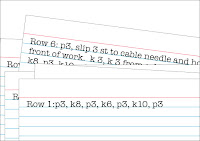
| Written instructions for cables and cable panel |
Whether knitting along from the chart or from the written instructions, the first 6 rows of this multiple-cable panel present no tracking problem. Knit row 1 of each cable (wrong side row), followed by row 2 (right side row) and so forth. But once you get to row 7, things change. Yes, it's row 7 overall, and it's still row 7 for the 8- and 10-row repeats, BUT, it's actually back to row 1 for the 6-row repeat.
By row 9, it's row 9 overall, yes, and it's row 9 for the 10-row repeat, BUT it's row 1 again for the 8-row repeat, and meanwhile, it's row 3 for the 6-row repeat.
By, let's say, row 25 of this garment, it's a three-ring circus, where every cable has been crossed a different number of times, and is at a different row in its repeat-cycle.
* * *
There are various methods for keeping track of this kind of a mess. Some super-knitters simply remember everything. I have met them, and am in awe. However, we knitters who are mere mortals must chose other methods.
Some knitters work with pdf charted versions of their patterns, enter that chart into a knitting program, then follow on-screen.
 |
| knit to the screen |
Some knitters write out cards for every row, showing how every stitch is to be knitted all the way across the whole row for every row of the garment, or at least until the cycles match up and the overall row pattern repeats (which would be all the way to row 120 in the example panel).
 |
| old school |
Other knitters peer at charts, keeping track by magnets or post-it notes moved up every row.
 |
| move on up |
All these methods work. If you use one of these methods and are happy with it, then no need to read further, truly. "If it ain't broke, don't fix it," as the old folks say. Innumerable gorgeous cables have been successfully kept track of via these (and doubtless many other) methods.
If you're still with me though, then IMHO, each of these methods have drawbacks. Tablets or computers are heavy and expensive. Post-its fall off. Cards take time to write up. And none of these methods truly lend themselves to watching TV at the same time. But the real disadvantage to my way of thinking is that ...
--> it's hard to get an overall idea of where you really are with a vertical pattern if all you see is one horizontal line at a time <--
See, the real underlying problem is that cables are VERTICAL elements, but knitting itself is HORIZONTAL. When you cut multiple vertical elements into horizontal slices, each slice captures only a small portion of the vertical element. The coherence of the vertical repeats are obscured. Seen one row at a time, knitting instructions tell you all you need to know about the relationship of each stitch to every other stitch IN THAT ROW, but at the cost of randomizing information about COLUMNAR relationships. Stated simply: because cables are a column-by-column phenomena, row-by-row instructions hide the ball.
Of course, the situation isn't as bad as all that: most knitters do get an idea of where they are by periodically stepping back and assessing progress, by peeling the post-its off the chart or zooming out on the screen to see how things are going overall. And of course, the piece of knitting in your hand displays the vertical as well as the horizontal elements by just looking. But these are round-about methods of adapting horizontal instructions to vertical elements. And worse than that, these are horizontal instructions you really don't need to track all that exactly, since, per above, most cable-knitting is "plain rows" where you knit the knits and purl the purls.
Box and circle is light on information about the the horizontal elements, but it does tells you EXACTLY where you are in the vertical progression of an individual cable. So, what if we adapt the box-and-circle method for multiple cables? what if we make it into a system for keeping track of both vertical AND horizontal information?
A chart with a separate box-and-circle set-up for each cable would show just where each cable in the knitting was, is, and is going to be. It encodes the vertical past, present, and future at a glance. By this method, each vertical cable tracks as an independent whole, rather than as a disjointed and random-seeming component of the horizontal knitted row in which it happens to appear.
However, keeping track of the vertical component is "necessary, but not sufficient" as logicians like to say, because in addition to keeping track of each cable independently, it is also necessary to keep track of overall row count. It would be just as bad to slice horizontal information with a vertical knife as slicing vertical information with a horizontal knife.
See, cables do not exist in a vacuum, and the fundamentally horizontal nature of knitting means that row count dictates things like shaping ("decrease every sixth row") and matching (one sleeve should be the same length as the other). However, by tracking horizontal information in addition to, but independent of the vertical--by tracking row count separately from cable repeats--there's no confusion about where you are in the cable repeats. Overall row count also provides a back-up cross-check. If the overall row count differs from the sum of the cable rows, or the sum of each cables' rows aren't all the same, there's a problem!
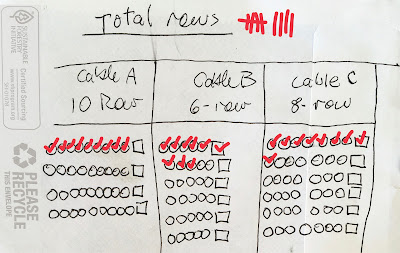
So, in addition to keeping track of each cables via its own box-and-circle set up, the box-and-circle system shown below also charts total rows knitted. This is done at the top of the chart, via the tally mark system, the picket fences drawn earlier. This yields row-count in easy-to-read groups of 5.
Here's how cables A, B and C (the 10, 6, and 8-row cables charted above) progress using a box-and-circle system. The handmade charts shown below, drawn on the back of old envelopes, are pretty typical. However, per part 2 (the next upcoming post), you can go quite elaborate with the box-and-circle with a graphics program, if you prefer.
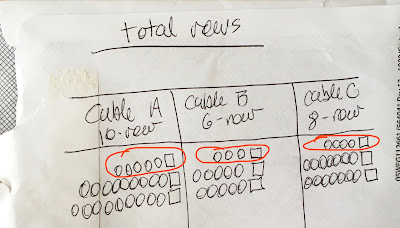
Before any knitting, here's what the chart for the three repeating cables looks like. The tally marks for total rows knit go on top, like a control system. Then, each cable gets its own individual area, its own little compartment. The individual cable compartments happen to be set up as columns on this chart, but that's just because my envelope-back was long and narrow. In fact, the compartments for each cable could really be any self-contained area of the chart.
Unused chart showing set-up
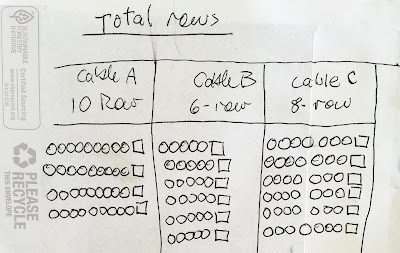 |
A brand-new, never-used box and circle chart for the
cables A, B and C (click to enlarge) |
Just to be clear before we set off, each individual cable's compartment of the chart is set up the same way.
- inside each compartment, any shape to check off (circle or box) = one worked row of that kind of cable, a knitted row. One shape=one knitted row.
- circle = plain row of that kind of cable, meaning knit the knits, purl the purls.
- box = cable crossing row of that kind of cable
- inside each compartment, each chart row = one cable repeat of that kind of cable. So, for cable C, one chart row of 8 shapes = one repeat of that eight-row cable. Similarly, for Cable B, one chart row of 6 shapes = one repeat of that six-row cable.
I've used red text to highlight the difference between a KNIT ROW (a single box or circle in each cable-compartment) and CHART ROW (all the cable rows which make up each full repeat). When talking about "rows" it's easy to get real fuzzy, real fast, unless you distinguish.
OK, now back to the chart. After making a tally mark at the top, I personally check off one shape in each compartment of my chart before
beginning each (knitted) row, but the knitting police won't come for you if you prefer to mark the
end. The only real rule is
be consistent.
The chart after knitting row 1 and before beginning or marking for row 2
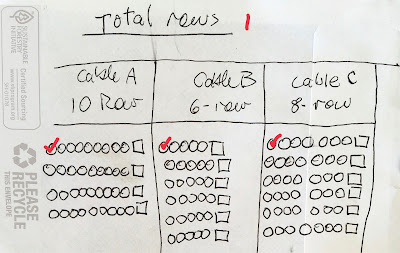 |
Total rows knit =1 (one tally mark on top). ALSO, one check mark made in EACH compartment of the chart.
|
I started the work by knitting a bottom band in seed stitch--a band which was not in the instructions, but which I added so you can see the knitting better. In the below picture, I've just finished working row 1 from the panel chart and/or the written directions near the top of this post, to establish the pattern of 3 purl columns between each cable, and a 3-st purl border either side. Stitch markers mark each cable, the purls lie between. Before setting off on row 2, the chart will be marked again.
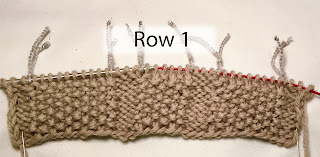 |
| one row knit, second row coming up |
Geek note: it's only coincidence that in this sample, each cable is as many stitches across as it is rows high. Cable WIDTH (stitch count) and HEIGHT (row count) are only loosely correlated. Too few repeats on a narrow cable looks like a plant starved for light, too many repeats on a wide cable overly scrunch the fabric, but within these wide parameters, many variations are possible.
After knitting seven rows, and before beginning or marking off from row 8
Seven rows have been knit, as shown by the tally marks. The only excitement coming up in the next row to knit, row 8, is the crossing row in cable C: there's a box coming up in that compartment of the chart. As the chart shows (by the circles) the rest of the knitting across the other cables of the panel is plain (knit the knits, purl the purls). Also evident from the chart is the past history of the other cables. Cable B was crossed on the last front-side row, and this next row coming up will be a row 2 of that cable, while cable A has not yet been crossed.
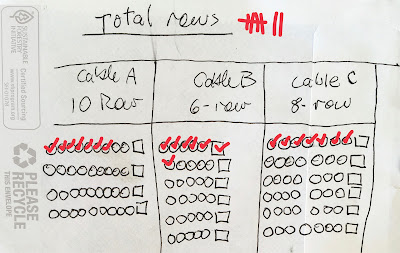 |
| Each row worked above the seed-stitch band has been marked off with a tally mark and also a red check in
each compartment-area of the chart. If wondering "am I still in pattern?" this chart answers "yes." The seven total check marks for each cable within its own compartment equal the seven
tally marks at the top (and each other!) |
 |
| seven rows knit, ready to knit row 8 |
After knitting 9 rows and before beginning or marking off for row 10
The excitement coming up in row 10 is the first crossing of the widest cable as shown by the upcoming box in the compartment for cable A, a box which is waiting to be marked off when the knitting starts again. The rest of the upcoming knitting in this knitted row is all circles, all the way across the panel, meaning for cables B and C it's the default routine of "knit the knits, purl the purls."
 |
| nine rows knit, row 10 coming up |
After knitting 25 rows and before beginning or marking off for row 26
 |
The number of red-checked chart rows = the number
of cables crossed, compare chart to knitting, below |
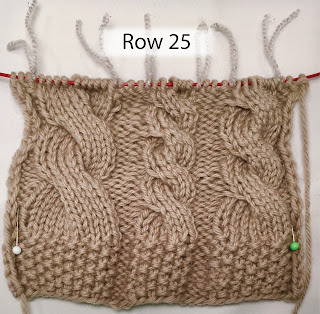 |
| twenty-five rows knit |
After twenty-five rows, the fuller overall pattern is becoming evident, both from the chart (the number of chart-rows checked off in each compartment) and from the knitting itself. This particular pattern appears unbalanced, but would look well if it were mirrored on the other side of a central panel of, say, stockinette or seed stitch.
Partial repeats, especially on old patterns
The examples we've been looking at, both charted and written, all start the cable off on a row 1, with the cross coming at the end of the design. That's easy to understand, but it's an old fashioned way of writing a cable. Cables usually look best if the first cross isn't too far up the pattern, so the old pattern writers would start a cable with a partial repeat to compensate. This usually takes the form of a few rows of stitch-by-stitch directions, followed by directions for full repeats of the general cable pattern. If you get an old-school pattern like this, you can extrapolate with partial repeats on your box-and-circle chart to show exactly what's going on.
 |
starting with partial-repeats (circled) extrapolated from
older-style written directions |
Newer patterns generally avoid this problem by re-conceptualizing the cable pattern so the cross comes in the middle of the repeat. If that's the case with your pattern, simply track the written or diagramed directions exactly by putting the crossing-box in the middle of the chart-row--as shown in
part 2 of this series, the crossing box is often in the middle of the row, especially in complex patterns with several crosses to each full repeat.
The limits of a box chart
Nothing is all roses, all methods have drawbacks, and box-and-circle is no exception.
One drawback already mentioned, you must be 100% comfortable "reading your
knitting" meaning, identifying stitches in the row below, even when distorted by crossing. Otherwise all those circle-rows
where you "knit the knits and purl the purls" are more likely to produce
anxiety than a handy short cut.
Another drawback is the incompleteness of what ISN'T on the chart. As pointed out earlier, the ACTUAL DIRECTIONS for the cables themselves are not included. (This is the same limitation as the
chart-charts for lace--those don't give the directions for the lace knitting either.) So, for example, the box-and-circle for a cabled panel does not tell you whether to drop the crossing stitches to the front or in back, or how many stitches across each cable measures. The box chart also does not track non-cable elements such borders and backgrounds--in the above examples, the purl stitch borders and backgrounds from the written and charted directions for the panel are not tracked on the box chart at all. For these finer details, the pattern must be on standby.
In short, a box-and-circle chart does not encode the entire pattern. It is, however, a pretty nifty tracking device as to where you are, overall, in the (vertical) progression of the main cables, and the overall (horizontal) row count.
Pro-tip for sleeves, socks, mittens, or anything made in pairs
For pairs of things knit the same, there's no need to make two box-and-circle charts. Use check marks for the first time through your box-and-circle chart. To make the second item match the first EXACTLY, use the same chart, but this time marking off each circle or box in the other direction (and perhaps with a different color, also) turning the check into an "X." Result: a perfect match from the same chart. The front and back of a sweater made in parts can also be matched in this way, at least to the point of the shaping.
 |
The previous chart, reused a second time, this
time worked up to row 11 via purple checks and tally marks
(click to enlarge) |
* * *
This is part 1 of a two-part series. The
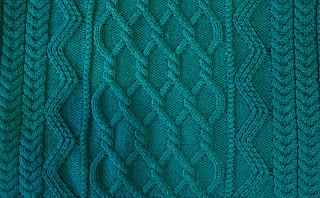
second part shows where box-and-circle really shines: keeping such good track that you can watch TV while knitting even the most complex panels, even traveling cables, like on the pretty green one at the top of this post.
Good knitting!
--TK