This trick to correct miscrossed cables uses an anchored I-cord. The cord creates a new cross which goes straight OVER the miscross, disguising it. The old miscrossed cable remains hidden under the correction.
TECHknitting's previous post showed how to correct a miscrossed cable to be structurally identical to one knitted correctly in the first place. By comparison, you may think today's "cover-up" second rate and second best. But perhaps you will change your mind?
When teaching a knitting class some time ago, I passed around a sample of a mistaken cable-cross which had been fixed with this trick. The knitters had every reason to be suspicious: they were asked to look at the sample carefully. Not one found the miscross corrected with an I-cord. Admittedly, they were only allowed to see the front and were not told what they were looking for--just asked to look carefully, but not feel (the sample was stapled to a cardboard). Yet, if a class-full of suspicious knitters couldn't see this fix when it literally passed before their eyes, then it seems to me that no one else ever will.
Have a look yourself. Can you spot where the anchored I-cord fix was used?
 |
| Where's the fix? |
After you've made up your mind about where the cable has been fixed, click here to see the original: this is what the sample looked like before correction. I hope I may have surprised you!
And, you know, even if you'd rather "fix it right" than disguise a mistake, what if you only find the error much later? After the project has been bound off, blocked and ready to be put in a gift box? As long as you have a scrap of the original yarn, this fix is really and truly undetectable, except for a slight bump.
Anchored I-cord
So, what does it mean to anchor an I-cord? Well, for one thing, it means that the I-cord is anchored to the fabric, as firmly as if it had been knit there in the first place. In other words, the I-cord of today's fix isn't free floating over the mistaken cross, it is actually fastened down. Yes, this adds layers and makes a bump which you can feel, but consider: this bump is in a chain of other bumps because all cable crossings make a bump. So, even though this is a (slightly) bigger bump, the tradeoff is that the anchoring process, although thickening, does prevent the I-cord from lifting, melding it invisibly to the fabric face.
Anchoring also means that the I-cord is not really an I-cord at all, but more a sort of tubular blanket spread atop the relevant cable arm. One result is that the I-cord doesn't go all skinny where the yarn wraps around from last stitch to first stitch. Instead, the yarn returns from last stitch to the first stitch along the fabric back. This not only blankets the cable arm being disguised, it also spreads and anchors the new cable arm, as well.
How-to

- a pair of slim grabby double pointed needles (dpn's) made of wood or bamboo preferably
- a tapestry needle (wide eye, blunt tip) for grafting / duplicate stitching the top of the cord in place
- a crochet- or latch-hook (latch hook is easier IMHO)
Step 1: Cut a length of the repair yarn, here, red. Allow perhaps 20-24", more for bulky yarn and/or a wide cable arm.
Step 2: Select a target row in the relevant cable arm. It should be below the miscross, about the halfway point of the cable, as measured from cross to cross. You are looking for a plump row, not too distorted from the cross.

Step 3: Hold the repair yarn at the back. Using the hook, draw up one loop right through the middle of each stitch of the target row in the relevant cable arm. Place each loop over a dpn, right arm forward. Adjust the yarn tension by eye to match the underlying fabric.

Step 4: Using the hook, draw the repair yarn from the back of the fabric to the front fabric face. The hook is inserted from the front, just past the right arm of the first stitch of the next row up. This travels the repair yarn across the fabric back from the end of the last loop to where the new loop of the next row will begin. The travel across the back is the anchor of the cord.
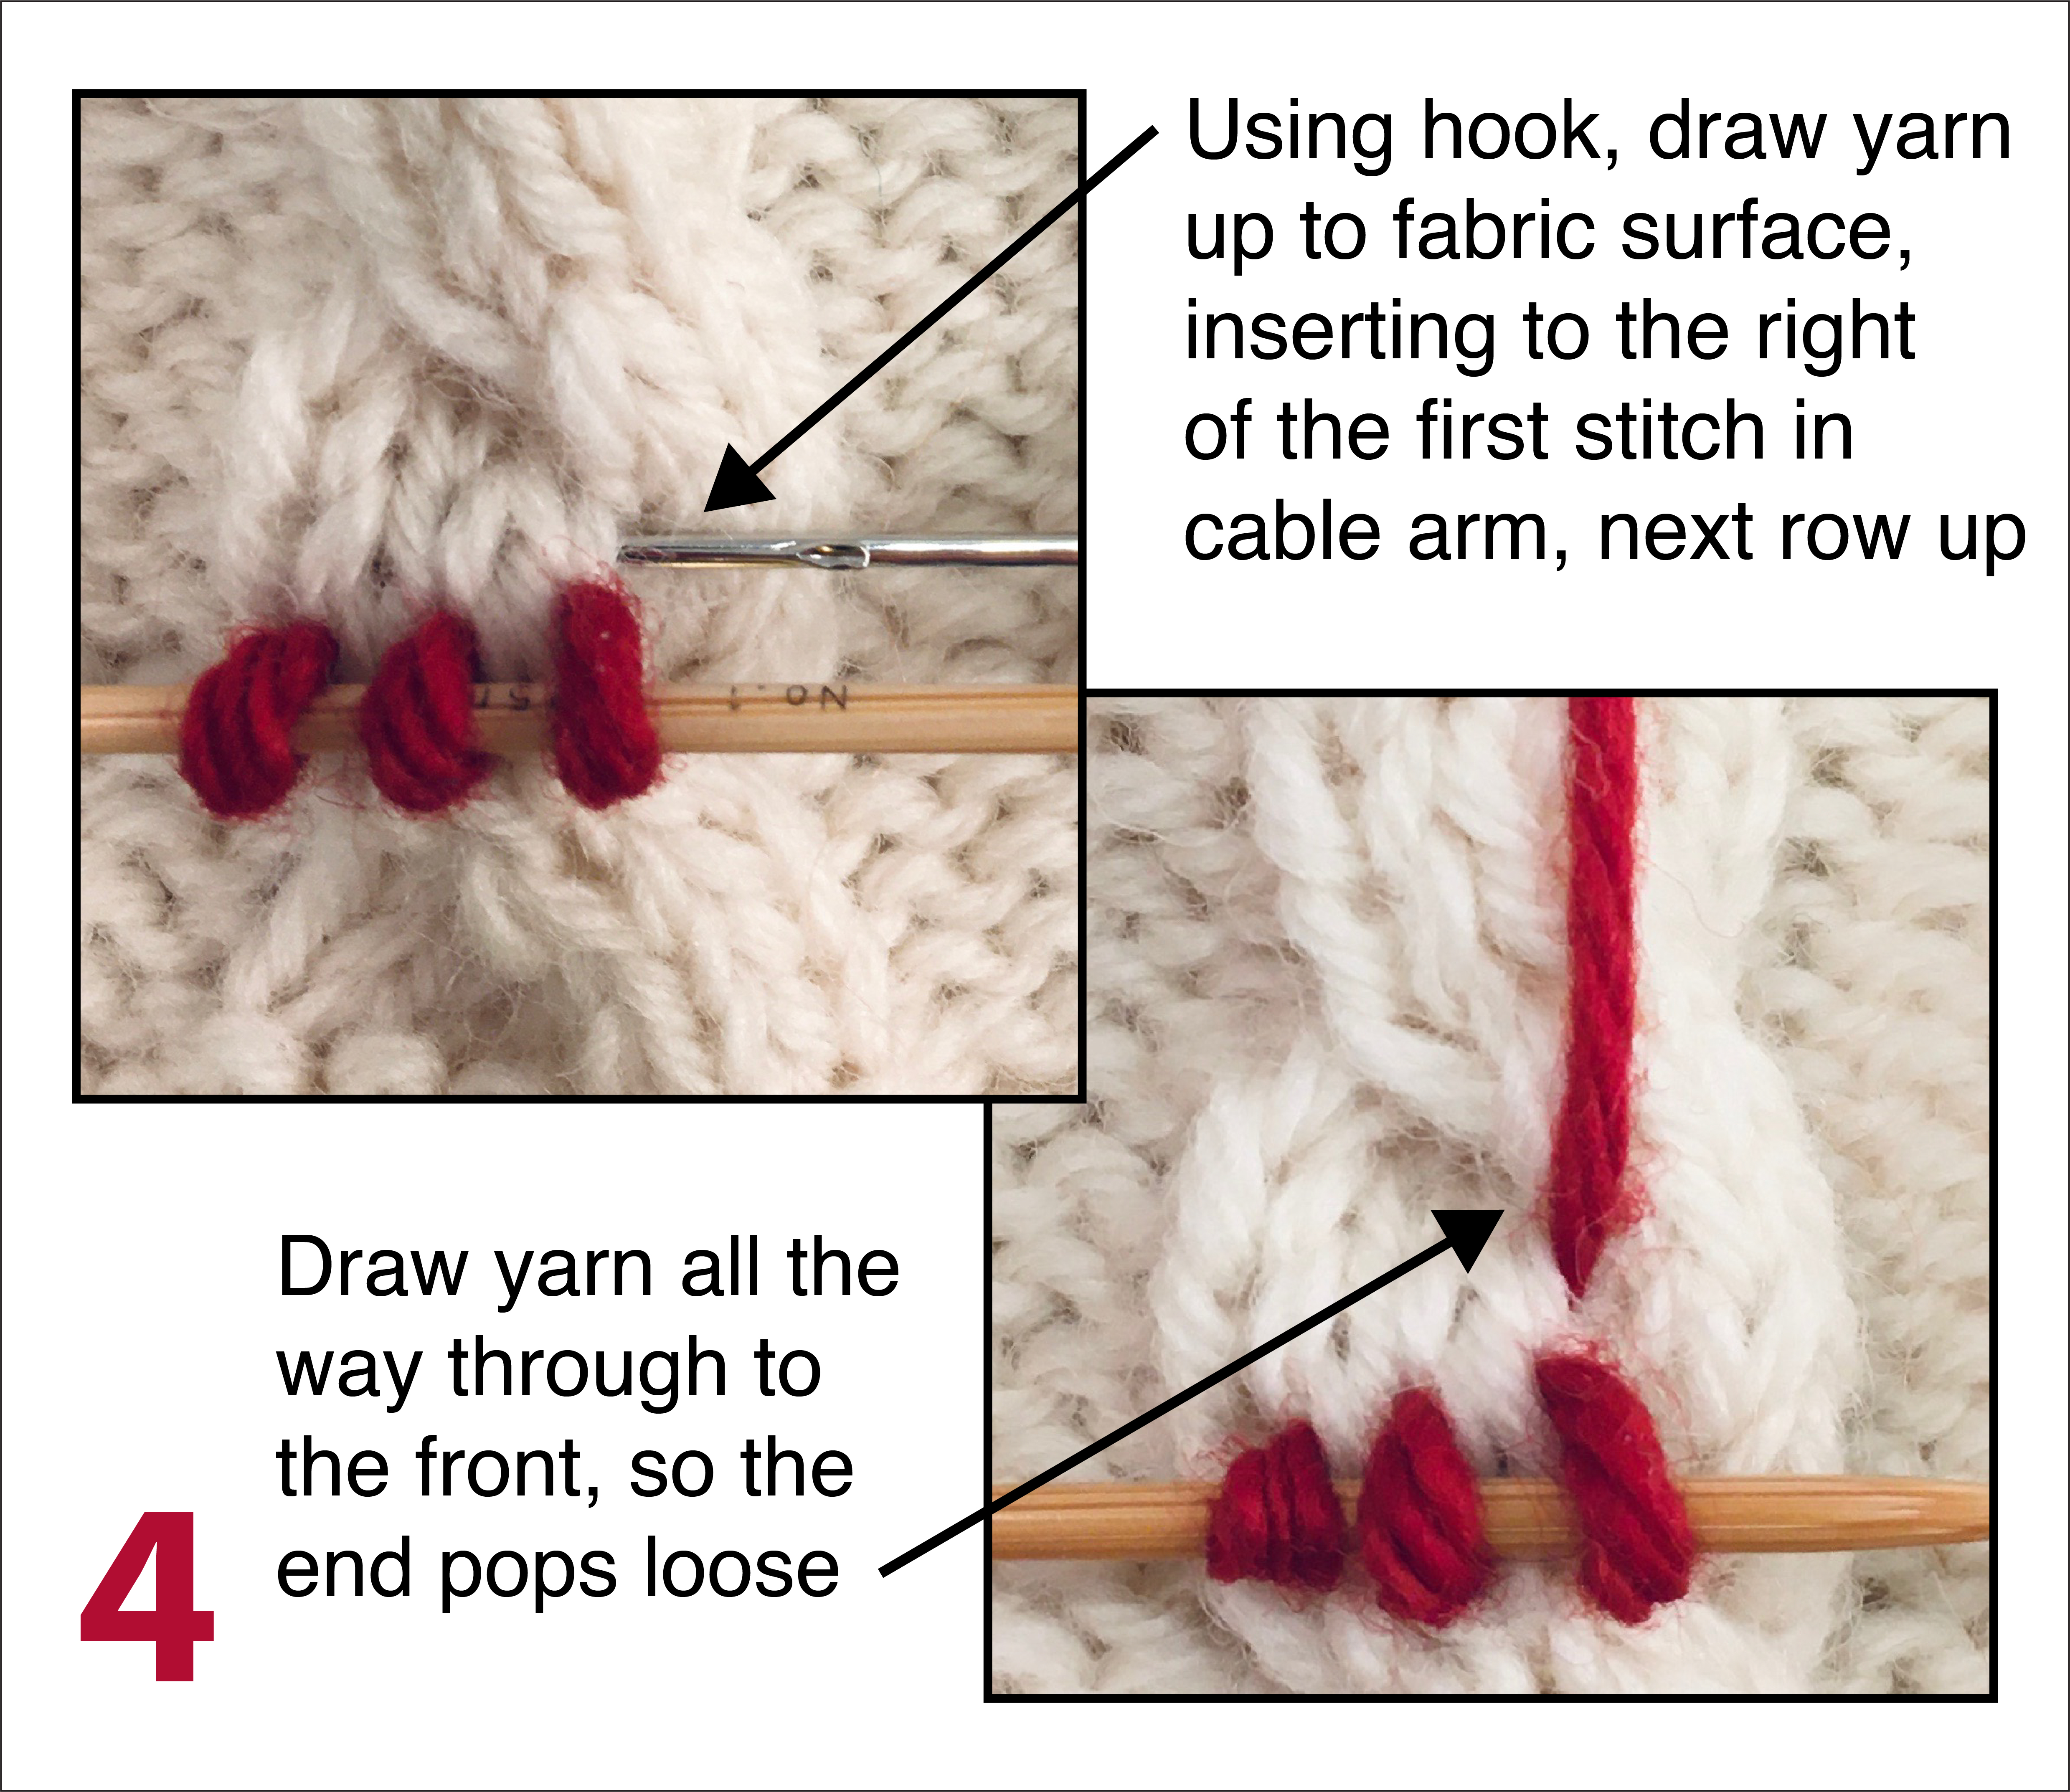
Step 5: Once the end has been drawn free, use the repair yarn to knit across the loops on the dpn. Note that at this point, you're only knitting the loops on the needle--ordinary knitting in an ordinary way. You are NOT drawing new loops through the stitches of the underlying cable arm as you did in step 3.
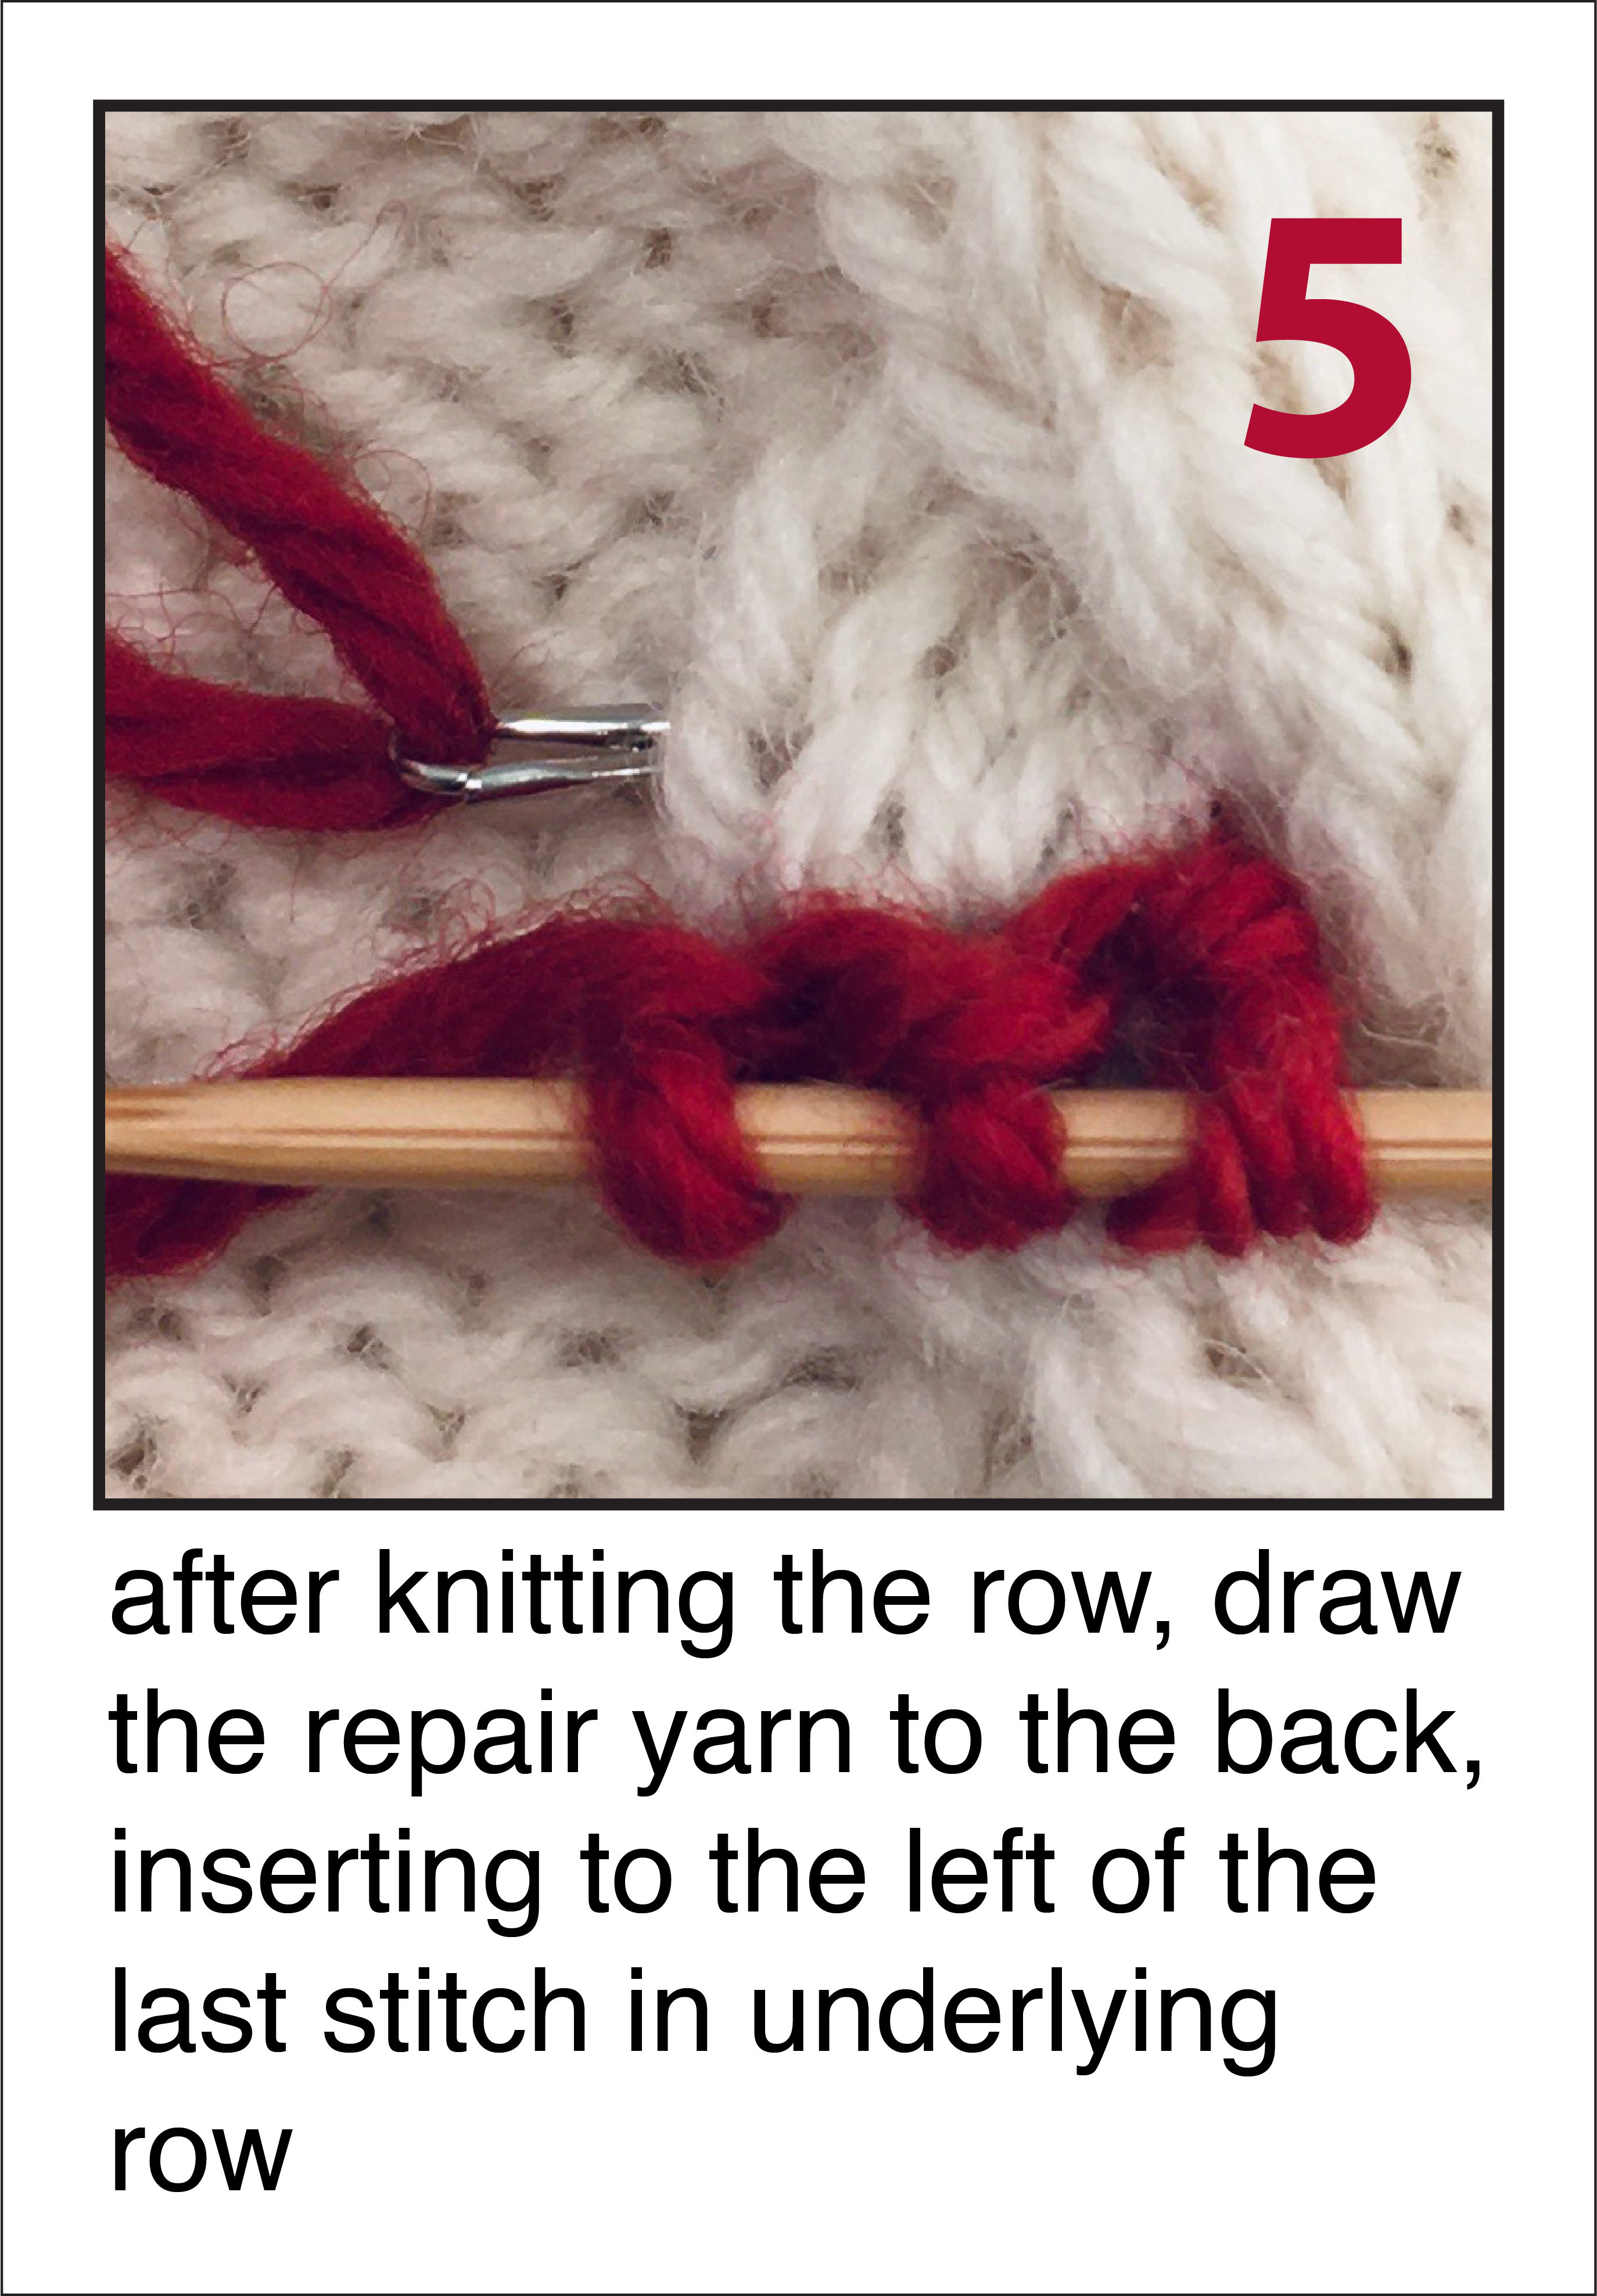
At the end of the row (here, three stitches), draw the repair yarn to the back using the hook. The hook to draw back is inserted from back to front, just past the last stitch of the underlying cable arm, one row up from the target row on which we started. Note that, although it looks like the stitches on the needle are purls, this is only because the stitches have been folded down out of the way so you can see where the hook is inserted for step 5.
Step 6: In this step, the goal is to knit the blanketing I-cord correction tall enough to be one row BELOW where the miscross is. If you need another row or rows before the cross, repeat steps 4 and 5. If you do not need another row, simply repeat step 4. Whether you need another row or rows depends on where you inserted the starting loops, how tall your cable is, and most of all, when your eye tells you it looks like you're one row below the actual miscross itself. In this process, we aren't necessarily replacing row for row. Instead, we're making an optical illusion. After working a few of these, experience will dictate.
Step 7: Knit one row more--meaning, simply knit the stitches on the needle. This will be the row which actually crosses over the mistake. At the end of this row, the yarn is anchored by passing it through the original cross (meaning, under the top cable arm of the mistaken cross). Note that you are not drawing the yarn through all the way to the fabric back, but instead, only under the arm of the miscrossed cable.
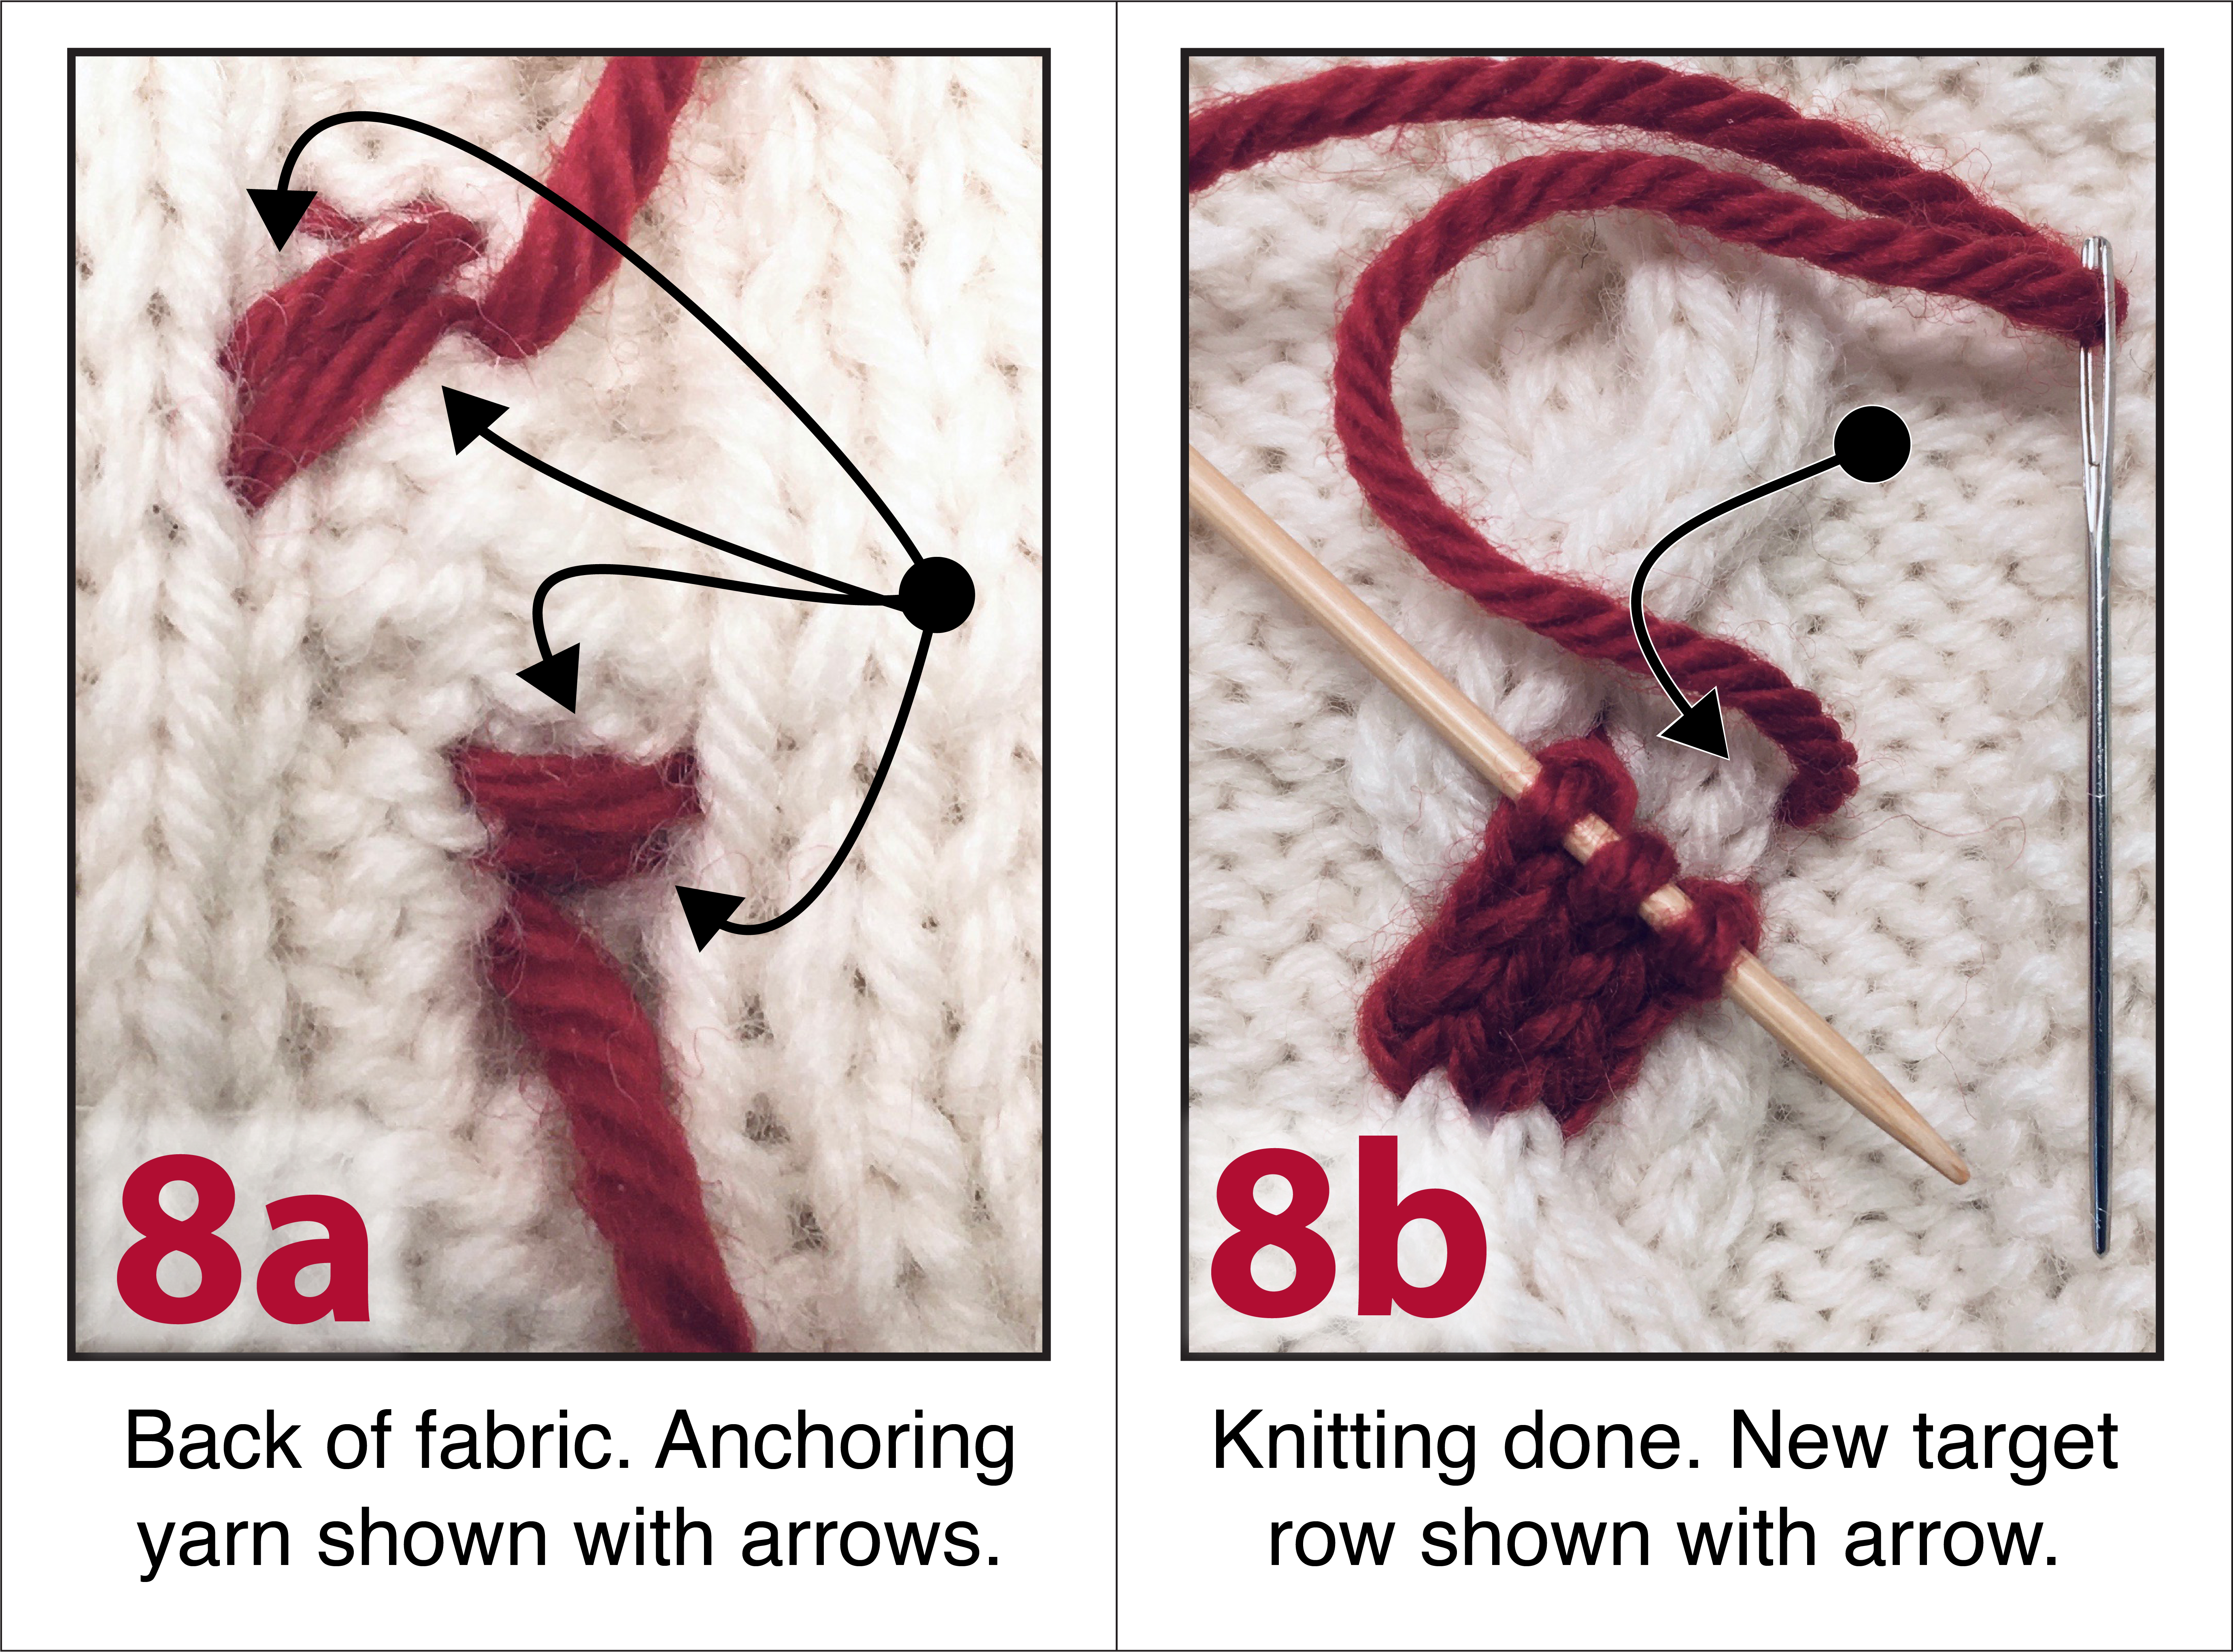

- The red stitches are the new anchored I-cord you just knit. These are the stitches still on the knitting needle in photo-figure 8b. They lay over the gray (original) underlying cable stitches.
- The green row is the new target row, being the midpoint row of the cable arm. This new target row is simply the row we have chosen as the plumpest of all gray rows surrounding it: it is only colorized green to make clear which row it is. In photo-figure 8b, the yarn threaded on the tapestry needle is coming out alongside this row, the target row itself is shown by the arrow.
- The black is the yarn that bridges between the top of the red stitches and the top of the green stitches. In photo-figure 8b, it is the yarn threaded on the needle--red in the photo, but here, colorized black to distinguish it.

- Step 1. Where the black yarn is shown thin, the needle carrying the yarn enters the red (anchored I-cord) stitch UP from BEHIND.
- the right arm of a knitted stitch worked into the red stitch would take this same path, so step 1 is a form of grafting / Kitchener stitching.
- Step 2. The threaded needle next goes BEHIND both arms of the stitches in the row above the target tow.
- This duplicates exactly the same path which the yarn of the green stitch-top takes. Therefore, step 2 is a form of duplicate stitching.
- Step 3. Where the black yarn is shown thick, the needle carrying the yarn enters the left side the red (I-cord) stitch DOWN from in FRONT.
- the left arm of a knitted stitch worked into the red stitch would take this same path, so this step, again, is a form of grafting / Kitchener stitching.
- In fact, steps 1 and 3--the grafting steps--are always worked in pairs--each of the pair taking the path of the right or left arm of a single knitted stitch, respectively.
- step 4 begins the cycle anew, meaning that it is the same as step 1.
* * *
Cable series so far
- .What is a cable, anyhow? Cable crosses and how to knit them (August 30, 2022)
- .Keeping track of cables: box and circle method, intro (September 6, 2022)
- .Tracking complex cables using box-and-circle, Part 2 of a series (September 13, 2022)
- .What row am I on in my cable? Counting cable rows (September 23, 2022)
- .Fixing miscrossed cables: unlatching and re-knitting cables crossed the wrong way (October 4, 2022)
- and today's post on Fixing miscrossed cables with anchored I-cord. (October 14, 2022)
- .Afterthought reversible cable-ette border (April 27, 2016)
- .Uneven knitting--fixing the loose knit column in ribbing, textures and cables (March 27, 2010)