Sunday, December 31, 2006

Ever have one of those days?


--Techknitter
R2D2 knits
R2D2 knitting

Thursday, December 28, 2006

The English knit stitch

The English knit stitch differs from the continental knit stitch in only one detail--which hand supplies the yarn. In continental style knitting, the LEFT hand supplies the yarn, in English style knitting, the RIGHT hand supplies the yarn. The yarn, however, goes the same way around the needles, and the needles go the same way through the loop.

If you are having trouble wrapping the yarn correctly in English-style knitting, look at the three yarn wrapping errors illustrated for continental knitting (ignore the fingers, just look at the way the yarn lays on the needles) link 1, link 2, link 3. Each of those yarn-wrapping errors is a wrapping error in English-style knitting also.

THE ENGLISH KNIT STITCH
click picture

Step 1: The right needle is inserted FROM the FRONT, TO the BACK of the stitch at the tip of the left needle, as shown. The right hand supplies the yarn--the right forefinger carrying the yarn acts as a shuttle, tracing a path in the air shown by the dotted line, above. The standing yarn (green) takes the path shown by the solid red arrow, wrapping around the RIGHT needle.

click picture

Step 2: Once the standing yarn (green) is wrapped around the right needle, the tip of the right needle draws the wrap "down and through" the stitch at the tip of the left needle as shown by the red arrow.

click picture

If everything goes right, this is what you will see on your right needle--a new stitch (green) with the right arm forward.

Other posts in this series:
The continental knit stitch
The continental purl stitch
The English purl stitch

--TECHknitter

(You have been reading TECHknitting on: The English knit stitch.)

Sunday, December 24, 2006

The continental purl stitch

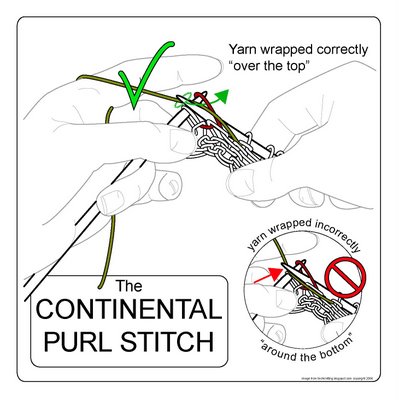
The pictures say it all.
click picture

The yarn follows the path of the green arrow. Beware of the yarn-wrapping error illustrated in the inset--you'll wind up with a twisted stitch if you wrap the yarn "around the bottom" of the right needle, instead of "over the top," as you should.

click picture
If all goes right, here's what you'll see:


Merry Christmas--from
--Techknitter

Friday, December 22, 2006

Knitting efficiently

Today, I’m going to rant on about *EFFICIENCY IN KNITTING.*

My heart leapt when I saw a book called “Speed Knitting.” But it wasn’t about efficiency, it was about big needles and big yarn.

Efficiency is really about ergonomics. How you hold the yarn and needles is less important than how much you MOVE the needle for each stitch. Of course, you may have to move your needles more because you are holding your yarn and needles badly, but the motion is really the first thing to analyze—all else follows.

The very fastest knitters move the needles hardly at all—production knitters in the old times often immobilized their (very long) needles by tucking the end of one or both needles into a knitting belt or sheath. Their fingers carried no weight, but were free to manipulate the very tippy ends of the needles with (evidently) incredible rapidity.

Today’s successors to production knitters are the awsome bloggers who produce scads of garments: a new lace shawl or six pairs of socks with every couple of posts. The rest of us do well to limp along producing as much in a month as these wonders produce in a week. Of course, actual production knitting is by no means dead, either...with all the baggage THAT carries. Check out this link to a truly scary sounding article--can anyone read Polish?

I have never had a chance to watch a true world beater. But the two fastest knitters I’ve ever seen personally (a Japanese lady who knits continental, and a British lady who knits English style) both share several traits: They move their hands very little. There are no grand sweeping motions, their elbows stay down, their wrists flex only slightly. The continental knitter's fingers do not move at all; the English-style knitter's fingers move only in a repetitive, efficient shuttling action. They do not sit hunched, they do not grip the needles with all ten fingers, holding on for dear life. The yarn flows onto their needles.

Because their motions are spare and efficient, their stitches always present at the same place on their needles. This means they’re not hunting for the next stitch—their hands know exactly where it is. Consequently, both of these ladies knit great swathes of fabric while hardly watching what they are doing.

How can us mere mortals duplicate this? Most of us probably won't. But we can walk a short way down that path. Get a drink of water. Sit in your favorite chair. Take a deep breath. Watch your hands, wrists, arms. Can you immobilize a needle by tucking it under your arm? By resting it on a chair arm or table? By tucking it into the cuff of your sweater? Can you stop your elbow from swinging out at every stitch? Can your wrist rotate less and still get the yarn onto the needle?

One reward will be faster knitting. An even better reward will be fewer repetitve strain injuries—the less you move, the less you strain.

--TECHknitter

Wednesday, December 20, 2006

The continental knit stitch

Today's post is about the continental knit stitch. It is the first in a four-part series, which includes the continental purl stitch, the English knit stitch and the English purl stitch.

HOW TO
There are many fabulous web sites devoted to teaching knitting. Several have videos, even. I don't have a lot to add to all that, but here's my little contribution towards illuminating the knit stitch, continental style:
click picture
continental knit stitch, step 1The right needle inserts into the stitch at the tip of the left needle, and catches the standing yarn (green) "up from under." The tip then travels out of the loop along the path of the red arrow carrying the snagged standing yarn, which enlarges and becomes a new loop on the right needle.
TROUBLESHOOTING
If you think about it, a lot of things have to happen "just right" for a stitch to be created and lie correctly on your needle--the stitch you're knitting into had to be made correctly, you have to position the standing yarn in the right place, the tip of the right needle has to be correctly inserted into the stitch and the right needle has to correctly snag the standing yarn. Something can go wrong with each of these steps, and generally does when you're first learning.

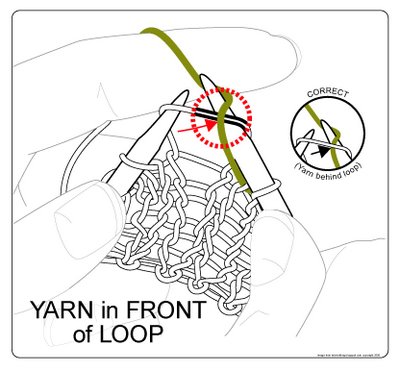
HOLDING THE STANDING YARN IN
FRONT OF THE LOOP
click picture
standing yarn in front of loopYou won't get too far with this mistake--it's too hard to catch the standing yarn if you've held it in front of the left loop while trying to snag it from the back with your right needle. That doesn't mean you won't drive yourself nuts trying, though.

TWISTED STITCH
click picture
twisted stitchThere are two ways to create this problem: Either the stitch was already sitting twisted on your left needle when you got there (because you inserted the tip of the right needle wrong when you made the stitch on the row below), OR you inserted the right needle wrong on this row (the correct way to insert the right needle into the left stitch is from the front, over the right arm in a left-to-right "hooking" motion .Either way you got there, though, if you see something happening like the illustration above, you've got a problem. Take it out and do it again.

CATCHING THE STANDING YARN THE WRONG WAY
click picture
standing yarn caught wrongThis, too, is a very popular error, especially when you first learn to knit, what with learning to control the needles, the yarn and your non-dominant hand (all at once). It's easy to make the mistake of catching the standing yarn "over the top" instead of the way it should be: "up from under." If you see this, take it out and do it again.
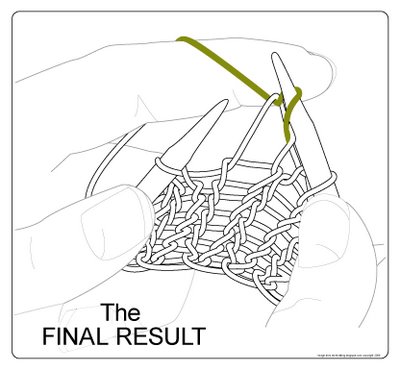
WHAT IT SHOULD LOOK LIKE
click picture
the final stage continental knit stitchIf you got everything just right, this is what the stitch should look like when you're done.

Next post: the continental purl stitch

--Techknitter

Saturday, December 16, 2006

Continental knitting, English knitting & handedness

In all of knittingdom, there are only 2 stitches: The KNIT (K) stitch and the PURL (P) stitch. (Well, perhaps there are 3? A yarn over (YO) is neither a knit nor a purl. On the other hand, a YO may not be a stitch at all, so maybe we are back to 2?) As soon as you master these 2 (3?) stitches, you can make anything at all in all of knitting; cables, picots, stockinette fabric, garter-stitch fabric, lace. This all seems simple, and, in a zen-like sort of way, it is. However, the complications soon start cascading and obscuring all. The first complication stems from the split between knitting's two main divisions: continental knitters who carry the working yarn on their left hands, and English knitters, who carry the yarn on their right hands. Knitters argue about which method is "better." Speed records are set by both kinds of knitters. I believe the best way to knit is the way that you, personally, prefer. The next 4 posts will illustrate both continental and English knitting and purling--if you don't already know how to do these, you could try them and make up your own mind. But before the how-to posts, THIS post is about how the continental style and English style differ, and why handedness (left-handed, right-handed) has only a little to do with which style will work better for YOU.
CONFUSION
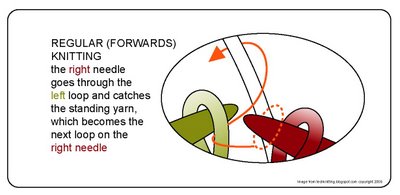
There is a lot of confusion about the difference between continental and English knitting. For me, learning to knit continental arose from this confusion. I did not learn to knit until I was 24 years old--old enough to get my own way with my very stubborn mother. Before that, my mother refused to teach me because she thought she would teach me the "wrong" way--the continental way--which she had learned as a girl in Germany. She thought that I should learn "regular" (English) knitting so I could follow knitting patterns written in English--she thought continental knitting was "backwards" to English knitting. My mom was confused (and did I mention? stubborn...). It is true that continental knitting and English knitting differ. However, the stitch which results--the loop on the needle--is the same (and the same knitting patterns work for both). The difference between continental and English knitting arises ONLY from which hand holds the working yarn. In continental knitting, the working yarn is held on the left hand, so that the tip of the right needle "picks" the yarn to draw it through the loop. In English knitting, the working yarn is held on the right hand, and the working yarn is "thrown" around the tip of the right needle, then drawn through the loop. If you ignore the hands supplying the yarn and watch only the needles, the ACT of drawing a new loop through the old loop is the same in continental and in English knitting:
click picture
forward loop *the loop to be worked is held at the very tip of the left needle *the tip of the right needle reaches through that loop, snags the standing yarn "up from under," and pulls that snag through the left loop. *by this act, two things happen simultaneously: first, as the right needle draws the snag through the left (old) loop, the snag enlarges to become a new loop, second, the new loop is transferred to the right needle.
HANDEDNESS
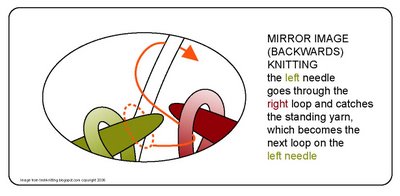
Some think that continental and English knitting have to do with handedness--left handedness, right handedness. That's not correct--both righties and lefties can and do  knit both ways. 
click picture
backwards loop What some call "left- handed knitting" is actually MIRROR-IMAGE ("Backwards") knitting: using the left needle to draw a new loop through a stitch on the tip of the right needle. This transfers the new stitch onto the left needle and generally leaves the new stitch oriented backwards--that is, left arm forward. The act of supplying the yarn also changes hands, with the right hand carrying the standing yarn in continental knitting, and the left hand supplying the yarn in English knitting. There are knitting teachers who use a mirror to teach this way.  

I myself would not start with this approach. Knitting is (usually, but not always) a two-handed activity--the right-handed have just as much trouble learning to control their left hands as the left-handed have controlling their rights. The left-handed are (for once) at no disadvantage. However, it may be that a left-handed person will be more comfortable with continental knitting--in that style the left hand gets to do more work than in English style. I'd try that before going on to mirror-image knitting. 

 To those of you who already knit mirror-image: you have my admiration for your perseverance and persistence in a knitting world which lies somewhat backwards to you--in that technical instructions about right and left needles have to be transposed. To those of you who are left handed and have yet to learn to knit, try continental first.

Amended February 2007, edited October 2022 

A new final conclusion: I myself have taught at least a half-dozen different left handed people to knit "regular" over the years. I also know several additional left handed people who knit continental with no problem. It was based on this experience that I originally wrote this post in 2006. 

HOWEVER...dear readers, I have just heard from Jenny, a left-handed reader who posted in the comments. She has had quite a different experience--she tried to learn regular knitting--English AND continental, and she STILL found mirror image knitting easier. So, evidently, sometimes a left-handed person has to choose between mirror image knitting or no knitting. In that case the choice is easy--knitting is SO obviously more fun than not-knitting.

Bottom line: I would start off trying to teach a left handed person to knit "regular," concentrating on the continental style. BUT, if you try and try, dear lefty, and still can't knit, not even continental, then we'll all have to swallow the fact that transposing patterns is not THAT big a deal, and learn to knit mirror image accordingly. 


--TK 

Wednesday, December 13, 2006

Tech facts about TECHknitting

Anonymous asked: "great illustrations, how do you do them?"

Wisconsin highway 51A: For nearly 10 years I've been trying to find the correct format for getting the "knitting tricks" viruses out of my mind (and into yours!) I twice started books (and got several chapters into each) but the book format lacked a feedback loop, and there was no way to keep updating. I don't have much to show from those attempts except 1) several bulging files; 2) a bunch of sample garments (many already worn out) and 3) a knowledge of ADOBE ILLUSTRATOR. Over the years, Illustrator has taken over my mind to the extent that when I see a highway sign, for example, I imagine how I could reproduce it.
Since I started this blog, I hardly knit any more--I illustrate knitting instead. Each line drawing can take between 2 and 10 hours (which accounts for the time lag between posts...)

--Techknitter

Tuesday, December 12, 2006

Knitting needles

You know knitting needles come in different sizes, and are made of different materials--metal, bamboo, wood. Each knitter has a favorite--warm wood or strong metal. I like bamboo needles in small sizes for knitting socks, but the price often is a snapped needle--at which point I remember why small double pointed needles were traditionally made in steel. Every kind of needle has it faults, however, metal needles can scratch, and wooden needles can split. different needle point stylesNeedles come in radically different point styles. It took several years of knitting before I settled on my favorites (Boye needles, now harder to find than ever...). These are aluminium needles with a relatively long, somewhat concave, ball-pointed tip. The needles I go slowest on are those with short, convex, rounded tips. Yet, when I'm knitting with superwash wool (very prone to splitting), I go faster with a rounded tip because it is less likely to split the wool.
Needles come in different finishes. I prefer the matte surface of the anodized Boye brand aluminium needle to the mirror finish of some nickel-plated needles. The nickel-plated needles can be so shiny that I end up stabbing at the reflection of the stitch, instead of the stitch itself--annoying. The relatively rough surface of a bamboo needle is a good match for a slippery superwash yarn on four small double pointed needles--a metal needle might slide right out. Yet, a metal needle is a far better choice for hairy single ply lopi--that hairy wool would knit up slower on wood or bamboo.


The point (!) is that on some projects, you'd go a lot faster if you had a different needle. Maybe some of the clunker projects in the bottom of the basket would reveal their loveable sides if there were a better match between the needle and the yarn.

(And given our proximity to the holidays, you may, if you like, consider this an excuse to go out and...shop for some more needles, even if you already have that size in every length.)

--Techknitter

Sunday, December 10, 2006

Provisional casting-on for knitting on via crochet chain

(includes a five-part how-to)
click picture

Q: What is provisional casting on via crochet chain? A: Like all provisional casting on, the crochet chain is a casting-on designed to be taken out.

Q: When do you use it?
A: Long story short: when you want to start in the middle of your knitting, and add the finishing touches later, you start with a provisional casting-on.

Q: Examples?

A: Let's say you want a white sweater with a blue border. You have the white yarn, but the blue yarn is still coming by mail, and you are IMPATIENT to start RIGHT NOW! With provisional casting-on, no need to wait, cast on the white provisionally. Once the white part's done, you'd pull out the provisional casting-on and there would be a series of loops waiting for you to pick up and add the border AFTER the sweater was finished.

A: let's say you're making a lace scarf with a directional stitch pattern and a plain middle section. A scarf started at one end and worked to the other would display when worn as a right-side-up pattern, and an upside-down pattern. To get both ends to display the same, cast-on provisionally and work half the plain section, then work the lace pattern to the end and bind off. Next, pull out the provisional casting on, pick up the loops, and now work the other half of the scraf exactly like you worked the first half. Voila; a scarf with directionally matching lace patterns on both ends. (Confession #1: it's not quite as simple as all that, because there are going to be one fewer loops working down than working up. There are tricks to get around this problem, and they can be found in the post of December 7, 2008, click here.)

A. You can also use provisional casting on to assure that the cast ON and the cast OFF match.  What you do is, you provisionally cast on the beginning, then leaving yourself a generous strand of yarn, work the scarf in the main yarn. Then, you cast OFF the top end.  Next, go back to the beginning end and remove the provisional cast on.  Finally, using the generous strand of yarn you parked there, cast OFF the bottom end.  The two ends now automatically match because they feature the same cast OFF method. 

Q: Provisional cast on seems like a lot of trouble--is there another way?
Yup, there IS an easier way. I myself hardly ever use a provisional cast-on via crocheted chain. Instead, using waste yarn, I make a regular cast-on and knit a couple of extra rows. This is called the COWYAK method, and I think it the best provisional cast-on method. However, this post is supposed to be about provisional casting on via crocheting, and you might as well know how to do it, so here's the--

HOW TO

Some instructions have you crochet the edge right onto the knitting needle. That IS very clever and a fine idea. However, it is awfully slow. A much quicker way, I think, is to create a crocheted chain, then pick up the loops afterwards. So, the first step is to create the crocheted chain.
click picture
first step of crocheted chain
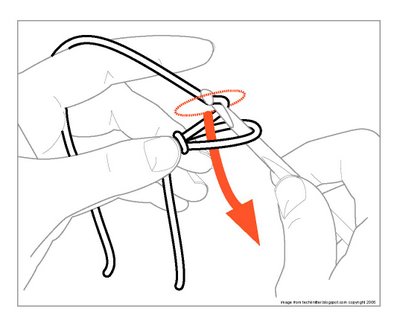
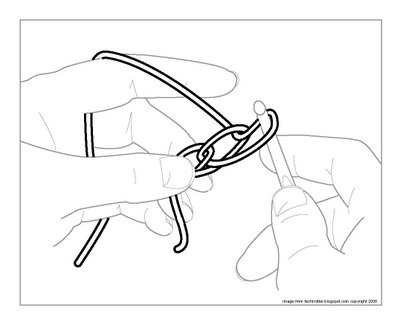
Make a slip knot and insert your crochet hook. Continue on with the hook, catching the standing yarn "up from under," then draw it through the slip knot (picture above). Once the new loop is on your crochet hook, continue to catch the standing yarn in the same manner and pull it through the previous stitch. This will make a "chain" (picture below).
click picture
second step of crocheted chain

After you have the crocheted chain, you have to slide the correct loop of that chain onto your knitting needle. It's fairly easy to do, but it's also fairly easy to make a mistake and catch the wrong loop. If you do catch the wrong loop, the provisional casting-on won't "unzip." That's actually an easy problem to fix with a quick snip from a pair of SHARP emboidery scissiors (cut the provisional cast-on of course, not the first row of loops). But if you want to be able to "unzip" with the pros, read on.

WHICH LOOP?
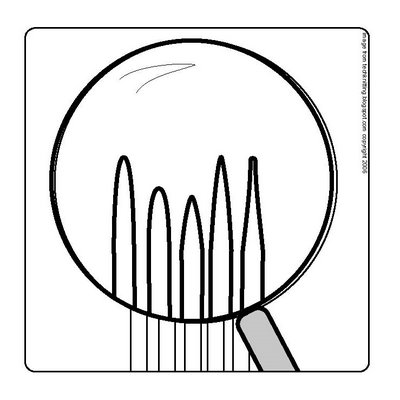
The illustration at the top of this post is "anatomically correct." But it really isn't a lot of help to show which loop of the crocheted chain to catch with your knitting needle, because crocheting doesn't really *look* like my illustration until you've stared at it and spent several hours trying to draw it. So, let's leave the anatomical illustration for the record, and take a more conceptual look at what your eye will *see* when you contemplate a crocheted chain.

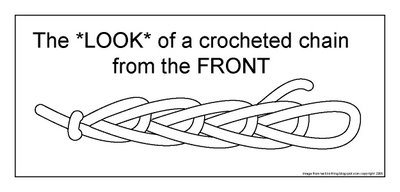
From the front, crocheted chain *looks* deceptively like a single column of knitting.
click picture
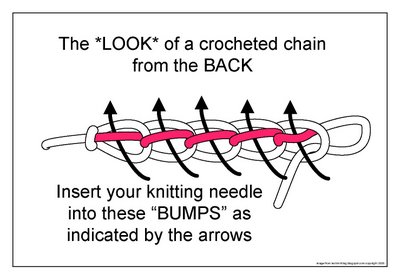
the look of a crochet chain from the frontFrom the back, you can see that a crocheted chain does NOT look like knitting--it has "bumps." Slide your knitting needle under the bumps as shown by the arrows.
click picture
the look of crocheted chain from the backThe result should be loops on your needle, ready to knit up, which look like this:
click picture
crocheted provisional cast on placed on knitting needles
When your knitting is finished, "unzip" the provisional casting-on by pulling on the open loop at the end of the chain, and there will be a set of "live loops" waiting to be knit in some other direction.

Final note
All my illustrations show the "last loops" dangling. Your intelligence will tell you that if you really leave them that way, your provisional knitting will unravel far sooner than you want it to. Therefore, tuck the loose end into the open loop and snug the loop up. When you're ready to unzip, pick the loose end out of the loop, and you'll be on your way.

--TK

Monday, December 4, 2006

Casting on by the "looping on" method, also called "e-loop"

(includes a two-part how-to)
click picture
looping on Gardeners say "a weed is a plant out of place." In your lawn, that purslane is a pest, but in the hands of a Italian chef, it's a tasty side dish. It's the same with looping-on. Looping-on is a horrible way to cast on a heavy sweater and a dismal way to start circular knitting. But in the right place, looping on is a valuable technique--the trick is knowing where to use it.
THE BAD SIDE of LOOPING ON
A looped-on edge is fragile: the loops cross and saw away at one another until they break. Unraveling sleeve ribbing is a common result. Looped-on loops are skimpy--nothing prevents loops from sharing yarn. As soon as you put your needle into one loop, that loop gets larger, while the loops around it get tighter. The result: lumpy cast-on. Loooping-on is hard to get "sunny side up" along the needle(s) as you try to connect circular knitting. The loops are so skimpy, its hard to tell which way up they lie. It's easier to make an inadvertent moebius strip with looping-on than with any other method.
THE GOOD SIDE of LOOPING-ON
With all these flaws, when does it ever make sense to use looping-on? This skimpiest of all casting-on is a perfect match with the skimpiest of all knitted fabric: lace. Some ladies and I at a knitting club meeting were trying to discover how a beautiful piece of Russian lace had been cast on. It took some time and a pair of glasses to find the looped-on edge. A sturdy long tail cast-on would have been easy to see, but the looping-on was nearly undetectable. Unlike a heavy sweater, lace isn't often subject to stress, so it's irrelevant that the crossed stitches might saw on one another. Also, lace is hardly ever made in the round, so looping-on's distressing tendency to twist--to lay on the needle all twisted-- is also irrelevant. Of course, even with lace, looped-on loops tend to skitter around the needle when knitting the first row. Also the loops still want to share yarn between themselves, making each stitch a different size than its partners. But by the time you've come to lace, you're better able to control this problem, and in any event, in lace, the result is worth it. Another reason to use looping on is when you want to cast on new fabric at the end of a row (a dolman sleeve, perhaps) or bridge over previously cast-off stitches (the top of a buttonhole, for example).


 And now, back to the original text...

HOW TO
click picture
regular (forward) looping-onNot a lot to say: Follow the illustration above to get regular (forward) looping-on, follow the illustration below to get twisted (backwards) looping-on.
click picturetwisted (backwards) looping on
--TECHknitter

Friday, December 1, 2006

Casting on by the "knitting on" method (also called "cable" or "chain" cast on)

(includes a four-part how-to)
click picture
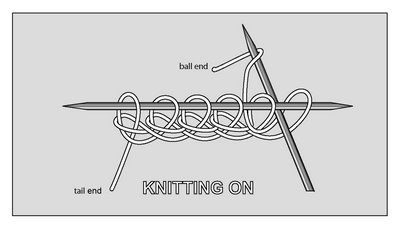
line drawing of the knitting-on process
"Knitting on" is an excellent cast-on method. The edge is created from a doubled yarn, which makes it durable. The method is easy, the tension not difficult to adjust. Also, unlike long-tail casting on, there's no annoying long tail to position and fool with. This method is also called "cable" or "chain" cast on.

Knitting-on is actually a form of crochet. It is made by drawing new loops with your right needle through a previous set of loops on your left needle, to make a foundation row for knitting. Some instructions will tell you to draw the new loop actually through the previous loop, and that does work. However, a more flexible edge arises by drawing the new loop through the space BETWEEN the previous two loops.

Obviously, in order to draw a new loop through the space between two already-existing loops, you have to have two loops already on your needle. Here's a trick to making the---

FIRST TWO STITCHES

Many knitters start knitting-on with a slip knot. In the last post it was stated that slip knots are not an optimal way to start a cast on because they leave a hard knot in one corner of the knitting.

Slip knots are especially easy to avoid in knitting-on, and here's how: start by making 2 slip knots. (...it'll all come clear, keep reading...) These first two loops are provisional loops.

Next, cast on the number of stitches you actually want to have. In other words, cast on the number wanted, not counting the first two provisional stitches.

When you're done --ta da!--pull out the two provisional stitches. All you have left on your needle now are actual knit-on stitches, there's no slip knot left in your fabric to contend with, and all the stitches in the foundation row look and act the same.

KNITTING ON--How to

You can probably figure out how to knit-on based on the first illustration, but here it is again, one more time, slower, with explanations:

* * *
First step
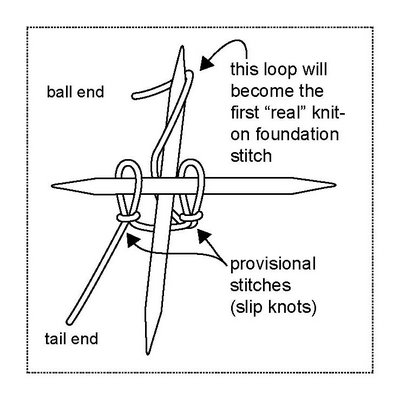
click picture
knitting on--step 1Two provisional stitches (slip knots) have been made in the tail end of the yarn, and placed on the left needle. Insert the right needle into the space BETWEEN the provisional stitches. With the right needle, catch the ball end of the yarn "up from under." This wrap around the right needle will become the first "real" knit-on foundation loop.
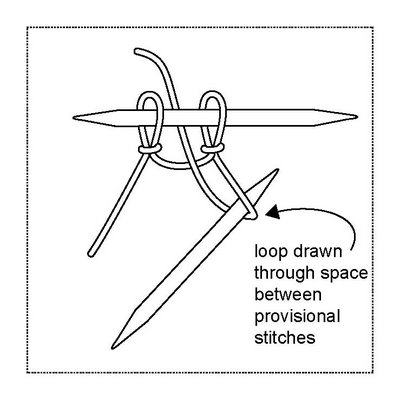
* * *
Second step
click picture
knitting on--step 2Using the right needle, draw the loop through the space between the two provisional stitches.
* * *
Third step
click picture
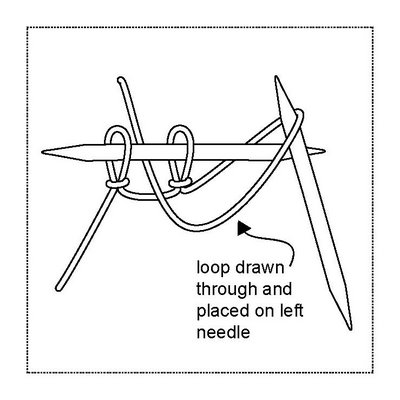
Transfer the loop (drawn up large) from the right needle to the left needle. Be careful not to twist the loop.
* * *
Fourth step
click picture
Snug up the transferred loop. Insert the right needle into the space between the two previous stitches, catch the ball end of the yarn and repeat steps two through four until you've cast on the correct number of stitches. At the end of the process, don't forget to unravel the two provisional stitches.
* * *
Two final notes:

1) The very first illustration at the top of this post shows what the knitting-on will look like after the two provisional loops have been taken off.

2) If you're wondering about the double pointed needles, here's the deal--knitting-on to double pointed needles makes it much easier to drop the two provisional stitches off the left tip of the left needle BEFORE you accidentally knit into them. If using single pointed needles, remember to unravel the two provisional stitches when you get to them in the first row of knitting.

--TECHknitter
You have been reading TECHknitting on cable cast on, also called chain cast on

Monday, November 20, 2006

How best to cast on--long tail method

click any illustration to enlarge


Hand knitting involves drawing new loops through old. So first, you have to HAVE some loops. Putting the first row of loops on your needle is called "cast on" or "casting on," abbreviated "CO."

There are several main kinds of casting on in this world including knitting on, and looping on (the subject of the next two posts). THIS post is about--

LONG TAIL CASTING ON
In many kinds of casting on, you first make a floppy sort of foundation row, often a row of simple loops which happily share yarn with their neighbors: growing or shrinking with the merest tug. To start your knitting, you must chase these skittering loops around the needle. It isn't until the third or fourth row that you get a rhythm going, and the foundation row often looks lumpy and distorted.

With long tail cast on, you don't have these problems because you make the foundation row AND knit the first row at the same time--that's why it's my favorite. In other words, long tail casting-on produces a uniform row of loops already pre-knit into the underlying foundation row. These loops and the foundation row stabilize one another.

Another advantage: for circular projects, other kinds of foundations are a bit skimpy; they're hard to hold right-side up so as to avoid making the dreaded moebius strip. In long tail cast on, you've actually created a looped foundation row AND a first row of knitting at the same time. Because more fabric lies on your needles, it's easier to keep the whole works sunny-side-up when you join for a circular project.

A note to the unconvinced: if you've tried long tail casting on and gotten a tight, unyielding edge, you're not alone. But it's such a great method, I urge you to try again.

In most knitting directions, the first stitch is shown as a slip knot. I think they're second-rate, and at the very end of this post I show a better way. But because most knitting instructions call for a slip knot, you might as well know how to make one.


SLIP KNOT
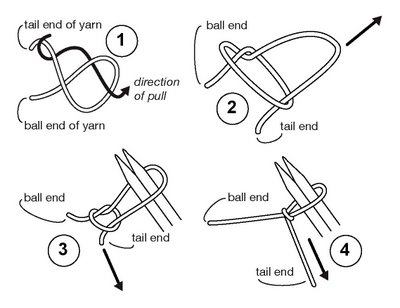
how to make a slip knot in 4 steps1) make a loop with the tail end of the yarn laying OVER the ball end of the yarn,
2) catch the tail end through the original loop and pull on the top of the new loop you just made.
3) insert two needles into the new loop, tugging the ball end,
4) snug the new loop around the two needles by further tugging on the tail end.

BTW: Here is a short cut to making a slip knot: Make a pretzel shape as shown below. Insert the needle as shown: over, under, over. Once the needle is through, hold onto both ends of the yarn and pull up with the needle. Then, tighten by pulling on the tail end. Voila: instant slip knot.


WHERE TO PUT THE SLIP KNOT
or: why is my tail always too short?

A lot of knitters DESPISE long tail casting on because the tail always winds up a few stitches too short. And there truly is no cure if your tail is too short the first time you try to cast on-- you'll just have to pull it out and do it again. But there IS a cure for moving the knot again and again, having the tail come out too short a couple of more times, and then suddenly, infuriatingly, having the tail coming out WAY too long.

showing placement of slip knot between tail end and ball end of yarnSee, with long tail casting on, you're making a looped foundation row at the bottom, and putting a first row of knitting on your needles, both at the same time. The top loops are a lot bigger than the bottom loops and take up a lot more yarn. So, what makes sense is to use the ball end of the yarn to create the bigger top loops, and the more limited tail end to make the smaller bottom loops. My casting on instructions are very specific about which is the ball end of the yarn, and which is the tail end.
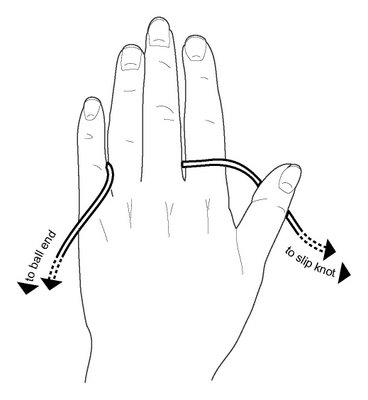
If you consistently arrange the yarn this way, then at least when you move your first slip knot to a new spot and try again, you've got a far greater chance of getting it right. And, if you always arrange your yarn the same way, experience will shortly teach you how much to pull out in the first place.
CASTING ON IN 6 STEPS
First step: putting the yarn on your hand

Thread the yarn on your left hand as shown. The ball end (the end going to the ball of yarn) is to the left, trailing from your little finger, and the tail end trails from your thumb. The slip knot you just made is partway along the tail end.

Preparation for casting on: Hand draped with yarn
The yarn passes twice through your fingers. You tension the yarn by pressing together the little finger and the ring finger, as well as the pointer finger and the middle finger.
* * *
Second Step: Preparation

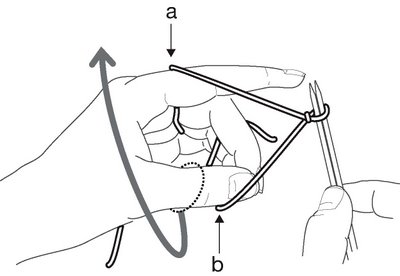
The strand marked "a" is the ball end of the yarn; "b,"the tail end of the yarn. Holding the needles with the slip knot in your right hand, arrange the yarn on your left hand as shown: the ball end remains between your ring and little fingers. Catch the tail end between your middle and fourth finger. Insert your thumb into part "b" --that is, the loop of yarn which stretches between the needles and your middle/fourth fingers. To get to the third step, swing your thumb towards you and up, as shown by the gray arrow.

After arranging the yarn, this picture shows the first step in the casting-on process
* * *
Third Step

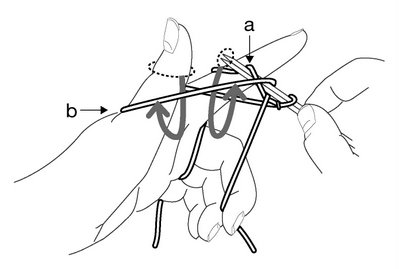
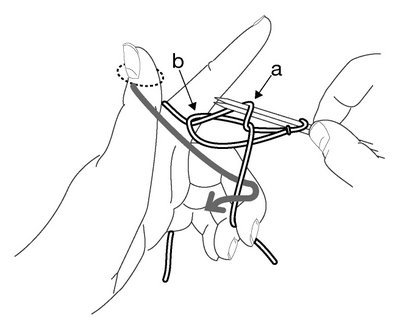
Once you've swung your thumb towards you and up as instructed in the second step, your hand should look like the picture below. To get to the fourth step, swing your right hand down, as shown by the arrow.

Your ring finger has a lot to do. The base of your ring finger is pressing against the base of your little finger to hold the ball end of the yarn in tension. The top of your ring finger is pressing against your middle finger to hold the tail end of the yarn in tension.
* * *
Fourth Step

Once you've swung your right hand down, as instructed in the third step, your hand should be positioned as in the picture below. To get to the next step, follow the gray arrow: insert the tip of the needles through loop "b" on your thumb, and hook them around the front part of loop "a."
* * *
Fifth step

After hooking the front part of loop "a" with your needle as instructed in the fourth step, your set-up should look like the picture below. To get to the sixth (and last) step, swing the needles down and towards you, bringing loop "a" through loop "b." At the same time, swing your thumb down and out of loop "b."


* * *
Sixth step

After you've removed the needles and your thumb from loop "b," loop "b" is left wrapped around loop "a." In other words, what you've done is draw loop "a" through loop "b." Loop "a" is a stitch in the first row of knitting, and loop "b" is the foundation row through which that loop passes.


Long tail casting on is the same thing as making a foundation row of backwards loops and then knitting your first row into those loops. But making the foundation row and the first row at the same time is far easier than making the foundation row first, then trying to knit the first row into loops which skitter maddeningly around your needle.

If you follow the gray arrow and pass your thumb around the yarn below the newly cast-on stitch, you'll see that your hand is in the same position as step 3, above. From here out, repeat steps 3 through 7 over and over again until you have the correct number of stitches on your needles.

One last, but VERY IMPORTANT thing: When you complete the cycle of stitch creation and swing your thumb into loop "b" to make all look as it does in step 3, you are tightening up the bottom loop of the previous stitch. It is NOT necessary to yank that loop as tight as possible as you swing your thumb up. Rather, it is best to be mild in this adjustment. A tight and constrained long-tail cast on is directly traceable to an over-tightening of the bottom loop in this last step.

* * *

When you've cast on the correct number of stitches, remove one needle from the loops. There are all your stitches, ready to be knitted. They'll look loose, but after a few rows of knitting, you'll see that they magically adjust to the correct tension. (You COULD have cast on over one needle, very, very loosely, but it's hard to adjust your tension freehand like that.)

* * *
MISTAKES AND HOW TO AVOID THEM

Here are some notes to the wise, so you don't make the same stupid mistakes I do, over and over again.

1) Count your stitches. I often count the stitches as I cast on, only to find (five rows later) that I've got one stitch too many because I forgot to count the first stitch, which was made differently.
2) If you're making a pattern which requires you to count rows religiously, try to figure out whether pattern author cast on long-tail or some other way. Long tail casting on creates a first row as you cast on. Your first pattern repeat might have one too many rows if you don't count long-tail casting on as the first row. For further information about how to count rows in knitting, click here.
3) If you've pulled your second needle out, and then discover that you have too few stitches cast on, no worries. If you still have enough tail yarn left, simply hold the second needle next to the first and cast on some more stitches, then pull the second needle out of the newly added stitches: no need to unravel all the way to the beginning.

* * *
A LAST (opinionated) THOUGHT:
Getting rid of slip-knots

I've give the directions for the slip knot only because so many other knitting instructions call for it. But it's actually not a great technique for the first stitch of your hand-made project. No matter how you slice it, slip knot is a KNOT which is going to leave a hard nub in one corner of your knitting. That may not matter much in a heavy sweater, but in a lace shawl, it's a mess. In my opinion, the far better way to make the first stitch in knitting is by making a--

SIMPLE LOOP


The point of this blog is to infest your mind with all the little improving viruses which currently infest mine. So here's the best way, in my mind, to make the first stitch in your knitting. (FYI: this also works for the first stitch in crocheting.) If you make a simple loop, there's no knot. To start your knitting with a simple loop, just insert your needles and twist, and there's the first stitch, waiting on your needles. If the loop unwinds when you make the second stitch, that only means that you made the loop with the wrong end up. Twist it the other way and try again.


Final tangential thought: Although slip knots are not a great way to start your knitting, they have many other uses (such as making provisional stitches intended to be unraveled.) But, slip knot's highest and best use is tying balloons onto children and vice versa. If you practice this skill you'll be the hit of the next birthday party as the "balloon mommy."

--TECHknitter

ADDENDUM: If you have a truly monumental number of stitches to cast on, and want to do it using the long tail method, click HERE to be taken to a different TECHknitting post about a nifty little trick which assures that you CANNOT run out of yarn.

You have been reading TECHknitting on "long tail cast on."

Monday, November 6, 2006

What knitting is

click any illustration to enlarge
Seems like a logical place to start: What IS knitting? How is it constructed? How does knitted fabric differ from cloth? And what's so special about knitted fabric, anyhow?

Knitting is made of a continuous yarn formed into loops, which are drawn through other loops. Each stitch maintains a connection with all the other stitches in its row and in its column, even after the knitting process is complete.
By contrast, woven fabric is made of cut lengths of thread, which have no connection (other than proximity) to their surrounding threads.
fabric blow-up
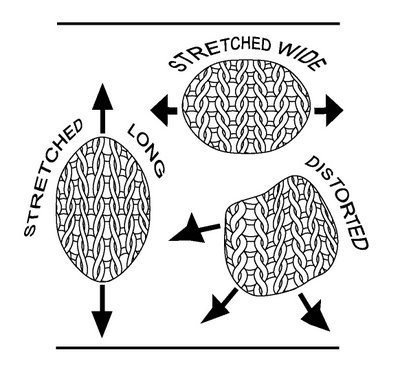
Because of knitting's unique structure, it S-T-R-E-T-C-H-E-S. Each stitch traces a loopy path through the fabric, so the yarn lies coiled within the fabric. There is plenty of "reserve" yarn to stretch. Unlike the threads of woven cloth (which trace a straight line through woven fabric) knitting can be stretched wide, or long, or even distorted both ways at the same time.
knitting distorted long and wide, as well as long and wide at the same time
Knitting's outstanding capacity to stretch means that everyone today wears knits, even people who think they "hate knitting," because knitting isn't just the sweaters created by hand knitters. T-shirts, sweatshirts, underpants, socks are all knitted of very fine yarn on giant machines. When you consider that they had to wear woven fabric against the skin, it's no wonder folks look so crabby in those old-time photos.

Another great thing about knitting is that, because it is connected in the rows, knitting can be raveled out, row by row. This raveling is called "pulling back" or "ripping out." (Some call it "frogging" because frogs say "rip-it, rip-it." Be warned--this is a fair sample of knitting humor.)

Being able to rip out may not seem like much of an advantage, but it is: if you make a mistake, there is nothing to throw out--the yarn can be re-used (very different than the cut threads of weaving). Also, it is possible to snip a stitch and ravel out a few stitches along a row of already-knitted fabric. Snip and pull, and you get a horizontal opening surrounded by the loops of the rows above and below. Put these newly-exposed loops back on a needle, and you can knit in a whole new piece of fabric. This is the secret of after-thought buttonholes, after-thought heels, after-thought pockets, after-thought mitten thumbs.

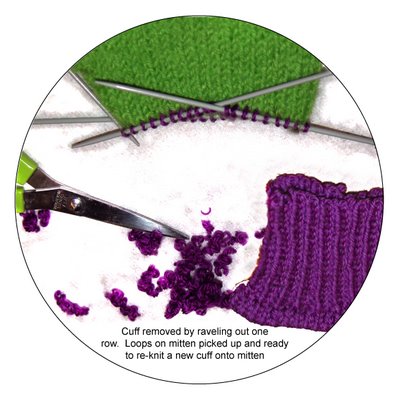
If you ravel across a whole row, or around a complete round, the knitted fabric splits in two. The loops of either half can be put back on a needle knitted up (or down). This is the way to lengthen already-knit sleeves without pulling them out, or take a worn-out cuff off a mitten and add a new one, as in the picture below.
mitt with raveled off cuffA third advantage of knitting's row-and-column structure is that knitting can "run out" in the columns. Once you've seen a run in a nylon stocking or a T shirt, or the laddered mess above a dropped stitch, you may not think of this as much of an advantage, but it is. Drop a stitch down on purpose and you can correct a mistake 20 rows back without ripping back, row by row. Once the mistake is fixed, you can hook the run back up with a crochet hook, ladder by ladder, to the top.
For further information about correcting errors, use the series index in the sidebar to find posts on "correcting errors in the row below."

As to how knitting is created, there are two methods, needle knitting and peg knitting. Hand knitters do needle knitting: as you transfer the loops on the left needle to the right needle, you draw a new loop through each old loop with the tip of the right needle. This continuous web of loops makes knitted fabric.

The most familiar example of peg knitting is spool knitting. Knitting "looms" (which are nothing but much bigger spool knitting frames) are currently a sort of mini-fad at craft and fabric shops. Knitting machines are also peg-knitting devices. On all peg-knitting devices, a separate peg holds each stitch, the yarn is wound around the outside of the peg, and the old loop lifted over the new loop with a "pick" or hook, either manually (spool or loom) or mechanically (knitting machine).

Both needle- and peg-knitting produce the same fabric: loopy, stretchy knitting.

And now, goodnight. My husband is ready to kill me because all these illustrations (not to mention the HTML code) take for-freaking-ever.

--TECHknitter


Sunday, November 5, 2006

An explanation of sorts

So, after 25 years of knitting, various knitting tricks have manifested themselves to me. And, after 25 years of knitting, these tricks, like a virus, are desperate to get out and infect other knitters. Beware. Once you discover there is a trick for every part of your knitting, you'll never again be happy with ruffled cast-on edges, or too-tight cast-off edges--with puckery points and floppy felting. There is a trick for going back a couple of rows back in lace knitting (before you made that terrible mistake) without tinking every stitch, there is a trick for lengthening the too short-sleeves without ripping out and starting over; there are hundreds and hundreds of tricks, and over time, they'll appear in this blog. Along these lines, I hope that if you have a trick infesting your mind, you will share it in the comments section.

So, give me a chance to get my feet wet in this new medium, and pretty soon the tips and tricks will be flowing along. We'll talk again soon.