 |
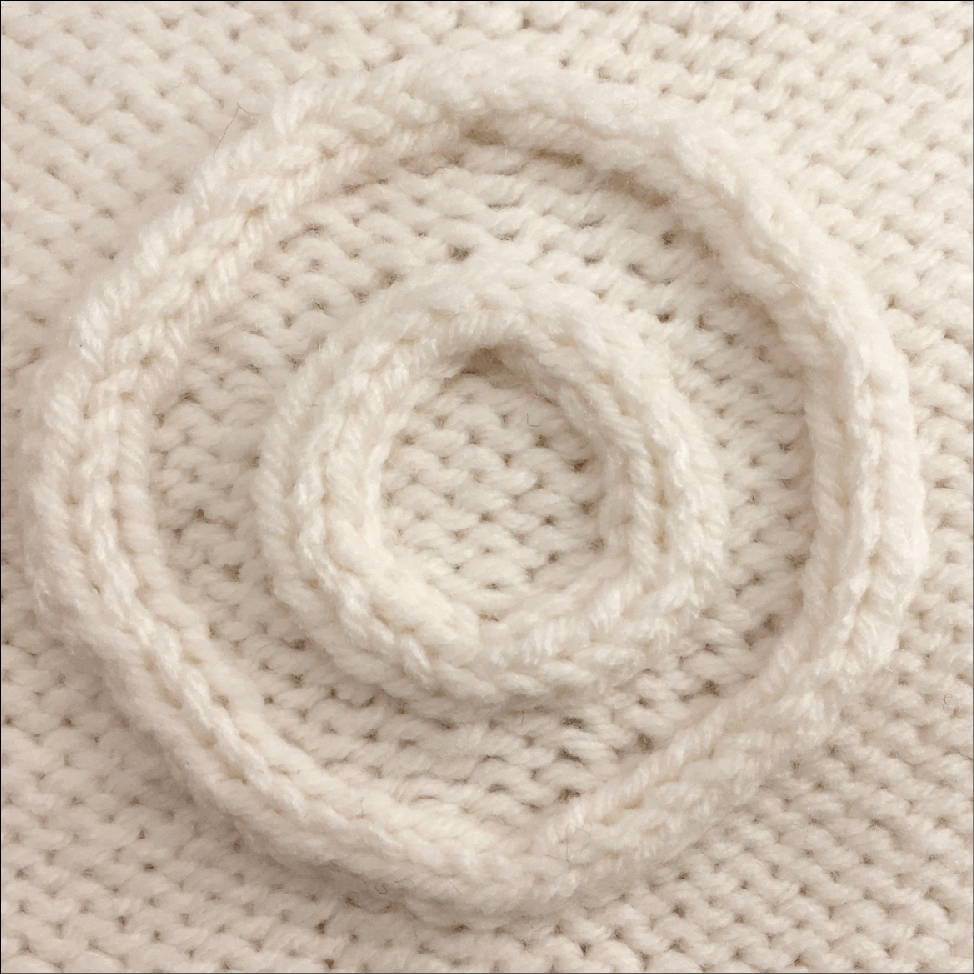
| Simple infinity loop rings. Note the lack of distortion top and bottom. |
 |
| coming up: Bowen cross |

To demo, two rings. The upper is knit, as carefully as I am capable, according to fairly standard Celtic knot technique. The lower ring was knit the new way. As you can see, the upper ring isn't awful, but at its top and bottom, things get a bit messy.

Infinity loops look like applied I-cord. But, infinity loops are actually knitted-in. Not being sewn on, they can't get wiggly like applied i-cord can.
As to practicality, infinity loops fall into the category of "making knitting dance." It's the type of fiddling around to amuse yourself and puzzle your knitting friends: applied topology.
In a structural sense, the infinity loop ring (bottom) truly has no beginning and no end, which is normally a knitting impossibility. For perfectionists, this is fun hack; for the more practical, a curiosity, perhaps. But whatever your philosophy, they are pretty, no?
Why the tops and bottoms of continuous loops look goofy
You can't fix a thing until you know what's wrong with it.
Problem 1: Background distortion
Per the below illustration, the bottom of the loop is the base from which these two-stitch wide traveling cable arms set out (red shading). Departing in pairs--one headed left, one right--means four stitches are required as the base.
Some authors have you pop out two new stitches via some sort of paired increases, then obtain the other two required stitches by converting two of the background purl stitches to knits. Some authors have you pop out three stitches by some form of kfb (knit front and back of same stitch). Some have you create four stitches by some combination of m1's and knitting into the stitch below. And some authors have you pop out a even a fifth stitch, the extra being the purl center stitch which separates the arms, which then involves M1's plus 3-in-one increase, or even a 5-in-1 increase. If the cable arms are three stitches wide, rather than two, yet more stitches need to get popped out. Sometimes, increases get stacked atop one another in successive rows, also.
 |
| red dots: tail to tail green dots: head to head |
Problem 2: Cable distortion--discontinuity
Not only are the background stitches distorted, but so are the cables themselves. The stitch pattern at very base of each loop (red shading) divides like the red sea as each cable sets off in its own direction (gray arrows). Therefore the pretty little stockinette V's do not track around the bottom curve of the loop. Instead, at the place of parting, the stitches lie tail-to-tail (red dots) instead of head-to-tail as is usual in stockinette.
Additional confusion: Stitch count
The stitch count on motif knitting varies as stitches enter and leave the fabric. When you first encounter it, it's surprising. See, if you had a certain number of purl stitches as your background, as soon as you add the required stitches for the loop base, the stitch count increases. Each additional loop adds more stitches. For directions which have you pop out all the stitches you need at the base of each loop, then the stitch count = background + stitches added. For directions which convert some of the background stitches, you have to keep a running total of additions and subtractions. But whichever way the stitches are added, the stitch count on a Celtic motif can easily double the number originally cast on, especially on smaller squares or narrow scarves.
Now, just to be clear--the problem isn't that the cable itself makes the fabric change width. On flat knitting, adding stitches would indeed distort the fabric by adding width, but cables aren't flat. Being a kind of ribbing (alternating knits and purls) cables "draw the fabric in," trading width for depth. In fact, cables go one further than ribbing because every cable-cross locks the fabric into the gathered-up position (which is why cables aren't stretchy like ribbing is). So, if you didn't add stitches to cable knitting, the fabric would actually get narrower. So, the problem isn't the cables themselves, but the way background stitches get may get sucked in and spit out of the loops, and the related problem of keeping track of all that.
Double trouble
Each of these problems occurs in reverse at the loop tops. The background stitches get distorted where two, four or even five stitches pile into some sort of sudden decrease (green shading). The cable arms are distorted where the two stitch pattern marching around the loop suddenly end discontinuously, meeting head-to-head (green dot). And the stitch count decreases suddenly also.
INFINITY LOOPS: knit a simple ring
I'm a great fan of something I call "after-knitting" by which I mean fiddling around with the loops and stitches of existing fabric after the knitting is finished, to improve looks or structure. In this series on cables, there's already been one example, where a giant runner was let down to fix a mis-crossed cable, then the fabric was knit up again. There's more about after-knitting below, but letting down and knitting up a mis-crossed cable arm is a pretty fair example of the idea.
With infinity rings, after-knitting accomplishes what's impossible in actual knitting: a perfect little ring. No background distortion, plus the v's of the cables sit pretty, nestling head-to-tail all the way around the entire loop. No end, no beginning and you can't tell how it was made.
These rings are the basis for the all the more complicated Celtic knots still to come. Every Celtic knot has at least some loops in it, and those loops are worked in the same basic way as these rings.
How-to overview
As far as the background stitches are concerned, infinity loops are knitted different than the usual Celtic knot in two ways. First, the stitches for the cables are picked up on provisional scrap yarn placeholders. Second, there's an intervening background purl stitch which acts as a spacer between the cable arms. These two tricks help preserve the background stitches from distortion. After all the work is done, the purl background stitches (those stitches alongside the cable) actually end up laying directly next to one another, so there is nothing to BE distorted.
As far as the stitches within the cables are concerned, once the knitting is done, this particular piece of knitting magic involves letting down a ladder and latching it back up. There are also two Kitchener stitches (grafting) with a sewing needle to close the ring. These tricks tweak the cable arms from their original distorted state at knitting's end to lay in a smooth new configuration with no beginning and no end, stitches nestled head-to-tail, marching around infinitely without interruption.
Infinity loops are fiddly for sure, but once you get it down, they go faster. They would not add significant time overall to a sweater project, once you get how they are worked.
How-to: knit the simple ring
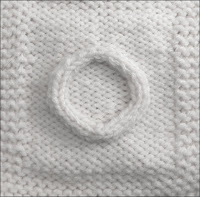 |
| infinity ring to knit |
Here's how to make the little sample infinity ring
Materials
- Scrap yarn maybe an ounce--worsted weight yarn of the kind usually knit up at 5 stitches per inch, wool preferred
- Knitting needles in size to suit yarn
- blunt-nosed large-eyed sewing needle
- 8 inch scrap of yarn in a contrasting color, same weight or lighter
- two bobby pins
- crochet hook or latch hook in size to suit yarn
- slim dpn or single pointed needle for poking at stitches, wood or bamboo preferred
How to

STITCH DIRECTIONS
L-p-T Left-purl-Twist, worked over 3 stitches. Slip 2 sts to holder (I suggest using a bobby pin). Drop holder to front. Purl 1. Return held stitches to left needle, then knit 2.
R-p-T Right-purl-Twist worked over 3 stitches. Slip 1 st to holder and drop holder to back. Knit 2 stitches. Return held stitch to left needle, then purl 1.
Both of these twists are the basis of traveling cables. The purl stitch acts as a hidden partner, "hidden" because it melds into the general purl background. The twist makes the 2-stitch-wide knit column travel one stitch to the left or right against the purled background.
PATTERN
OPTIONAL: To make this project go faster, I have written it with no outside borders, although there is a four-stitch background margin. If you would like your sample to have an outside border like the illustrations, cast on an additional 10 stitches to the 15 in the pattern below, 25 stitches total. Arrange these excess stitches 5 each side, then work these border stitches of every row as a knit. This makes an optional garter stitch side border which helps with curling. If impatient, follow the borderless pattern as written, casting on only the 15 stitches of the pattern itself.
FURTHER OPTIONAL: This pattern is for the single ring. However, at the bottom of this post are the modifications to this pattern to knit the two concentric rings in opening photo.
|
CO |
Cast on 15 stitches. Add 10 sts for optional side borders in this step, if desired. Work a few rows of garter stitch just to make a solid bottom. |
|
|
Switch to stockinette (k 1 row, p 1 row) and work a few additional rows. End with a k row, then turn fabric so reverse stockinette (purl) side facing you. Because this is a cable on a purl background, the PURL side is the FRONT fabric face. In purl orientation, stockinette fabric is technically called a "reverse stockinette fabric." |
|
R.1 |
Purl 7. Place first two loops of the knotted-up placeholder on L needle, k 1 st into each loop of placeholder, 2 k's total, then p1. Place last two loops of the knotted-up placeholder on L needle and k 1 st into each loop of placeholder, 2 k's total. End with p7. The 4 sts on placeholders are the base of the ring. 19 stitches now on needle (not counting optional side borders) |
 |
4 sts for base on scrap yarn placeholders. Note the center purl stitch between the cable arms. Note: This sample has the 10 -stitch optional garter-stitch side borders, five stitches each side * (see footnote for video link you may find helpful) |
|
2 |
On this and every even (back) row, knit the knits and purl the purls. In this particular row, that means k7, p2, k1, p2, k7. Note that the purl stitches are the 4 sts previously worked into the scrap yarn placeholder. |
|
3 |
p6, R-p-T on next 3 sts, p1, L-p-T on next 3 sts, p6 |
|
5 |
p5, R-p-T on next 3 sts, p3, L-p-T on next 3 sts, p5 |
|
7 |
p4, R-p-T on next 3 sts, p5, L-p-T on next 3 sts, p4 |
|
9 |
p4, k2, p7, k2, p4 (same as knit the knits, purl the purls) |
|
11 |
as row 9 |
|
13 |
p4, L-p-T on next 3 sts, p5, R-p-T on next 3 sts, p4 |
|
15 |
p5, L-p-T on next 3 sts, p3, R-p-T on next 3 sts, p5 |
|
17 |
p6, L-p-T on next 3 sts, p1, R-p-T on next 3 sts, p6 |
|
19 |
p7, remove 2 knit sts to a holder (bobby pin) and drop to front of work. p1, remove next 2 knit sts to a holder and drop to front of work, p7. Tip: Work the yellow highlighted p1 and its neighboring p's as firmly as possible. |
|
|
Work a few additional rows in reverse stockinette, then, work a top border of a few rows of garter st. Bind off. |
Prep for after-knitting
When the knitting is done and before the "after-knitting" begins, it looks like you've knitted a pair of disconnected parentheses. At the top on the holders (bobby pins) the stitches of both arms lie head to head. At the bottom on the placeholders (the knotted-up scrap yarn) the stitches of both arms lie tail to tail. At both top and bottom, the arms are separated by a purl stitch.
 |
The knitting is done. The arm-tops are on bobby pins, the bottoms on the dark-colored scrap yarn. The green colorized stitches in the close-up inserts show that the stitches at the top of these parentheses meet head-to-head, meaning, the open part of the stitch V's point at one another. Meanwhile the bottom stitches, on their provisional yarn holders, lie tail-to-tail, meaning, the pointy part of the stitch-V's point at one another. By "after-knitting" this pair of parentheses, they will turn into an infinity ring where all the stitches will march the same direction. Click here to enlarge illustration in a free floating window. |
- Geek note: Directional transformation in infinity rings is permanent. However, directional transformation can be temporary, also. For example, temporary directional transformation is used to preserve information about stitch order when unlatching color- or double-knitting, a trick called "controlled drop." In controlled drop, the stitches stood on their heads via transformation are ultimately re-transformed to lay the same way as originally.
- Geek notes: Another example of after-knitting, already mentioned earlier, is releasing and re-latching a cable arm to correct a miscross. In that example, the transformation was not directional: the stitches released into ladder-strands were transformed back into the arms of a cable which marched the same direction as originally.
- another kind of after-knitting is where you let down a knit column and latch it back up again as a purl column. This trick is called "conversion," being a transformation of orientation (K-to-P), rather than stitch direction. Conversion is a handy trick to make ribbing tighter than it could be knit in the first place, to transform columns for pinstriping (even curved columns) and to convert a rolling scarf into one which will lie flat.
 |
| In the right arm (which will be the dominant arm here) the stitch heads march anticlockwise. (Anticlockwise is also called counterclockwise.) In the left (non-dominant arm) the stitch heads march clockwise. At project end, all the stitches in both arms will march anticlockwise, as the "anticlockwise" ring on the above diagram. Optionally, if you choose to make the ring-in-a-ring variation, you will make one of each--right arm dominant AND left arm dominant. |
- Geek Note: If you wonder why the right arm is dominant, the fact is, in the simple single ring, either the right OR the left arm could could have been designated dominant. Being right-handed, I chose right arm dominant to make my work easier. However, in complex shapes, it turns out that one's preference does not matter. It is the design of the Celtic knot which dictates which arm is to be dominant--there will be more about this in future posts.
Ok, enough vocabulary. Here's how-to
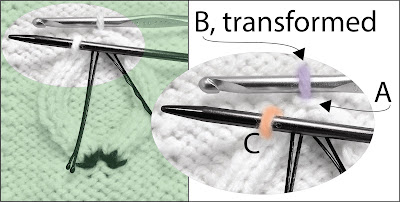
Per above, the right arm stitches are going to be the "dominant stitches" meaning all the stitches in the little knitted ring will be transformed to march the same way the right arm stitches now do (heads anticlockwise). The left-arm stitches to be transformed, the "non-dominant stitches," are transformed using a crochet hook. * (see footnote for video link you may find helpful)
Therefore, carefully pull back the bobby pin and place the outer stitch from the dominant arm (in this case, the right arm) onto the crochet hook. This is labeled stitch A in the close-up insert below. Take care that stitch A is not twisted.
The stitch at the head of the column to be transformed, the outer non-dominant left-column stitch, is also carefully removed from its bobby pin holder and is then temporarily placed on a dpn. This is labeled Stitch B on the close-up, and it is colorized purple, to make it easier to see.
 |
--Stitch A (top stitch of outer dominant right column) is placed on crochet hook, untwisted --Stitch B (top stitch of outer non-dominant left column) on double pointed needle (dpn). It is colorized purple in the closeup insert --On bobby-pin holders, the inner columns wait, staying out of the way. |
Step 2 In this step, something very important changes: B loses its status as a stitch. The dpn is removed from the loop of this stitch. By then using the dpn to pick at it from where it connects to its neighboring stitch, B is undone (left illustration). Being "undone" means it has been picked out of the head of the stitch below--stitch C. What was stitch B now becomes nothing more than a strand of yarn over the dpn (right illustration below).
 |
--LEFT: Stitch B, the stitch at the top of the left non-dominant arm is being undone (pulled out of the top of the stitch below, C) by picking at it with the dpn in the direction shown by the transparent purple arrow. --RIGHT: By picking the loop out of the top of stitch C, what was stitch B is now a mere strand over the dpn, while S titch C is now open on top. |
Step 3 Once stitch B is undone, the next step is to transfer the strand-formerly-known-as-stitch-B onto the crochet hook, while the dpn is inserted into the next open stitch down along the outer left column, which is stitch C. Note that the strand is transferred to lay as a knitting stitch lays: untwisted, right arm forward.
 |
| Stitch B has been undone into a strand and this strand has been transferred to lay over the barrel of the crochet hook which has been holding stitch A. Meanwhile, the dpn has been inserted into stitch C, colorized orange. In this way, stitch C has become the new top stitch of the non-dominant column. Click to enlarge. |
Step 4 Strand B is now transformed back into a stitch by using the crochet hook to pull its strand through stitch A. The transformation is directional, meaning stitch B has been stood on its head. In the process, stitch B has become the lead stitch in the outer dominant column, having taken the place of stitch A, which was formerly the the lead stitch of the outer column of dominant stitches. Stitch C is next in line to be undone and transformed.
 |
| --After being pulled through stitch A, B is no longer a strand, but has been transformed, taking A's place as the lead stitch of the dominant column. --Stitch C is next in line and will be transformed the same way: turned into a strand with the dpn, placed on the hook, and then pulled through stitch B. Click to enlarge. |
Step 5 Transformation continues down the column, each undone strand in turn being pulled through the stitch above it. The stitches in the non-dominant column formerly marched heads pointing clockwise, but after transformation the stitches march in the direction of the dominant columns: heads anticlockwise.
 |
| Several stitches in the outer left stitch-column have now been transformed using the crochet hook and the dpn. Click to enlarge |
Step 6 When you get to the bottom of the outer column, pull the last stitch out of the yarn placholder and transform it. The scrap yarn holder-loop now flops, empty. I have shown it flopping on the fabric front so you can see it, but it really would be best if you pull it to the fabric back, out of the way. Note the inner columns still waiting on their bobby pins.
 |
--The last outer stitch in the non-dominant column is worked by pulling it out of the scrap-yarn stitch holder at the bottom of the column and transforming it as before: first into a strand, and then into a stitch in the dominant column. The scrap-yarn loop which anchored that column now flops empty. It would be best to pull it to the back, out of the way. The bottom of the column now on a crochet hook is to be put onto a bobby pin. --The inner columns, waiting on their bobby pins, are coming up next |
Optional: after working a few transformations, you may find it more efficient to work batchwise, releasing a batch of stitches at a time, catching them over the dpn, and then hooking them all up before releasing another batch of stitches. If you intend to knit knots, hearts or spirals in the future, this would be a good time to experiment with the batchwise method, because it becomes unavoidable in complex Celtic Infinity Loops.
 |
| Outer column all transformed, its bottom stitch has been put on a bobby pin holder. Now, the inner column is being transformed batchwise. Click to enlarge |
Step 8 All the stitches in both columns have been transformed, and two loops of the scrap yarn placeholder are empty. Pull these empty loops to the back to get them out of the way. Closeup right inset: the outer column stitch has been transferred off the bobby pin, and both inner-and outer-bottom stitches are on the dpn now. The stitches on the dpn will be grafted to the green-colorized stitches on the scrap yarn placeholder.
 |
| Transformation of both columns is complete--see how nice the loop-top looks on the left general view? Now it's time to make the bottom look equally nice by grafting the heads of the stitches on the dpn to the tails of the green-colorized stitches on the (dark-colored) scrap yarn placeholder, as shown more clearly on the left closeup insert . Click to enlarge |
Step 9 The next-to-last step is grafting. This is head-to-tail grafting, which is "perfect." The yarn exactly follows the path a knitting stitch would take, cloning a new knitting stitch with threaded sewing needle. Structurally, grafting IS a knitting stitch, which is why it's invisible when you're finished.
This graft, between open loops on the bottom and and stitches on a yarn holder is a little different from ordinary grafting, because it is actually duplicate stitch on top, while being grafting on the bottom. (I called it "dupli-grafting" in the previous post.) Here it is, in steps A-E.

A: Thread a blunt-nosed large eyed sewing needle with a 6-8 inches of yarn. Take the two open loops off the dpn and arrange them so they lay flat in your fingers, and not twisted at their bases. Start by inserting the threaded needle into the BACK of the right open loop. This is the bottom loop of the outer column you transformed.


C: now insert the needle into the FRONT of the lower right open loop and then into the BACK of the lower left open loop.
Step D is the same as step B: following the guide provided by the contrasting yarn, insert the needle from right to left BEHIND both stands of the tail yarn of the second stitch, as shown.
Step E: End by drawing the needle through the FRONT of the left lower stitch.


At the end, carefully (oh so carefully!) cut loose the two loops of the scrap yarn placeholder. Then, adjust your tension. Here is what the work looks like when the grafting is completed, but before the ends are worked in.
 |
| Last step before working in the ends: grafting complete. The needle is inserted to better display the graft. Click to enlarge |
Step 10 The final step is to work in the ends from the grafting. Hook the ends to the fabric back. If you flip the fabric over, you'll see that every place you made a Right or Left purl Twist, a little "bridge" of two strands was formed over the back of the cable arm. Using the crochet hook, catch one end into a channel under the bridges, as shown. Repeat with the other end on the other side. Trim.
 |
| View of rear fabric face. Where the twists were knit, these formed a ready-made hiding spot for ends, very convenient |
Summing up:
1) You can now see how the distortion of the background stitches was avoided by using the scrap-yarn cast on. Once the arms are joined together--by transformation at the top, and grafting at the bottom--the cable arms have been completely diverted, so that, in the rows above and below, the background stitches lay side-by-side, absolutely undisturbed. If the background stitches lay undisturbed, they cannot be distorted.
2) The problem of the original discontinuities--head-to-head and tail-to-tail--have also been solved. All the stitches now march the same direction by the process of standing half of them on their heads via stranding and re-forming, the process called transformation.
3) As to stitch count, that problem has been simplified. You see, the background stitch count never changes because no background stitches are ever converted into cable arms. Instead, the extra stitches required as the bases for the knit-in cable motif are based on the scrap yarn holders. So, for garment-shaping purposes, when using infinity rings, you can use the stitch gauge and stitch count of the background fabric to do your cast-on and shaping calculations, ignoring total stitch count.
Put another way, the total stitch count for any one row can be calculated from the background stitch count + the number of cable arm-stitches arising out of provisional loops, BUT for shaping purposes, total stitch count can be ignored: simply forget about the added cable arm stitches--count the background stitches only. This is because the extra stitches based on the scrap-yarn holders go exclusively into the cable arms--the stitches are diverted away from the background because, after transformation, these arms lay ABOVE the background stitches. Contributing nothing to fabric width, the stitches of the ring form their own little self-contained yarn-bubble on the fabric surface. This yarn-bubble makes the fabric stiffer (in technical terms, it affects "drape") by making the fabric more 3-D, but it does not affect width or height.
It is true that in standard Celtic knot technique, you can also figure total added stitch count by figuring in the number of stitches added by the cable arms, but you must also account for 1) background stitches added or subtracted where the knots begin and end--stitches taken in and spit back out again. Also 2) you must account for the distortion where the cable arms begin and end. By contrast, all you have to measure gauge-wise for Infinity Loops is the background stitches. In this finished infinity ring, the border stitches lay parallel all along, the ring makes no difference to the overall gauge of the square. The more complex the Celtic Knot motifs, and the bigger the garment, the more important is stitch-count simplification.
|
| The final ring, transformed and grafted shut. |
Fine tuning, one final hint. If your knitted stitches are relatively tall, your rings may appear pointy at the top where the transformation began. As a cure, knit them one row shorter. On row 18 (a back of fabric row) instead of purling the purls, put each set of purl stitches on a holder when you come to them, dropping the holder to the fabric front (the purl face). On row 19, simply knit across the row. This makes the cable arms one row shorter at the top. Then, transform as per usual.
Optional pattern modification: concentric rings
 |
| Larger ring transformed right arm dominant, smaller, left arm dominant |
These rings are knit by modifying the pattern as follows.
When the knitting reaches the row where seven purl stitches would be expected to lie in the middle between the two traveling arms of the larger ring (row 7 of the ring pattern) the middle stitch is used as the purl center spacer for the smaller ring, meaning, two stitches are picked up through scrap-yarn holders on either side of that purl. Specifically, after the R-p-T, purl 2 and then use the following purl stitch as the center spacer. (Remember, the purl stitch to be crossed into the center by the following L-p-T must be included in total count of purls across the center., so what looks like six purls would actually be seven after the second arm is knit.)
The larger and smaller rings continue to be twisted outwards in regular succession until the smaller ring reaches 5 purl stitches across the middle. (Again, count the purl stitch to be crossed into to the center by the following L-p-T in this total.)
The next two odd rows are worked by knitting the knits, and purling the purls: the same idea behind rows 9 and 11. Then, regular decreases begin, where the rings begin with L-p-T's and end with R-p-T's, same idea as row 13. As each ring closes to a top, reaching 1 purl stitch between arms, work as set out in row 19. Afterwards, the rings are transformed and grafted shut.
Starting the smaller ring on row 7 sets a spacing of 3 purl stitches between the rings. However, by starting on row 5 you'd pack the rings closer together, separated by only two purl background stitches.
How many concentric rings can you pack together? When you get to three or more, the outer rings become a sort of a diamond. Try for yourself and see!
 |
| Questions? Feedback? Talk to me about this post on TECHknitting Ravelry forum. |
This is part 1 of a series. The others in this series
-Celtic Knots, improved: Bowen Cross and introducing shortcuts (Infinity Loops part 2)
-Celtic Knots: adapting Infinity Loops to complex forms--double -
--TK
-Celtic Knots: adapting Infinity Loops to complex forms--double -
- *Footnote: The fifth in the series, Celtic Valentine's heart, has two videos you might find helpful.
- 1: Casting on the four stitches at the bottom.
- This video shows putting on the four stitches at the bottom. However, because it is about colored hearts, the four stitches are cast on in a different color--a red heart on a white background. Nevertheless, you might find the video helpful for casting on the rings. If you imagine that the four stitches knit INTO the placeholder are not a separate strand, but a continuation in running yarn, then the video will be helpful.
- 2: Transforming the stitches
- Again, because the video is of a contrasting color heart, the yarn being transformed is red, meaning, not yarn of the background color. Nevertheless, the ACT of transformation (releasing stitches and standing them on their heads) is the same. So, if you imagine that the stitches being transformed are the same color as the background (which is the case with the rings) then the video will be helpful in showing how transformation proceeds.