In this post, we are to meet another type of tail--the kind which connects stitches of unlike kind, such as a knit to a purl, or a purl to a knit. Such unalike stitches connected together are very commonly found in ribbing. However, basketweave, seed stitch, cables, indeed all texture stitches also have K-P and P-K connections. So ribbing in this post stands in for texture stitches in general: everything said here about ribbing applies equally there.
In getting from stitch to stitch, yarn travels in a different direction in stockinette vs. in ribbing. To simplify: in stockinette, yarn travels along the row, but in ribbing, the yarn travels back and forth from one fabric face to another.
Specifically, in stockinette, all the stitches in any one row or round are always facing the same direction, so the yarn always enters the stitch by being drawn though the same way. As you know, from the knitter's point of view, yarn enters a knit stitch from the back (you hold the yarn behind the fabric, drawing it towards you, all the way down the knit row) while it enters a purl stitch from the front (you hold the yarn in front of the fabric, drawing it away from you, all the way down a purl row).
In ribbing, however, you work different stitches next to one another as you work your way down any one row. So, if you work a knit stitch (facing you) next to a purl stitch (facing away from you), you must switch the yarn from one fabric face to another. This is how the yarn enters the stitch from the correct direction, as required. Switching the yarn back and forth from one fabric face to another means that the yarn has to pass back and forth through the thickness of the fabric as it travels between the stitches from one fabric face to another. The act of passing through the thickness of the fabric suggests we call this kind of tail yarn a "passing strand."
Passing strands illustrated
Below ▼ is illustrated a k2, p2 ribbing (also called 2/2 ribbing) in a little scrap sample. This ribbing has been popped off the needles. The stitches appear in pairs, each pair forming two evident columns of stockinette-on-a-purl-background, and these columns appear alternately on opposite fabric faces. Stated otherwise, the hill-and-valley structure of 2/2 ribbing occurs because two columns of knit (the hills) always appear on a 2-column purl background (the valleys). The opposite of a knit is purl, so the hills of one fabric face become the valleys of the opposite face when the fabric is flipped, and, of course, the valleys become hills.
 |
| Figure 3: Scrap of 2/2 ribbing popped off the needles |
The arrangement of these alternating pairs is a bit surprising, perhaps, so here's a head-on shot, a close-up, below. ▼ As you see, pairs A, C, E and G appear on the lower fabric face in this diagram, while pairs B, D and F appear on the upper. Pairs on any one fabric face are closer together than are those of sequential pairs on opposite fabric faces. For one example, the heads of pair A are close to those of pair C. By contrast, the heads of pairs A and B are not nearly so close as A and C, despite pair B being originally created directly next to pair A. There is something about the structure of the ribbing which is pushing neighboring pairs of stitches--originally made right next to one another--apart onto the different fabric faces. Something pushes these pairs into hills and valleys. What is it?
 |
Figure 4: These pairs were knit in sequence A-B-C-D-E-F-G,
yet once off the needles, they appear on opposite fabric faces
in sequenceA-C-E-G (lower) and B-D-F (upper). So...why? |
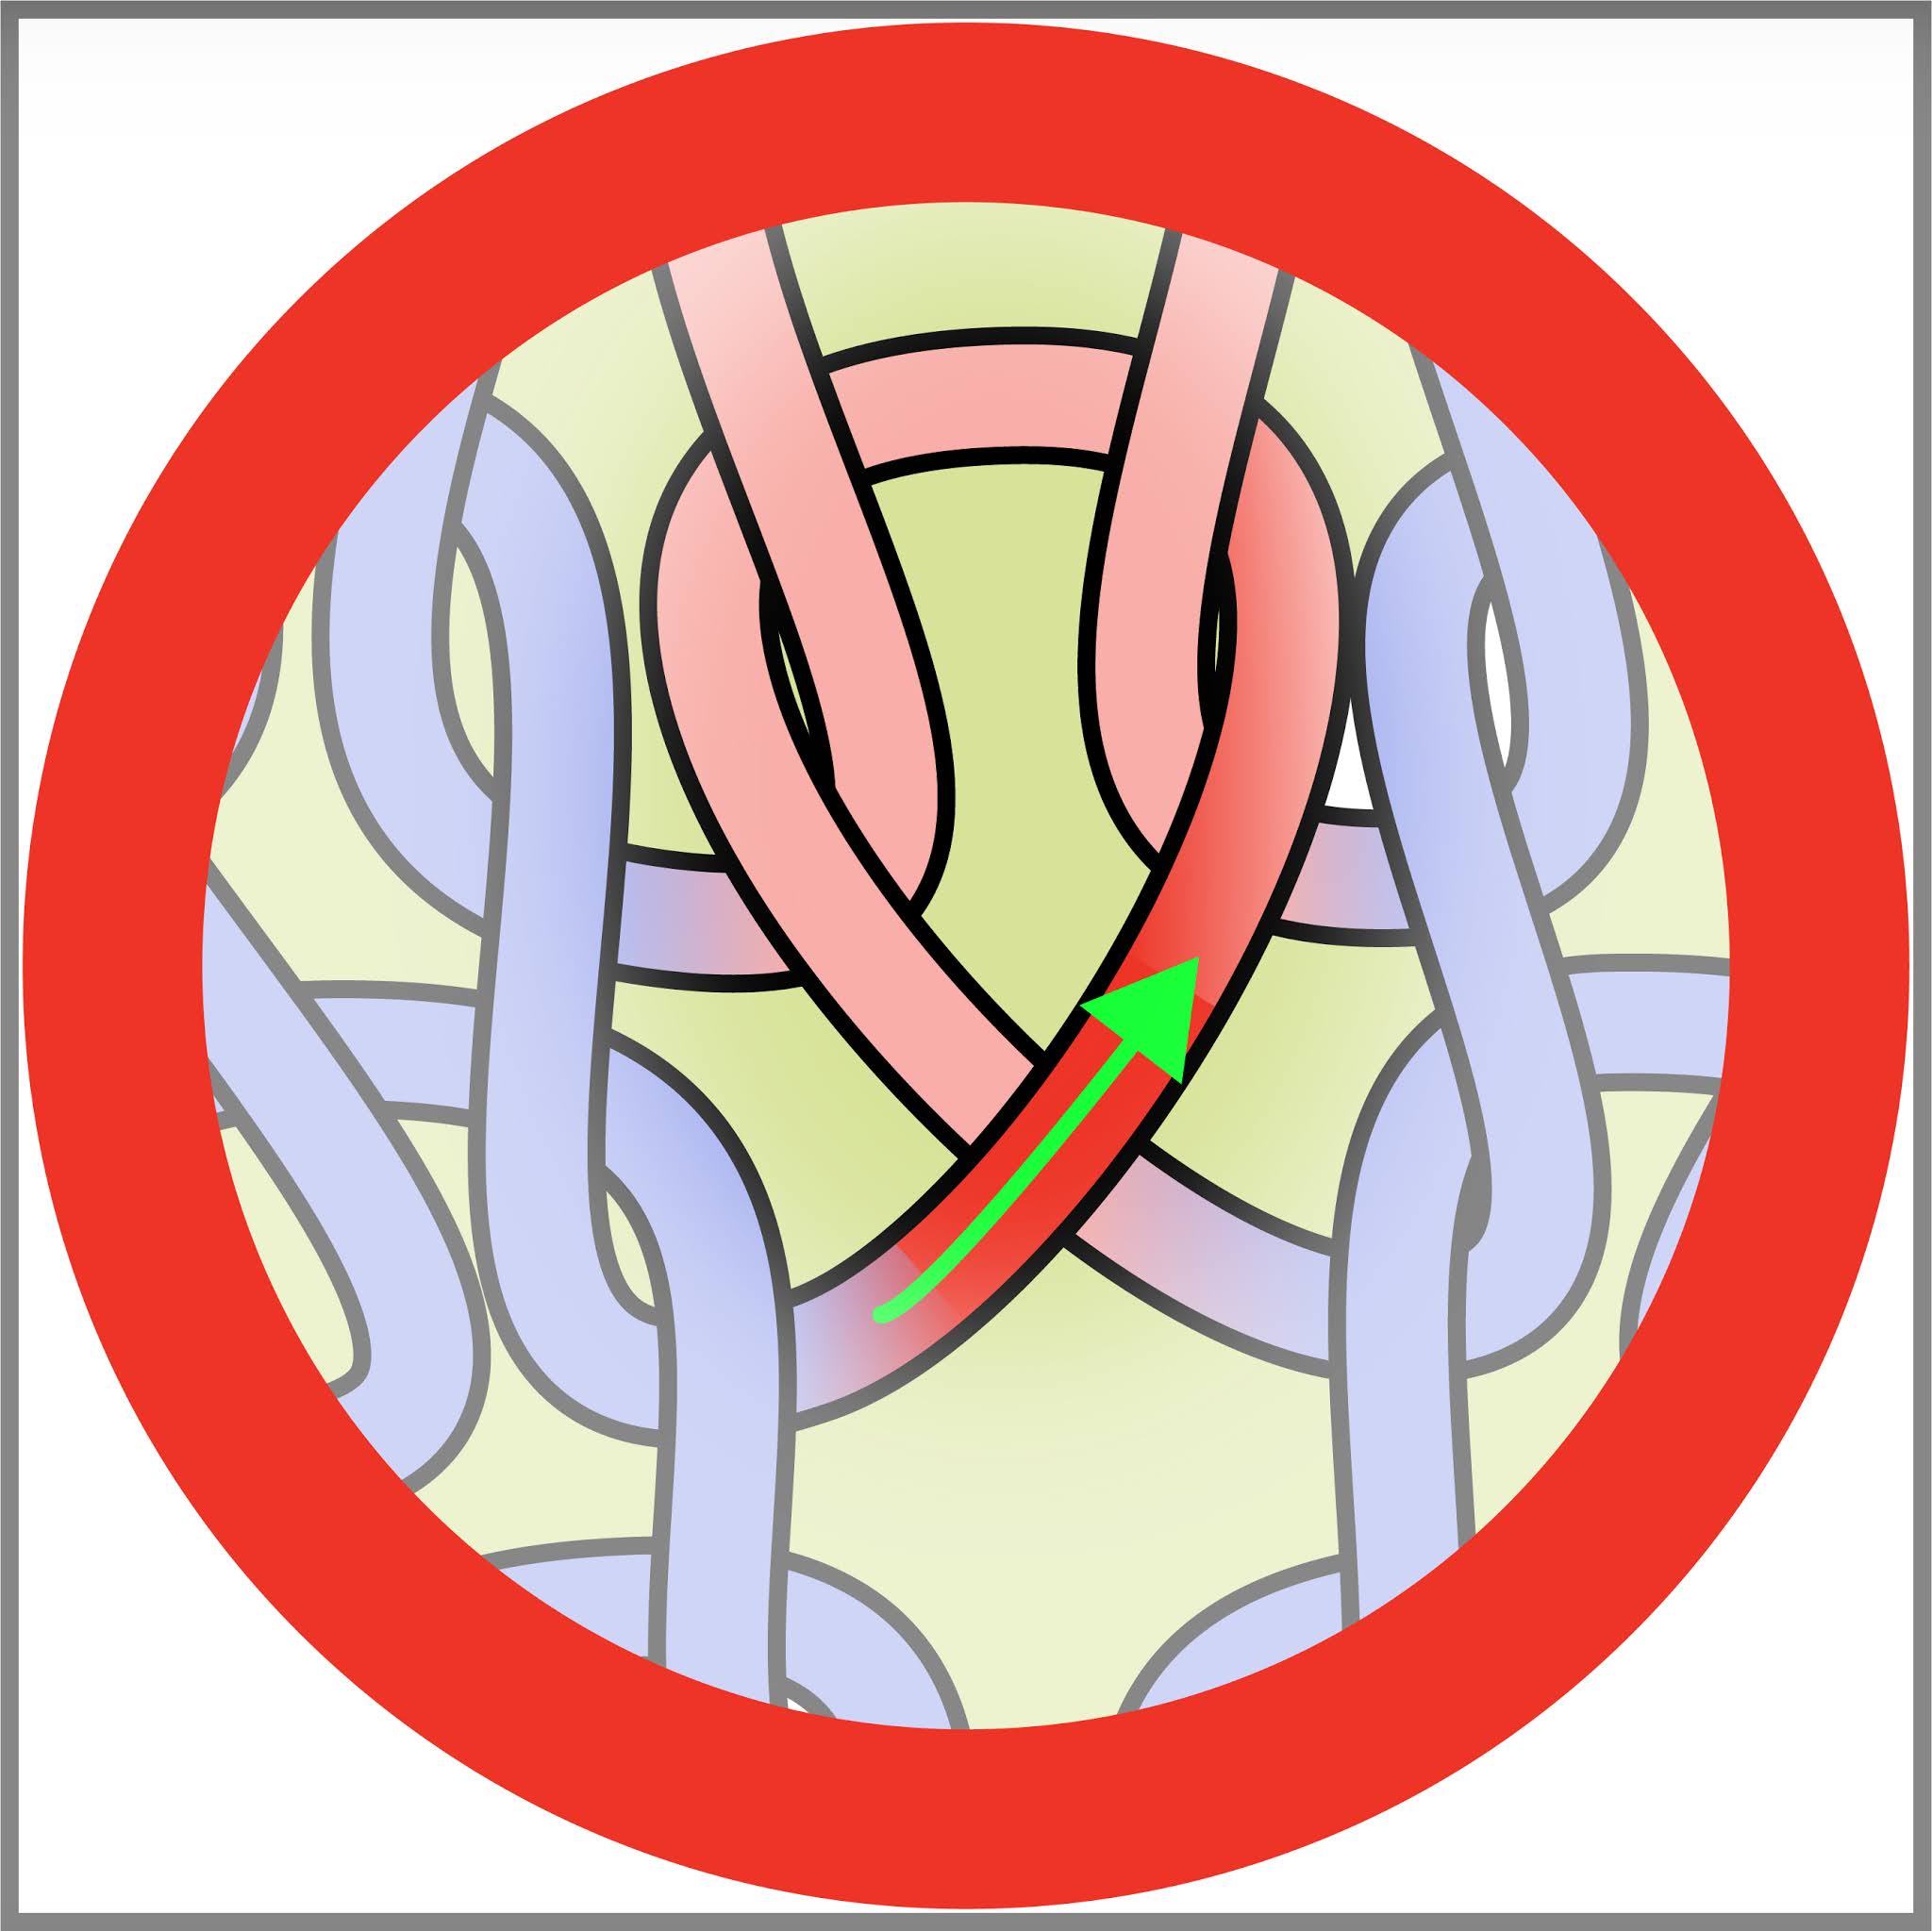
Below ▼ is a further closeup (figure 5) which gets to the heart of the matter.
 |
Figure 5: closeup of figure 4
|
In the above diagram, the pairs have now been individually labeled. This closeup now starts with the second of the "A" stitches, A2, and ends with the first of the "G" pair of stitches, G1.
--The gray line traces the line of the yarn as it travels along the current row.
--Where the line becomes .... dotted ... the yarn of the current row is diving below the heads of the stitches of the previous row.
--Where the line becomes red, this is the yarn between stitches of the same pair (which are also stitches of the same kind, whether knit or purl). We've already named this type of stitch tail a 'tweener strand. As you see, 'tweener strands travel through the fabric parallel to the plane of the fabric. We could say that they travel horizontally along an east-west axis.
--Where the line becomes green, this is the passing strand we've been talking about: it is the tail yarn as it passes through the thickness of the fabric, connecting a pair on one fabric face to a pair on the other fabric face. As you see, the passing strand travels forward and back, at right angles to the plane of the overall fabric: we could say that the passing strand travels vertically along a north-south axis.
Just let me drive this into the ground one more time: 'tweener strands (red) and passing strands (green) are both tail yarns as a generic category. Both 'tweener and passing strands are stitch tails which connect sequential stitches. Yet 'tweener strands and passing strands differ in what kind of stitches they connect, (same kind vs. different kinds) and which direction they travel with respect to the fabric: parallel, along the plane ('tweener) vs. right angles, back and forth through the plane (passing strands).
Where a purl stitch and a knit stitch lie adjacent, it is the fact that the yarn travels in and out of these stitches in different directions which forces the stitches into three-dimensionality.
Forces loaded into knitted fabric: a science-ish explanation
I've been sleuthing around in textile science textbooks and academic journal articles. It turns out there is a whole textile science universe, with such tools as "Shirley stiffness testers," serious research on the exact nature of the forces loaded into yarn at spinning, and such terms as "flexual rigidity, areal density and compressional energy." I do not claim to understand the more abstruse terms, but what I have gathered from reading and my own little experiments is this...
Yarn is composed of individual fibers, and these fibers are often quite springy in and of themselves. Have a look at this diagram of wool's structure: it is essentially built out of springs at the most fundamental level. Other fibers may not be quite so springy, but generally speaking, fibers suitable for spinning into handknitting yarns require to have at least some bounce and body.
In the spinning process which transforms fibers into yarn, these fibers, generally springy in themselves, are overlaid on one another in a continuous strand, then twisted and bundled. Twisting and bundling imparts more energy to the yarn.
 |
figure 6:
energetic
yarn
|
◄ A familiar example of the kind of energy which is stored in yarn during the spinning process (an example annoying to hand knitters) are the sorts of yarn called "energetic singles," or "overspun," or "overtwisted." These are the sorts of yarns which want to loop back on themselves as they come off the skein into the knitting.
Not all yarns store this much energy (thank goodness!) Yet, despite such balancing processes as plying, such taming processes as steaming, heating; and even chemical treatments such as vinegar, fabric softener (or their harsher industrial equivalents) all yarns store some energy--it is inherent in the spinning process. Another familiar example of the energy stored in yarn, even plied yarn (an example again annoying to hand knitters) is fabric biasing.
So far in our account, we have springy fibers, spun into yarn which stores energy inside of itself--an energy which it retains even when knit. Now we add more energy by knitting the yarn. You see, the loop of a stitch is a bend in this yarn. Bending adds energy by compressing the yarn and stiffening it: it is now more rigid. The thicker the yarn, or less fluffy (compressible) it is, or the tighter the twist (or all three) then the more the fibers are bunched together. Bunching stiffens the yarn, and the stiffer the fibers in the yarn are, the longer are their "bending lengths."
In other words, the bend of the stitch-loop loads energy into the yarn and stiffens it, as well as the fabric of which it is part. An example of energy stored in knitted fabric is familiar to hand knitters: stockinette curl. It is the stored energy in knit fabrics that makes stockinette curl a real force of nature: that curl can barely be tamed, no, not even with an iron, sometimes.
So now in our tale, we have come to inherently springy fibers, spun into yarn which retains energy from the spinning process, knitted into bendy fabric which has more energy loaded into it from the bend of the knitted stitches. There's a lot of energy looking for a way out in knitted fabric: a lot of pushing and jostling going on. (And here's an academic paper showing the modeling of the helixes of force within the fabric--"repulsive potential!" Oh boy!)
Looking at the closeup in figure 5 shows the pushing force in action two ways. First, the 'tweener yarns (red) are pushing the members of each pair in this K2, P2 ribbing apart. For example, although the "C" stitches along the lower fabric face are both stockinette (knit) stitches, side by side, and although both are on the same fabric face, and although both point south, yet C1 is pointing southeast, while C2 is pointing southwest: It is the force stored in the bend of the little red yarn between them that is doing the east-west pushing.
Similarly, the passing strands (green) are also stiffened by the bend of the stitch-loop. In ribbing, we helpfully arrange the back of one stitch right next to the back of another stitch--this is the knit-purl alternation which fundamentally characterizes ribbing. When the newly stiffened yarn "sticks straight out" of the back of its stitch, the back-to-back nature of ribbing means this is the same thing as "shoving straight into" the backs of the stitches facing the other way. This straight path of stiffened yarn between the opposite-facing stitches, connecting the back of one stitch to another, means the passing strands are aligned north-south (at right angles to the plane of the knitted fabric). The force of the stiffened fibers being offered a straight-line path is what's pushing the back-to-back stitches of alternating pairs onto the opposite fabric faces, perpendicular to the plane of the fabric.
To bring this down to your own tabletop, the fact that bending (loading) this springy stuff makes it want to push back is a test you can do yourself. Lay a length of thicker yarn on the table and pinch it up into a loop. When you let go, the yarn pops into a straighter form. Anthropomorphizing, we can say it "wants to" go straight. Similarly, as this springy stuff is pinched up into a loop by knitting it, it is stiffened, and pushes back by "wanting" to go straight. When you line up the back of a knit with the back of a purl, the yarn can and does do what it wants to do: it goes straight--straight out the back of one stitch into the back of another, passing straight through the thickness of the fabric. This straight line of travel continues until it meets the next bend, and it is the force stored in these sequential bends of the unalike stitches which push the stitch heads onto different fabric faces.
Differential length of the passing strand
A further problem with all this tail yarn entering and exiting the different stitches is, the yarn takes a different length path through the fabric on its north-south passes, depending what kind of stitch it's leaving, and what kind of stitch it's entering. Yes, the yarn between two stitch-backs is sticking straight out, * but * because of the way the stitches are mounted on the needle (usually, right arm forward), then in traveling from K to P, a passing strand has to "go around the arm." But, when traveling from the P to K, there is no arm to travel around. This means that the length of the passing strand is longer from knit to purl than from purl to knit. (At some point, TECHknitting will do an illustrated post on stitch mount explaining all this "path around the arm" stuff further, and when that post goes live, there will be a link here--this post is long enough already!)
Here ▼ is figure 5, again, but this time, with blue asterisks added.
 |
| Figure 7: same as figure 5, with asterisks added showing that, with "standard western mount," the K-P passing strands (asterisk'd) are longer than the P-K passing strands--the added length comes when the yarn travels around the protruding arm of the stitch below when that stitch is mounted right-arm-forward. |
This fabric ▲ was knit with standard western mount--right arm forward. As you see, the passing strand in the K-P direction marked with a blue asterisk (coming out of A2, C2, and E2) is longer then the P-K un-asterisk'd strands coming out from B2, D2 and F2. This systematic difference in length unbalances the fabric in favor of the shorter strand, being the tighter. This means that the longer strand occurs between a knit and a purl column, as in the diagram, and that's the cause for the much-lamented "loose knit column" bordering a purl column. However! Depending on factors such as stitch mount, yarn twist and whether the right ("regular") or left ("mirror image") needle is the working needle, the problem can also occur between a purl column and a knit column.
Knitting ribbing directly vs. "after-knitting" ribbing
So how do you tighten ribbing? How can you create ribbing without distorted columns, without uneven-length of passing strands? How do you knit an even-looking ribbing: thick, pleasant and cushy?
Giving a good yank on the running yarn is a popular remedy often suggested. Similarly, working as close as possible to the needle tips is another popular remedy. Because both these tricks pull slack out of the fabric, both these hints work, yes, but only in a limited way. You see, both these tricks suffer a physical lower limit. No matter how tight the yank, no matter how close to the tips, no stitch worked directly can ever be made less than the diameter of the needle on which it was created, plus whatever tail is needed, physically, to travel from one stitch to another. In other words, the size of the loop of yarn around the barrel of the needle creates is a lower limit to just how much slack can be pulled out of the fabric. You can make a stitch as small as the tightest path of the yarn over the needle, but not smaller.
Another popular remedy often suggested is to vary the stitch mount, so called "combination knitting." This involves mounting knit and purl stitches different arms forward on the knitting needle--R arm vs. L arm. The path of the yarn traveling around the arm protruding on the stitch below is changed as the location of the arm itself changes. Combination knitting creates a more balanced fabric as the length of the K-P passing strand is more equal to the P-K passing strand. However, while combination knitting does undoubtedly make a more balanced fabric, it does not so much change the overall length of the tail yarn, as redistribute that length between the passing strands and the 'tweener strands. Stated otherwise, if looking back at figure 7 (the closeup of the path of the yarn) combination knitting would make the asterisk'd green (passing) strands shorter, yes, but tends to make the (red) 'tweener strands longer. Yet this is a minor issue in the overall scheme: changing the direction in which the stitch travels around the needles does not change the fact that the stitch is still being formed around the barrel of the needle. Once again, the lower bound of stitch-diameter continues to be dictated by the diameter of the needle.
A third remedy is to simply knit ribbing tightly, on very small needles. As noted in the previous post about gauge, tighter-knit fabric has less slack all around, and less slack means the fabric gets up to fewer objectionable tricks. Regardless of how well it works, however, your hands and arms may not thank you for this solution--it is perfectly exhausting after just a few rows. Furthermore, a fabric stiff and tight all over may not get up to foolish tricks, but it might not be too popular to wear, either.
So, if different methods for knitting the fabric directly are not such good solutions for improving ribbing, what is to be done? I can offer two kinds of solutions, and, as hinted in the title of this post, each of these has already been the subject of an entire TECHknitting article, posted previously.
Both solutions linked below share a common trait: they are species of "after-knitting," by which I mean manipulating the yarn AFTER it has been knit into the fabric. This manipulation is done either with a knitting needle or a crochet hook. As is evident, messing with a stitch in the fabric after that stitch is off the needle eliminates the lower bound of tightness set by the needle diameter. In other words, a stitch formed (or re-formed) from yarn which is off the needle--well! That stitch can be smaller and therefore tighter than any stitch formed over a needle, whether by yank, by working close to the tips, by mounting the stitch differently. It can be as tight as a stitch knit on a much smaller needle, but--because you are only operating on a specific stitch--tightening the one stitch need not make the overall fabric stiff, as would happen with the "knit with a smaller needle "solution. (Note, however, that of the two types of after-knitting, one type does make a stiffer fabric than the other, more on this below.)
Another way of thinking about "after-knitting" is that you can force the yarn to bend more off the needle than on--or at least, this is so if you do not care to work tightly on small needles. As we have seen, bending yarn tighter puts more energy into the fabric. It is for this reason, in a mechanical sense, that after-knitted fabrics are cushy-er, springier, denser than you can get by knitting on any but the smallest needles: they are being pushed apart harder.
Have a look at the below ▼ photo, figure 8. This is the overview of a K2, P2 ribbing created by after-knitting--it is a top down view of a ribbed hat, popped off the needles. (The hat itself is featured in figure 16, below.) The stitch pairs are labeled in the same manner as in figures 4, 5 and 7. Although the structure is the same as the ribbing shown in those figures, this fabric is significantly tighter, the ribbing significantly cushy-er and thicker.
 |
Figure 8: "After-formed" K2, P2 ribbing in a hat popped off the needles. This particular type of after-knitting is called "ribbing by transformation, and is discussed more, below.
|
Below ▼ is a closeup. The very tight passing strands (the short green ones) could not be knit directly: compare the length of these passing strands to those in figures 5 and 7: in those figures, the fabric was created in the ordinary manner: knitting the knits and purling the purls.
In this after-knit fabric, the passing strands are much shorter than in the directly-knit fabric. Being short, they draw the stitches on opposite fabric closely together, making for a remarkably thick, energetic, and bouncy ribbing. There's very little slack between the stitch pairs, making it unlikely this ribbing will stretch out in the future. In short (har!) after-knitting tightens the fabric and specifically, shortens the passing strands. These shorter, more regular passing strands help improve ribbing by balancing it (passing strands essentially same length from K-P as from P-K). These tricks also thicken and densify the fabric.
 |
| Figure 9: close up of figure 8. Note the very short passing strands (green), compared to the length of the passing strands in figures 4, 5, and 7 |
So, how is this magic of after-knitting performed? Per above, TECHknitting has already shown the how-to in two different posts for improving textured fabrics such as the ribbing we've been examining here.
Avoid adding excess yarn in the first place
It is possible to avoid adding yarn at the site of the passing strand via the several tricks shown in this linked post about fixing the loose knit column in ribbing, textures and cables. At the heart of these tricks is the idea of after-forming the leftmost knit stitch bordering a purl.
Of the four tricks laid out in that post, I here summarize only the last, although the other tricks in that post also work. In this particular trick, a strand made in the current round forms a sort of "reserve yarn" parked on the fabric surface. (The act of parking the strand on the surface is similar to working linen stitch.) In the next row, this reserved strand is picked up and drawn through to form a loop. At the same time, a new reserve strand is left parked on the fabric surface to be pulled up in the next row, and so on. Here ▼ are the illustrations of that method shown in a k2, p2 ribbing: again, the complete instructions for this trick and others like it are in the post at this link.
 |
Figure 10 --A: Instead of purling the (darker blue) stitch adjoining the last (darker purple) knit stitch, slip that stitch instead: this parks a (red) strand on the fabric surface. --B: Purl the next (lighter blue) purl stitch --C: on the following round, when you come to the red strand, purl the first (darker blue) purl stitch using the red strand, NOT the running yarn. Then, purl the next (lighter blue) purl stitch. --D: Because you did not use the running yarn to knit the (darker blue) purl stitch in step C, that running yarn has formed a new (red) strand parked on the fabric surface. --Repeat steps C and D every round, wherever there is purl (blue) next to a knit column (purple). |
Geek note, science-ish.
"After-forming" a new stitch out of a parked strand is an example of pi (π) in action. A knit stitch approximates a circle. The path around the outside of a circle is called its "circumference." The parked strand, the red dotted line in figure 11, below ▼ is a schematic representation of the solid red strand in figure 10, above ▲. As you see, this red strand is approximately equal to the stitch width: this width of our circle-analog (the knit stitch) is also called its "diameter." The theory of pi says the path around the outside of a circle (circumference) is approximately three times as long as the path across its middle (diameter.) The exact relationship of circumference to diameter is that famous never-repeating irrational number "3.14159....."
 |
| Figire 11: The formula for the newly formed multi-colored stitch (bottom) is strand (red) + left partial arm (green)+ right partial arm (green) = new stitch. In other words, a new stitch transformed out of a strand tightens the fabric because only 1/3 of the new stitch is formed out of the strand (dotted red line). Another 1/3 is transformed out of the partial right (green) arm and the last 1/3 out of the partial left (green) arm. Pulling these green thirds out of the neighboring stitches is what tightens the fabric with the "slipped-stitch after-knitting" trick. |
Applying pi to our after-formed stitch, when you make a circle (knit stitch) out of the parked strand, the parked strand only forms about 1/3 of the new stitch. The other two-thirds come from the ( green ) arms of the adjoining stitches. It is this act of pulling the green yarn into the newly-formed stitch which tightens up the after-knitted ribbed fabric so very well. Further, that green yarn could never have been pulled into the new stitch if the two neighbor stitches were still looped over a knitting needle. Only because the neighbor stitches are off the needles and laying loose in the fabric of the row below, can that this green yarn be pulled out of them.
Even geekier note: This relationship of the circumference of the loop to the length of a strand is also why, when playing yarn-chicken, you can tell if you're going to win by measuring your remaining yarn against the width of the fabric. If the strand is about four times as long as the row, you'll have enough to eke out one more row and a tiny tail left over. I say 4-times and not 3-odd-times as wide because the circles of yarn (knitted loops) don't sit exactly next to one another--you also have to account for the connecting tail. (And, of course, as you know, to further improve the odds of winning at yarn-chicken, it helps to hold your breath, tense up all over, and knit as fast as possible all the way across that last chicken-row!)
Below ▼ is a real-world example of slipped-strand after-knitting. The ribbing on the bottom portion was knit directly in the ordinary manner, right arm forward (standard western mount). The top portion was worked via slipped-stitch after-knitting. I've stretched out this overview sample so the purl columns aren't hiding on the fabric back. You can really see how much tighter overall is the after-knit ribbing.
 |
Figure 12--slipped-stitch after-knitting, overview, stretched out to show purl columns
|
Here ▼ is a further closeup, unstretched this time. Compare the columns of numbers on the side--these are the identical labels from the fabric, just copied-and-pasted onto a plain background. This illustrates that forming the leftmost stitch of each knit column out of the parked strand has the effect of tightening down the entire fabric. Just that much slack is pulled out of the fabric! (Note that, of the two tricks shown in this post, this one--slipped-stitch after-knitting--tightens down the fabric the most.)
 |
Figure 13: slipped-stitch after-knitting, closeup
|
Ribbing by Transformation
The second solution is "ribbing by transformation." This amounts to dropping a column into a ladder, then latching the ladder rungs up again as a knit column on a purl background. If you prefer video, here are links to two tiny you-tubes about that process.
Releasing a ladder: https://youtu.be/qpLCBX3MZmA
Latching up a ladder: https://youtu.be/LDIy4VIfi_Q
This transformation forces 'tweener strand which originally connected a K-K or P-P pair of stitches to become a passing strand connecting a K-P or P-K pair. Because 'tweener strands are shorter than passing strands in directly knitted fabric, this trick of transforming a 'tweener strand into a passing strand tightens a transformed fabric. Note that this trick tightens the fabric less than does the slipping trick discussed above: re-orienting a 'tweener strand into a passing strand does indeed tighten and thicken the ribbed fabric but not as much as forming a loop out of a strand. There's less pulling yarn out of the arms of the neighboring stitches with transformation, and, as shown in figures 8 and 9, above, the overall row gauge does not change much with this transformation trick (although it does with slipped-stitch after-knitting).
Transforming stockinette into ribbing is a trick which has also been previously shown in a TECHknitting post. Although the original post appeared in the context of fixing a curling scarf, the idea of transforming a stockinette fabric into a ribbed one is identical, so have a look at that post for the full details. Note that the very tight fabric in figures 8 and 9 above (showing the super-short passing strands) was created by transforming knit fabric from stockinette to 2/2 ribbing.
Here's ▼ another example of ribbing by transformation. The first photo shows a half-and-half fabric clipped onto a magnet board, right half made in 1/1 (K1, P1) ribbing worked directly, left in stockinette.
 |
Figure 14
|
(Side note: Although you can't tell from this photo, the two fabrics are more or less the same length, the apparent difference is due to stockinette curl. Further, this fabric has not been blocked--more about blocking below. Further note: the V's of the stitches in this yarn appear unbalanced. This is because this yarn is a single yarn--Brown Sheep Lamb's Pride worsted-weight. This single yarn is not overspun, and so does not kink back on itself, nor does it bias in the fabric other than to form uneven V's in each stitch.)The second photo ▼ shows that same fabric, now with the left-hand stockinette portion transformed into 1/1 ribbing to match the right side. Because the fabric is unstretched, you can't see the purl columns, but they are between each of the stockinette columns. On each fabric, six knit columns (11 total stitches, if you include the 5 separating purls on the back) have been marked out with pins--red for the transformed fabric, white for the directly-knit. Even over this short of a run, there is a quarter-of-an-inch difference between the two ribbings. This photo does show the tighter nature of the fabric, what it cannot show is the greater bounce or cushy-ness of the transformed fabric, but that does exist.
 |
Figure 15: Even over so short a run as this, there is a marked difference between the directly knit (white pins, right) and after-knit (by transformation--red pins, left). Because not as much slack is pulled out of the fabric by transformation (this trick) , the row gauge does not change as much as it does with slipped-stitch after-knitting, figures 12 and 13, above (previous trick).
|
Which trick where?
For texture knitted fabrics like basketweave, where the pattern changes every few rows, then in my experience, after-knitting as-you-go is quicker, meaning slipped-stitch after-knitting with its parked strands, figure 10, above. In fact, if you practice at it, this method of knitting becomes second nature. The downside is, this works best in circular knitting (↻) because when worked back-and-forth (↔) the strand parked on the fabric surface on the way there (← ) turns out to be parked on the reverse fabric face on the way back (→ ) making it harder to get at.
For 1/1 (K1, P1) ribbing, then in my experience ribbing by transformation is somewhat easier, and the sort of work you can do mindlessly while watching Netflix. However, transformation takes longer. 1/1 ribbing is shown in figures 14 and 15.
NOTE that if planning to transform stockinette, the transformation will go easier if you do NOT block the stockinette before transforming. The reason is, blocking sets yarn into distinct and directional waves--it "kinks" or "sets" the yarn. Transforming a wave that has been set to curl one way (a knit stitch) into a wave curling the other way (purl stitch) is like trying to brush your hair to curl under when you absentmindedly used your curling wand to curl an outward flip.
If dealing with only a few loose column of knits on a purl background, such as with cables or broad ribs, then, in my experience, there's not a lot of difference, efficiency-wise. Mess around and see which trick you prefer.
Real world uses
One practical use in every-day knitting is to densify the outer edges of your ribbing. Even if you don't need ALL the ribbing in a sweater-bottom or cuff to be stiff and straight and very thick, you may wish to consider either knitting the edge stitches on a smaller needle, or doing one of these after-knitting improving tricks for the rows of ribbing closest to the outside (first few rows if knitting bottom up, last few rows if working top down.) As few as five rows or rounds is plenty enough to make a real difference. It's the edge which suffers snags, rough surfaces, and teeth used to pull on a mitten, so making this denser is worth the extra work. A further advantage: after-knitting (or knitting on a smaller needle) not only toughens the outermost edge, but has the further advantage of preventing flare and splay-out over time.