What row am I on in my cable? If losing row count leaves you with a mystery on your needles, today's post shows how to tell.

The answer lies in two pieces. First, if you do not remember your pattern, you have to figure out how many rows are in your cable repeat. Then, you have to find out where in the repeat you are. Luckily, cables have two landmarks to help: holes and strands.
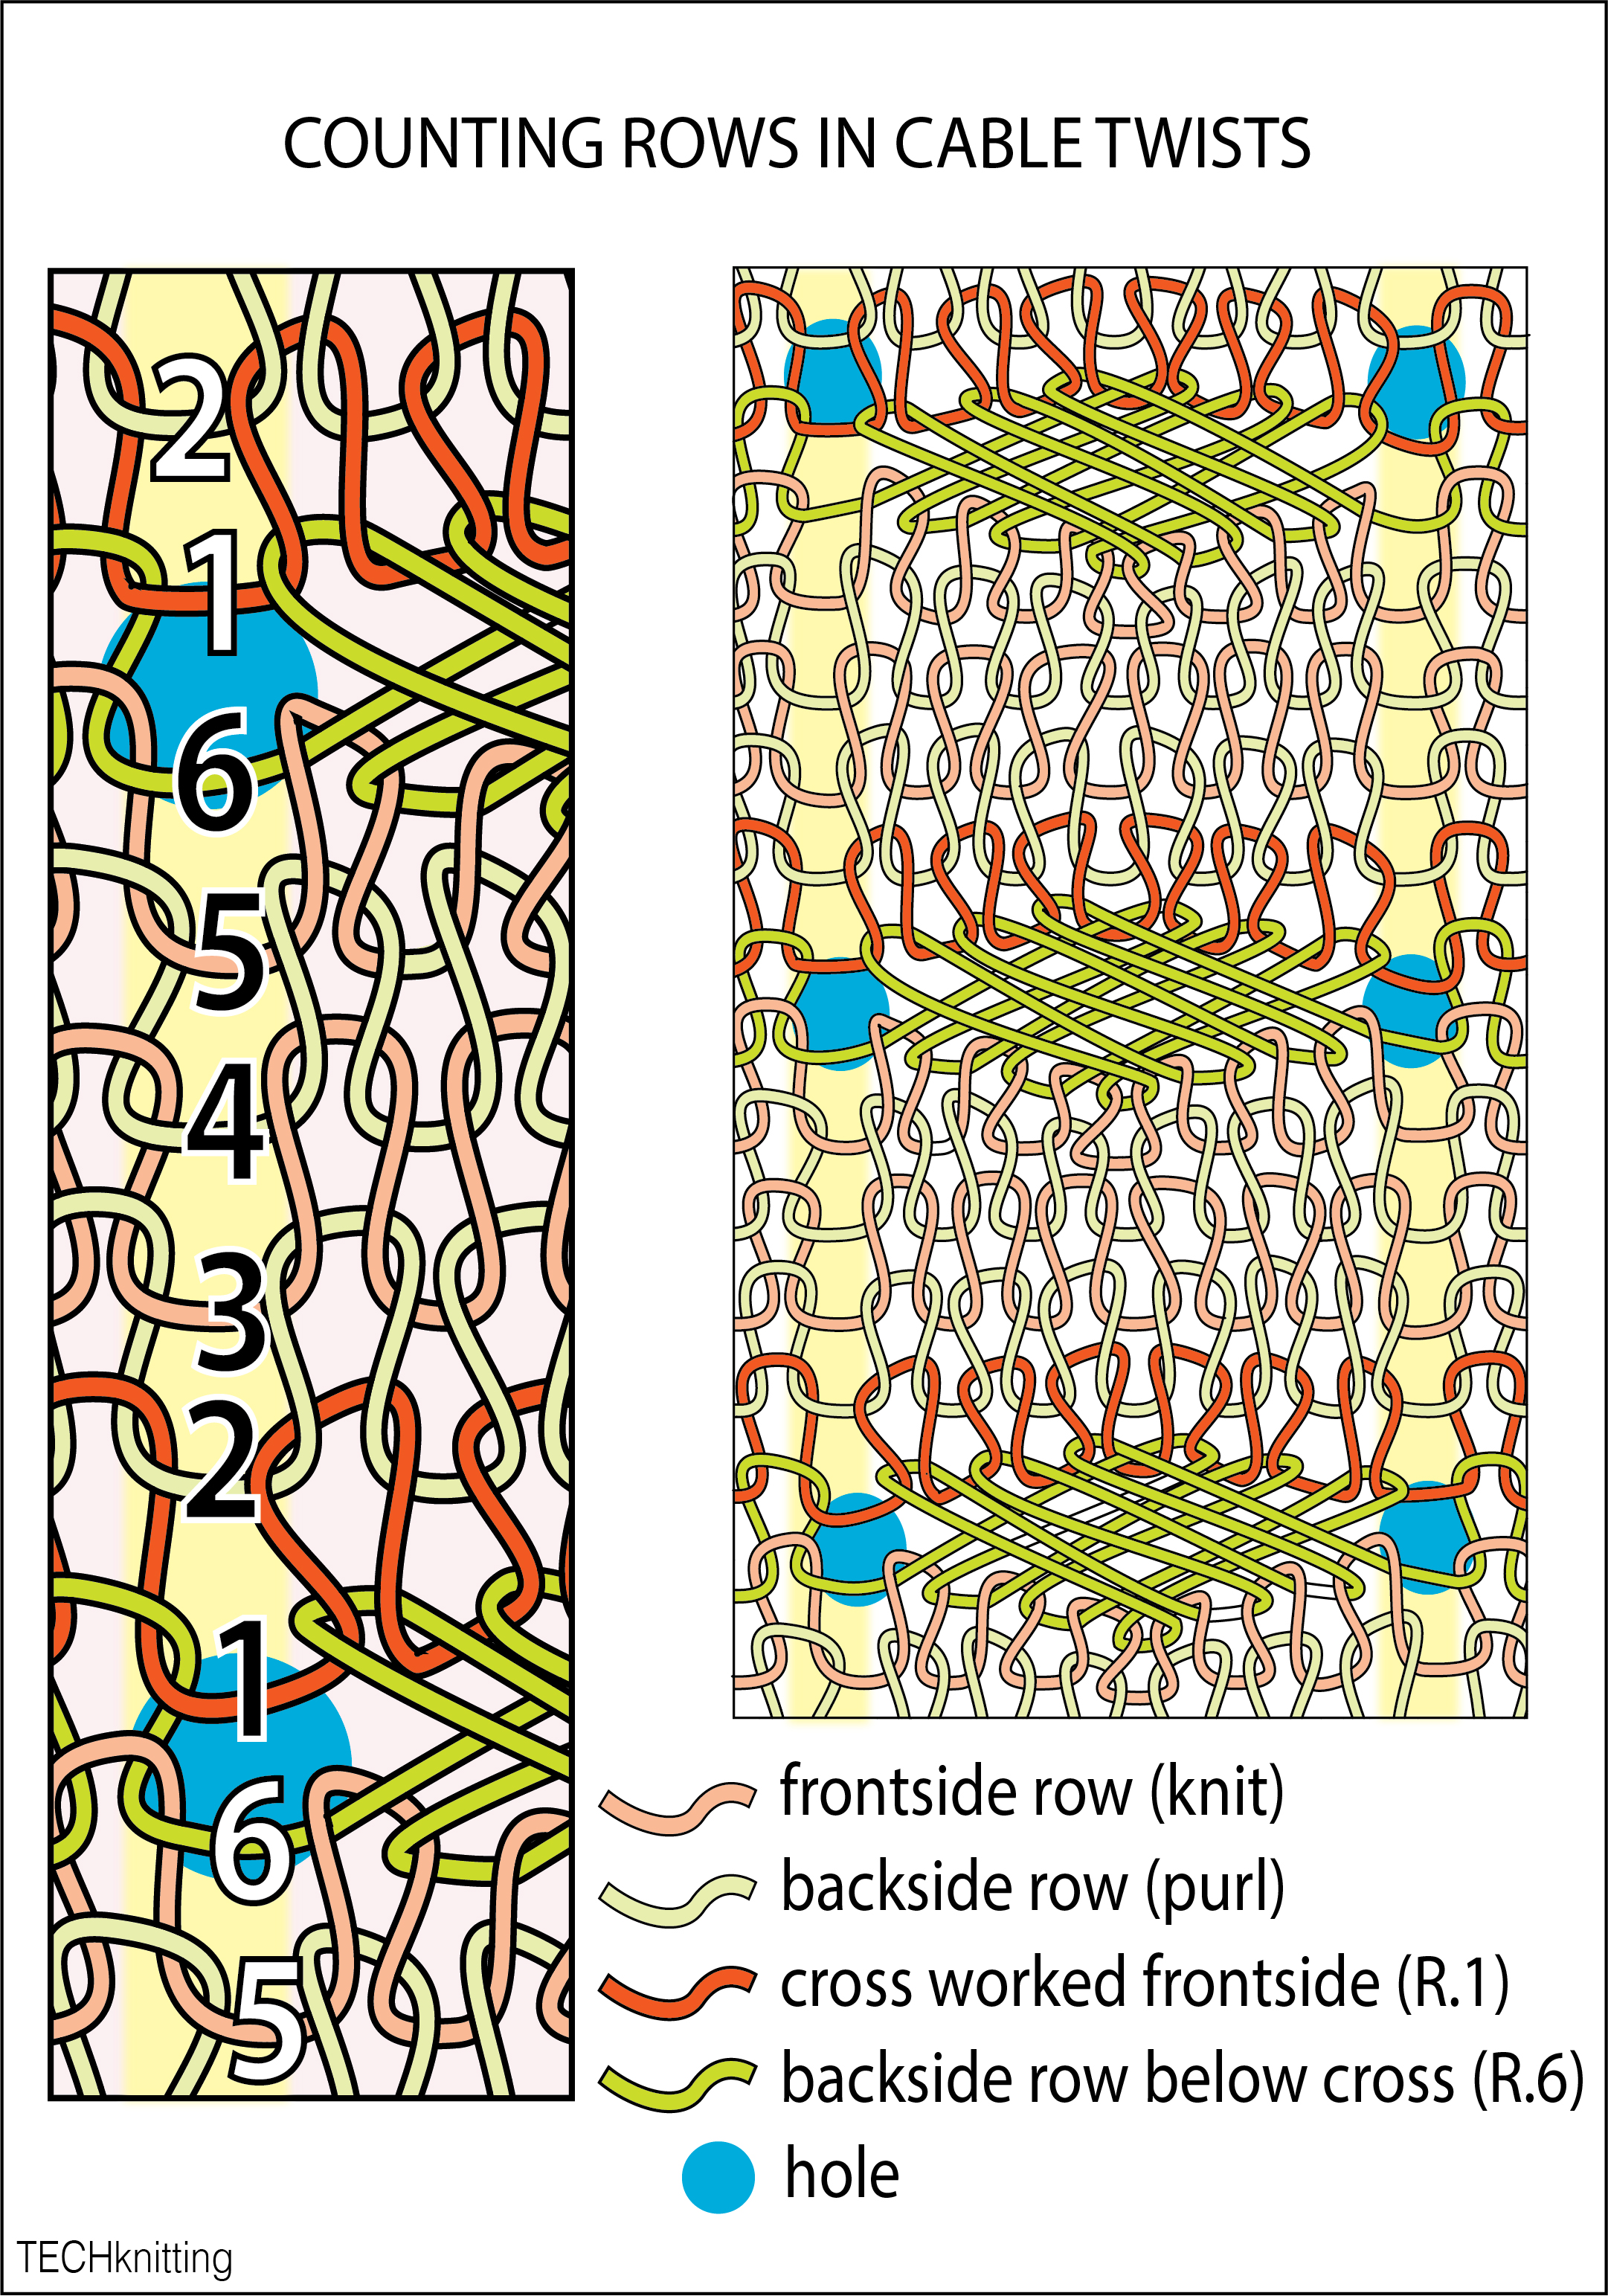 |
| Are you surprised that the cable twist is dark green (backside) row? Are you surprised the cable itself is labeled "row BELOW the cross?" And why is the darker orange row labeled "cross worked" when it is a plain row ABOVE the cable cross? Hold those thoughts a few paragraphs... |
This diagram shows what the cable in the top photo would look like laid out flat, without the distortion which comes from twisting the cable rows: makes it easier to see.
- The first landmark is the hole from the cable cross. In this diagram, these holes are highlighted in blue. In the closeup diagram (left) the hole appears between rows 6 and 1. The hole always appears in a cable cross row. It is an artifact of the crossing itself.
- Second, the easy way to count rows is by counting the strands connecting the cable rows to the purl stitches alongside. In closeup, these strands are highlighted in yellow, and there are six of them. (The more usual advice is to count rows in the cable starting at the cross, but IMHO counting strands from the hole is significantly easier.)
So, to determine row repeat, poke around with your finger until you find the cable hole. Then, count how many strands are ALONGSIDE the cable--in the diagram, there are six strands alongside the cable, counted from the top of one cable-cross hole to the bottom of the next. In the closeup diagram (above, left) the six rows are numbered. Finding the holes and counting the strands show that this is a "6-row repeat" cable.
In this photo of a real-life cable, the cable-cross holes are where the fingers poke through. Stretching makes it easy to count the six strands between the holes.
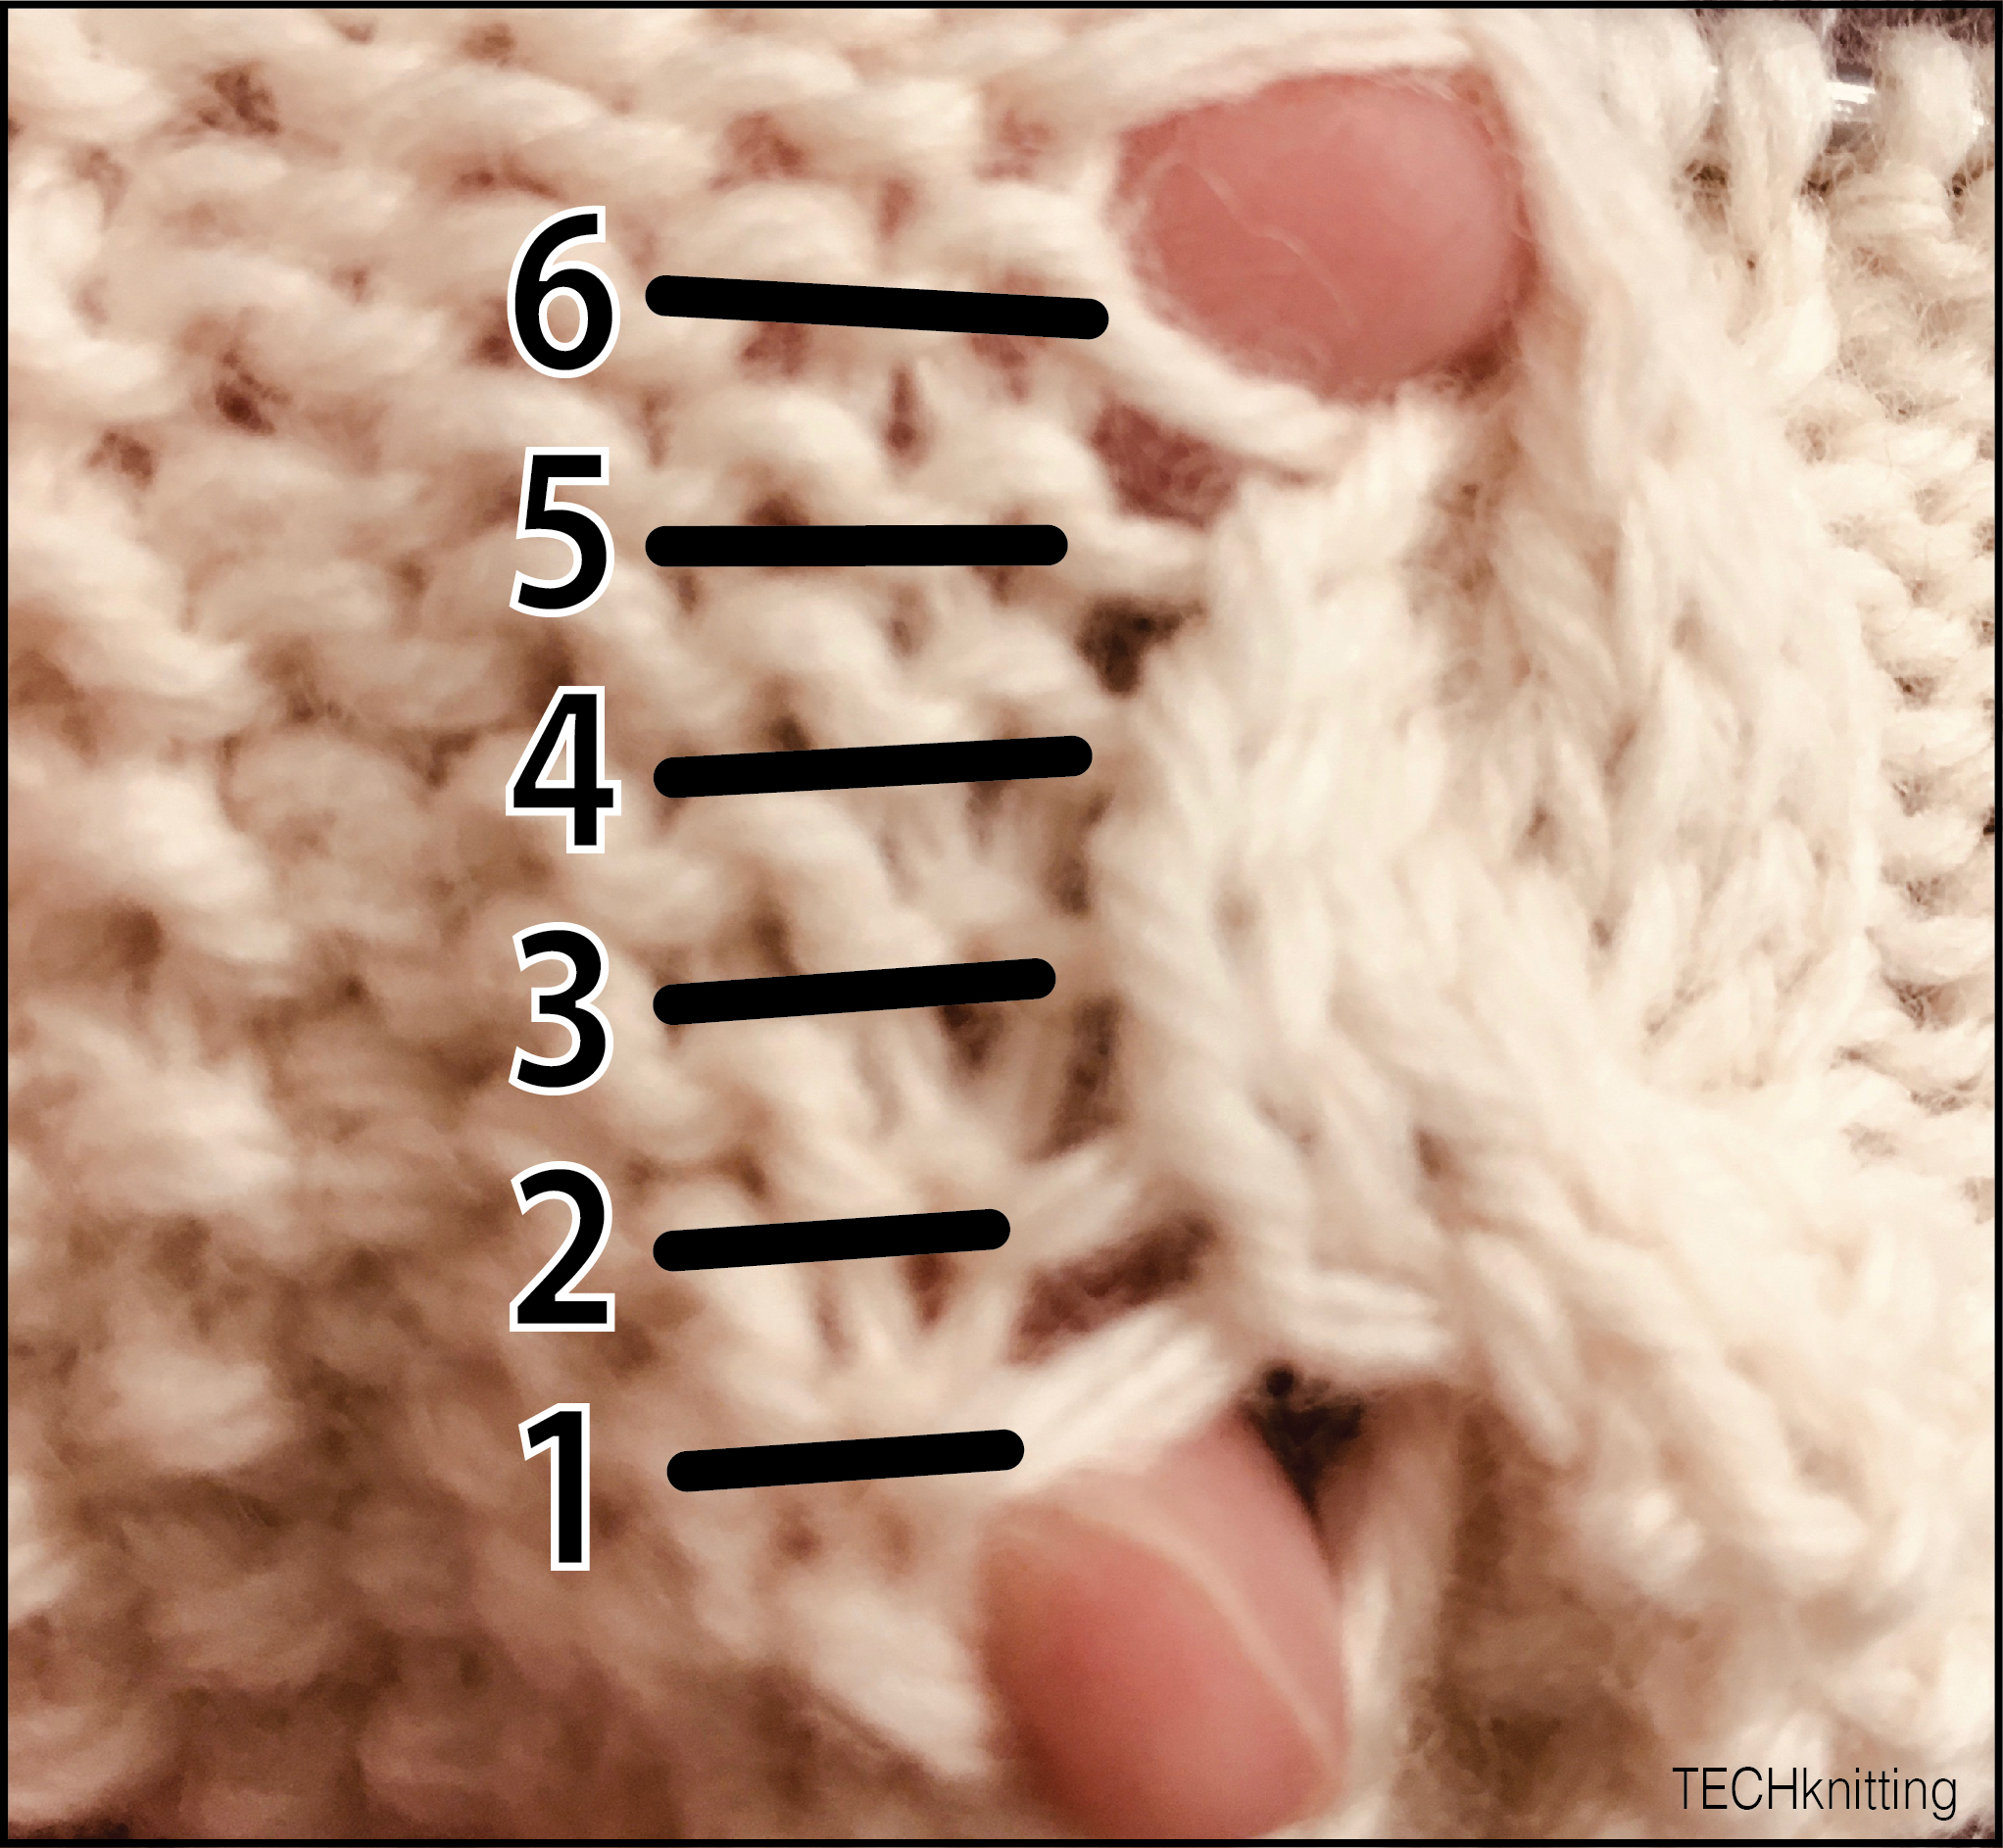 |
| Counting strands between holes to determine cable repeat (6 row repeat) |
Now comes the question of which one of six numbered cable rows is on your needle.
And here comes the explanation promised in the diagram caption. You see, the confusing thing about counting rows in cables is that the row on which you perform the cross is NOT the row in which the crossed stitches were laid down. It is (knitted) row ONE which makes the cross on (previously purled) row SIX.
Geek note: In fact, although we don't think about this very often, all knitting is like this. The stitches on the needles are blanks--they are neither knits nor purls--not yet, anyway. It is when we come through on the NEXT row that these "blanks" are transformed into a knit or a purl--or in this case--a cable cross.
- Draw a loop through a blank from from front to back and the blank becomes a purl in the row below.
- Draw a loop through a blank from back to front, and get a knit in the row below.
- Rearrange the blank stitches on your needle, and you perform a cable cross on blank stitches you laid down in the previous row.
If you want to explore more about blanks and knitting into them, there's a whole TECHknitting post which shows this effect in textured color knitting, where it is particularly easy to see. If you want to explore the idea that cable crosses are merely a rearrangement of previously plain-worked stitches, there's a whole TECHknitting post about that, too.
For row-counting purposes, the stitches you're rearranging (crossing) into a cable are the stitches you put onto the needles in the previous row. Row 6 is purled plain and it is (knitted) row 1 which does the crossing. And now you know why the cable in the diagram is labeled "the row below the cross:" the stitches of it were worked in the row below (row 6) and the cross made on the following row (row 1). |
| Count strands above last hole to determine what row you're on |
From the poking finger, you see there are three strands above the hole and below the knitting needle. In the photo, row 3 is on your needle,
From the diagram, you get a preview of the three rows to go before the cable cross:
- row 4--ordinary backside row (light green purl row)
- row 5--ordinary frontside row (light orange knit row)
- row 6--the ordinary backside row which will be twisted--bright green
Again, per the diagram, the twist itself will be worked on the knit row ABOVE the bright green twist, a row 1, colored DARKER ORANGE on the diagram.
After you straighten out the confusion of counting row-strands from the hole alongside the twist, there's one more hurdle.
See, if you're using a modern pattern, the pattern writer may not have numbered the rows as shown here. Often, the knit row which does the twisting is not called row 1, but is numbered somewhere in the middle of the cable row-repeat. This is done so that the cable column looks balanced by beginning and ending with a half-cable, instead of beginning and ending with a cable twist.
The old pattern writers used "partial repeats" to accomplish this centering, but newer patterns avoid partial repeats by simply "starting in the middle" of the cable. Therefore, in a modern pattern, the row which does the twist might be called row 5 or 6 or 3, rather than row 1, depending on the number of rows in the repeat, which row the author chose to be the half-way mark, and on which fabric face (knit face or purl face) the counting began.
Despite this kind of confusion, however, knowing that the twist is worked on the knit row ABOVE where the twist actually appears, you can figure out which row number to assign the row which does the twisting (cable cross), and thus, how many more rows remain to work before you get there.
And now you can pull out that cabled WIP which you lost the pattern to, and finish up! (But first pull out a few rows and start with fresh yarn from stitches which haven't been sitting on the needle for five years, or you'll get an obvious line--ask me how I know.)
* * *
Continuing onward with the cable theme, the next two posts will each show a different way of fixing a miscrossed cable. Stay tuned!
Til then, good knitting
--TK
* * *
Previous TECHknitting posts about cables:
- What is a cable, anyhow? (Cable crosses and how to knit them)
- Keeping track of cables, box and circle method, intro
- Tracking complex circles using box-and-circle. Part 2 of a series.