Sunday, July 4, 2010
Podcast Interview
Laura Neel aka (Math4knitters) who blogs for the Journal Gazette of Fort Wayne, Indiana, recently interviewed me for a podcast.
Tuesday, June 1, 2010
Tulips buttonhole: The video (and an interview on KD)
Interweave Knits has just produced a video featuring Eunny Jang, the IK editor, demonstrating TECHknitting's NEW buttonhole: the tulips buttonhole. The name came about because the buttonhole looks like "two lips" in stockinette.
The video is quite small here, but if you click on the lower right hand corner where it says "You tube," you will get a MUCH larger version--easier to follow, by far.
The video is also featured in a "Knitting Daily" interview with TECHknitter (that's me!) about how the Tulips buttonhole was invented.
The tulips buttonhole was originally featured in Summer 2010 Interweave Knits, "Beyond the Basics" column, which could be a handy reference to maybe keep with your knitting papers: it is a fully illustrated article, and shows the same steps as the video. The video is immensely useful, however, because the tulips buttonhole has a little change-up where the working yarn originally heads off in one direction, but is then unwound to head off in another direction: a bit difficult to show with illustrations, but beautifully demonstrated on Interweave Knit's video by Eunny Jang.
--TK
Related posts
Buttonhole series:
.Buttonholes in hand knitting, part 1: lore and tradition plus some nifty tricks
Other button and buttonhole posts:
Monday, May 17, 2010
We have a winner!
TECHknitting's "Poll with a Chance at a Prize" ended on May 15 at midnight. The winner of the Addi Clicks needle set (courtesy of Paradise Fibers) is Audrie who writes the "Purple Butterfly" blog.

Audrie also wins the $20.00 gift certificate to a yarn shop of her choice. Congratulations, Audrie!
However, even though Audrie won the physical prizes, the true winner is really TECHknitting blog, and the true prize is all of your thoughtful comments on what subjects interest you. Thank you all so much for taking the time to comment. I look forward to writing many posts based on your many excellent ideas.
Best, TK
PS: For those interested in methodology, the winner was selected randomly as follows: This blog is in a very old format, and it is not possible to add numbers to the comments. Therefore, the entire comments were cut-and-pasted into a Word document. Next, all comments were removed which were duplicates, and all comments were removed in which the commenter failed to leave a method of contact. This left a 138 page document. Word generates an automatic word count--for all the comments which were eligible for the drawing, there was a total of 34,010 words. Next, I went to Random.org and obtained a random number between 1 and 34,010. That number was 28532. The word corresponding to that number was found in Audrie's post, and that's how she was randomly selected as the winner. Congrats to Audrie, and thanks again to all who commented.
Friday, May 7, 2010
Body shapes and attributes--designing and fitting knitwear, part 2
In the previous post,  TECHknitting laid out some background considerations in designing and fitting knitwear. Today, we turn to the the most basic underlying consideration: what are the shape attributes of the body attempted to be fit?
 The tubular body shape (also called "rectangular") is the one that many children have: the chest, waist and hip measurements are substantially the same. Children are not the only ones with this shape, however. People of all ages and builds can also be described as "tubular" or "rectangular" if their three torso measurements are essentially the same, which means that the tubular figure can vary from the very slim to the compact and muscular. Limb shape (especially in children) is often correlated with the tubular shape: the arms and legs are often "straight," by which is meant that the fore-arms vs. upper arms do not vary greatly in diameter, nor do the calves vs. thighs. In other words, with the tubular shape, not only is the torso tubular, but often, the limbs are too.
 If the hip measurement is the largest, while the waist and chest/bust are smaller than the hip, but fairly close in size to one another, the shape is called the "upward cone." This shape is one many girls pass through: among their first body changes are a widening of the hips. When this widening precedes the bust development, or if developed bust is slim, this shape results. Many slim women, such as fashion models also fall into this category, although it's hard to tell because models are rarely photographed standing straight, arms at sides, legs together, directly facing the camera.
 Many people, and especially many women, have their largest measurement at the hip line. If this is accompanied by most of the weight being carried below the waist, this shape is called the "pear shape." The pear differs from the upward cone because the waist-bust differential is higher --bust relatively larger than with upward cone, and usually a substantial fraction of the hip measurement.
 The apple shape is fairly ubiquitous: found in men and women as well as some children. In men or children, this shape is expressed with a larger measurement at waist than at chest or hip. In women, the waist or the bust may be the larger measurement, but the smaller is generally a very substantial fraction of the larger. In apples, the weight is distributed more-or-less evenly around the waistline.
 Some women have an hourglass shape, in which the smaller of the bust and hip is a substantial fraction of the larger, while the waist is notably smaller than either. This shape was once considered so desirable that to achieve it, women rearranged their internal organs with corsets or even went so far as to have ribs surgically removed. Today, those not born to this shape, but seeking to reproduce it in their own figures generally enlarge (or appear to enlarge) the bust, rather than narrowing the waist. At its most extreme, this shape was called "wasp-waisted"for obvious reasons. Although current men's fashions are not associated with this pinched-waist shape, it has been popular in the past and is evidently technically possible for at least some men to achieve.
 With this shape, the largest of the three torso measurements is the chest or bust. The waist and hip are smaller than the chest, sometimes substantially so, with waist and hip very close in size to one another. Athletes are often of this shape, for example, swimmers, ballet dancers, weight lifters. The cone generally starts at the shoulder, which is another way of saying that wide, broad shoulders are often associated with the downward-cone shape.
The upshot is that frame differences most often accentuate one of the basic shapes: a super-pear, for example, or a super-cone.
An ankle-wrist discrepancy is the most common diagnostic tool, but there are others: because frame differences are actually fairly common, ready-to-wear clothiers have taken this into account. Many suits for men and women can now be bought as separates, as can two-piece bathing suits for women.If you've been availing yourself of this option, then you probably already know that you have a frame-difference.
 A common variable in fitting knitwear relates to the length of the waist. A long-waisted figure features a long stretch of torso of the same diameter, stretching from just below the bust, down to where the hips flare. In a short-waisted figure, the narrowest part of the torso may be only an inch or two long, as the hip flare begins closer to the bottom of the bustline. A long-waisted person might technically have the same bust/waist/hip measurements as a short-waisted person, but, because the waist is not the same length, a style suitable to one might not suit the other. Generally speaking, long waisted people are tall, while short-waited people are short, but this is not always the case--there are tall people who are short-waisted, although the reverse (a long-waisted short person) is rare, there being little height for a long stretch of waist.
 As a result of aging or birth condition or injury, some people have a stoop in their backs. A pronounced stoop may make the back actually longer than the front. As a result of pregnancy or a prominent "beer belly" some people may have a significant curve in the abdomen. A significant abdomen-curve may make the front actually longer than the back. These attributes are usually superimposed on one of the above shapes: a pear-shaped person who is pregnant, for example, or an older person of tubular shape with a stoop.
 In illustration above, we have a "square" set of shoulders of "normal" posture. As seen from the back, the shoulders describe a rectangle with a rise towards the neck--if you've knit a sweater in pieces or home-sewn a garment, you'll recognize that rising rectangle as the shape of the top of the garment back. Because these shoulders are essentially rectangular, this shape is called a "square" shoulder.
Seen from the side, the shoulder does not tilt, by which is meant that shoulder is held neither forward nor back, but in a neutral position between these two. One common way to see shoulder alignment is to examine the tilt of the chin: if the chin points slightly down, the shoulder is most probably in this neutral position.
The neutral shoulder position paired with a "square" shoulder is the basis for much patternmaking, and that's why it's considered "normal." In fact, if you see someone whose shoulders actually look like this, you'd probably say to yourself "my, that person stands straight." In other words, even though this is the standard shoulder assumption for patternmaking, it isn't necessarily the way many people stand, so the "normal square shoulder" may very well be the exception rather than the rule.
b. Round shoulders due to posture.
 There are two types of "round" shoulders. The first stems from posture. Illustration b actually shows the identical person as illustration a, but in illustration b, this person is standing slumped over, shoulders forward, chin pointing up. The measurements and shape of the body obviously hasn't changed between illustrations a and b, but the posture makes the body look very different.
Posture is important to design and fit: clothes that show off the bust would be a mismatch to a person who habitually stands so that the bust is hardly visible. In other words, although these two shapes are identical, and have the identical measurments, posture makes a vast deal of difference in fitting and pattern selection or design.
c. Round shoulders not due to posture.
 The second kind of round shoulders are shoulders which, although held in the neutral position, appears round from the back. In other words, this kind of round shoulder is not a function of posture. This sort of rounded shoulder is common in men and women, especially of the apple type shape; also women of the hourglass shape. However, it can appear with any of the basic shapes.
d. Triangle shoulders.
 When the body has a thick wedge of muscle over the collarbone, this raises the top of the shoulder rectangle so high that the upward rise becomes a triangle. Such heavy muculature is often accompanied by shoulders being held in the back position (the classic "shoulders back, chest out!" posture so beloved of gym teachers) and so that the chin usually points out straight, rather than up (as with slumping) or down (shoulders held in the neutral position). The figure is illustrated with arms crossed because this is a typical posture adopted to counterbalance the weight often put on the heels by the backward shoulder slant.
e. Shoulder width.
 Shoulder width is a very important consideration in choosing a sweater style. Many body types are highly correlated with shoulder size (downward-cone, for example, often has wide shoulders) but sometimes shoulder width is an independent variable (one which can pop up with any body shape). If your shoulders are unusually broad or narrow for your torso measurements, you probably know that about yourself by now, because ready-to-wear garments do not fit properly in the shoulder area.
It is my opinion that shoulder width, shape and posture and the related choice of shoulder styles in sweaters is among the most important make-or break aspects of fit, as important, or even more important that figure shape.
 TECHknitting laid out some background considerations in designing and fitting knitwear. Today, we turn to the the most basic underlying consideration: what are the shape attributes of the body attempted to be fit?
Bodies come in all types and shapes. A quick walk through a crowd reveals tiny sausage-shaped humans in one glance, while the next glance reveals humans of such heroic height or girth that the ancients would have worshiped them as gods.
Yet, despite the continuum underlying human shape and size, we're not going to get very far in the matter of designing or fitting knitwear unless we have some categories in our minds--unless we roughly group body types and attributes into a sort of shape-vocabulary.
If you search the internet for the term "body types," you will get lots of different classification systems. The one here is a sort of a hodgepodge of lots of different systems-a hodgepodge which may not pass muster with biomechanics or anatomists, but which experience shows has been useful in fitting knitting or sewing (or even just buying clothes!)
The chest or bust is measured at its widest point, often (but not always) at the nipple line. Likewise, the hip is measured at its widest point, and that point is often well below where the hip socket of your skeleton is. In other words, "hip measurement" is a polite euphemism for the diameter of your lower torso around the largest part of your rear end (buttocks). The waist is measured at the smallest point, often (but not always) very near the top of the belly-button (umbilicus). This waist measurement is often referred to as "natural waist," and this is to distinguish it from the "waist measurement" of a garment which starts (sweater bottom) or ends (pants top) or sits (dress waist) somewhere between your bust/chest and your hips, at a spot which fashion dictates, and which may or may not be your "natural waist."
These three torso measurements are really in the nature of raw data: surprisingly, measurements directly from the body aren't actually all-that-useful for constructing clothing, and this is because of the overlapping concepts of ease and fashion. The reason to take your body measurements, therefore, is not to determine what size garment you ought to next knit, but because the measurements are useful for determining your "shape." Your shape, in turn, has a lot to say about what items of clothing you will find well-fitting and attractive.
Torso shape is a limited metric, of course: bodies have so many more aspects than these basic three measurements. So, after we look at shape, we'll turn to some variables which occur across every shape, such as posture, shoulder build, waist length and the like.
SHAPES
When "shape" is mentioned with regard to fitting clothes, what is most often meant is torso shape: the shape of the body from chest to hip. This is particularly true for hand-knits, as hand-knit pants are almost never made, and hand-knit skirts rarely. The torso shape is traditionally described by its measurements at three points: The chest/bust, the waist and the hip.The chest or bust is measured at its widest point, often (but not always) at the nipple line. Likewise, the hip is measured at its widest point, and that point is often well below where the hip socket of your skeleton is. In other words, "hip measurement" is a polite euphemism for the diameter of your lower torso around the largest part of your rear end (buttocks). The waist is measured at the smallest point, often (but not always) very near the top of the belly-button (umbilicus). This waist measurement is often referred to as "natural waist," and this is to distinguish it from the "waist measurement" of a garment which starts (sweater bottom) or ends (pants top) or sits (dress waist) somewhere between your bust/chest and your hips, at a spot which fashion dictates, and which may or may not be your "natural waist."
These three torso measurements are really in the nature of raw data: surprisingly, measurements directly from the body aren't actually all-that-useful for constructing clothing, and this is because of the overlapping concepts of ease and fashion. The reason to take your body measurements, therefore, is not to determine what size garment you ought to next knit, but because the measurements are useful for determining your "shape." Your shape, in turn, has a lot to say about what items of clothing you will find well-fitting and attractive.
Torso shape is a limited metric, of course: bodies have so many more aspects than these basic three measurements. So, after we look at shape, we'll turn to some variables which occur across every shape, such as posture, shoulder build, waist length and the like.
Tubular
 The tubular body shape (also called "rectangular") is the one that many children have: the chest, waist and hip measurements are substantially the same. Children are not the only ones with this shape, however. People of all ages and builds can also be described as "tubular" or "rectangular" if their three torso measurements are essentially the same, which means that the tubular figure can vary from the very slim to the compact and muscular. Limb shape (especially in children) is often correlated with the tubular shape: the arms and legs are often "straight," by which is meant that the fore-arms vs. upper arms do not vary greatly in diameter, nor do the calves vs. thighs. In other words, with the tubular shape, not only is the torso tubular, but often, the limbs are too.
 Upward-cone
 If the hip measurement is the largest, while the waist and chest/bust are smaller than the hip, but fairly close in size to one another, the shape is called the "upward cone." This shape is one many girls pass through: among their first body changes are a widening of the hips. When this widening precedes the bust development, or if developed bust is slim, this shape results. Many slim women, such as fashion models also fall into this category, although it's hard to tell because models are rarely photographed standing straight, arms at sides, legs together, directly facing the camera.
Another group often found in the upward-cones are lower-body athletes of both genders. A speed skater, bicycle racer or cross-country skier may have such strong legs and well-developed hip muscles that the upper body, by comparison, is narrower in the waist and the chest/bust.
Pear
 Many people, and especially many women, have their largest measurement at the hip line. If this is accompanied by most of the weight being carried below the waist, this shape is called the "pear shape." The pear differs from the upward cone because the waist-bust differential is higher --bust relatively larger than with upward cone, and usually a substantial fraction of the hip measurement.
Apple
 The apple shape is fairly ubiquitous: found in men and women as well as some children. In men or children, this shape is expressed with a larger measurement at waist than at chest or hip. In women, the waist or the bust may be the larger measurement, but the smaller is generally a very substantial fraction of the larger. In apples, the weight is distributed more-or-less evenly around the waistline.
Hourglass
 Some women have an hourglass shape, in which the smaller of the bust and hip is a substantial fraction of the larger, while the waist is notably smaller than either. This shape was once considered so desirable that to achieve it, women rearranged their internal organs with corsets or even went so far as to have ribs surgically removed. Today, those not born to this shape, but seeking to reproduce it in their own figures generally enlarge (or appear to enlarge) the bust, rather than narrowing the waist. At its most extreme, this shape was called "wasp-waisted"for obvious reasons. Although current men's fashions are not associated with this pinched-waist shape, it has been popular in the past and is evidently technically possible for at least some men to achieve.
Downward-cone
 With this shape, the largest of the three torso measurements is the chest or bust. The waist and hip are smaller than the chest, sometimes substantially so, with waist and hip very close in size to one another. Athletes are often of this shape, for example, swimmers, ballet dancers, weight lifters. The cone generally starts at the shoulder, which is another way of saying that wide, broad shoulders are often associated with the downward-cone shape.
Combination shapes: frame (build) differences within one person
Any of the basic shapes can be of any build: a pear can have a thin frame or a heavy one, for example. The thin-framed pear will have less overall girth than the heavy-framed one, and weigh less, but both have the same RELATIVE measurements--larger in the hip than elsewhere, bust a significant fraction of hip size, waist smaller. However, it is not uncommon to see a combination shape where the build of the frame differs above and below the waist. This is called a "frame-difference" and is generally diagnosed by comparing wrist and ankle measurements.Why measure wrist and ankle? Well, your "frame" (skeleton) may not be internally consistent. The frame is easiest to measure where it comes closest to the skin, and this means the wrist and the ankle. Obviously, the wrist will always be thinner than the ankle, but when a relatively thin ankle is paired with a relatively thick wrist, this generally translates to a slim leg and hip paired with a heavier build in the upper body. The shape of a person built heavier above the waist than below tends to shade off into the downward-facing cone, and truthfully, the two shapes do not differ much, except that the transition between the chest/bust and the hip is more abrupt when a frame difference exists.
The reverse can also occur: a thicker ankle might be paired with a thinner wrist, and this generally translates to a relatively heavier leg and hip paired with a slim upper body shape. This shape is similar to the upward facing cone, or the pear shape, the main distinction, again, being a more abrupt transition at the waist.
An ankle-wrist discrepancy is the most common diagnostic tool, but there are others: because frame differences are actually fairly common, ready-to-wear clothiers have taken this into account. Many suits for men and women can now be bought as separates, as can two-piece bathing suits for women.If you've been availing yourself of this option, then you probably already know that you have a frame-difference.
ATTRIBUTES REGARDLESS OF SHAPE
So far, we've looked at some basic shapes: tubular, the two cones, pears, apples, hourglasses, as well as combo shapes. Now we're going to look at some physical attributes which can occur in ANY shape, and these attributes are often as important to fit as the shape itself.Long-waisted and short-waisted
 A common variable in fitting knitwear relates to the length of the waist. A long-waisted figure features a long stretch of torso of the same diameter, stretching from just below the bust, down to where the hips flare. In a short-waisted figure, the narrowest part of the torso may be only an inch or two long, as the hip flare begins closer to the bottom of the bustline. A long-waisted person might technically have the same bust/waist/hip measurements as a short-waisted person, but, because the waist is not the same length, a style suitable to one might not suit the other. Generally speaking, long waisted people are tall, while short-waited people are short, but this is not always the case--there are tall people who are short-waisted, although the reverse (a long-waisted short person) is rare, there being little height for a long stretch of waist.
 Back/Front differentials
 As a result of aging or birth condition or injury, some people have a stoop in their backs. A pronounced stoop may make the back actually longer than the front. As a result of pregnancy or a prominent "beer belly" some people may have a significant curve in the abdomen. A significant abdomen-curve may make the front actually longer than the back. These attributes are usually superimposed on one of the above shapes: a pear-shaped person who is pregnant, for example, or an older person of tubular shape with a stoop.
Shoulders: shape and posture
"Normal square shoulders" In illustration above, we have a "square" set of shoulders of "normal" posture. As seen from the back, the shoulders describe a rectangle with a rise towards the neck--if you've knit a sweater in pieces or home-sewn a garment, you'll recognize that rising rectangle as the shape of the top of the garment back. Because these shoulders are essentially rectangular, this shape is called a "square" shoulder.
Seen from the side, the shoulder does not tilt, by which is meant that shoulder is held neither forward nor back, but in a neutral position between these two. One common way to see shoulder alignment is to examine the tilt of the chin: if the chin points slightly down, the shoulder is most probably in this neutral position.
The neutral shoulder position paired with a "square" shoulder is the basis for much patternmaking, and that's why it's considered "normal." In fact, if you see someone whose shoulders actually look like this, you'd probably say to yourself "my, that person stands straight." In other words, even though this is the standard shoulder assumption for patternmaking, it isn't necessarily the way many people stand, so the "normal square shoulder" may very well be the exception rather than the rule.
b. Round shoulders due to posture.
 There are two types of "round" shoulders. The first stems from posture. Illustration b actually shows the identical person as illustration a, but in illustration b, this person is standing slumped over, shoulders forward, chin pointing up. The measurements and shape of the body obviously hasn't changed between illustrations a and b, but the posture makes the body look very different.
Posture is important to design and fit: clothes that show off the bust would be a mismatch to a person who habitually stands so that the bust is hardly visible. In other words, although these two shapes are identical, and have the identical measurments, posture makes a vast deal of difference in fitting and pattern selection or design.
c. Round shoulders not due to posture.
 The second kind of round shoulders are shoulders which, although held in the neutral position, appears round from the back. In other words, this kind of round shoulder is not a function of posture. This sort of rounded shoulder is common in men and women, especially of the apple type shape; also women of the hourglass shape. However, it can appear with any of the basic shapes.
d. Triangle shoulders.
 When the body has a thick wedge of muscle over the collarbone, this raises the top of the shoulder rectangle so high that the upward rise becomes a triangle. Such heavy muculature is often accompanied by shoulders being held in the back position (the classic "shoulders back, chest out!" posture so beloved of gym teachers) and so that the chin usually points out straight, rather than up (as with slumping) or down (shoulders held in the neutral position). The figure is illustrated with arms crossed because this is a typical posture adopted to counterbalance the weight often put on the heels by the backward shoulder slant.
e. Shoulder width.
 Shoulder width is a very important consideration in choosing a sweater style. Many body types are highly correlated with shoulder size (downward-cone, for example, often has wide shoulders) but sometimes shoulder width is an independent variable (one which can pop up with any body shape). If your shoulders are unusually broad or narrow for your torso measurements, you probably know that about yourself by now, because ready-to-wear garments do not fit properly in the shoulder area.
It is my opinion that shoulder width, shape and posture and the related choice of shoulder styles in sweaters is among the most important make-or break aspects of fit, as important, or even more important that figure shape.
Temporary shapes and situations
Pregnant women are a common temporary shape, as are folks whose shape has been altered due to a medical intervention--a broken limb in a cast, or a breast removed surgically, for example. Folks suffering hairlessness from chemotherapy are also in this category--losing hair alters the shape of the head. Knit garments really shine in these situations being both stretchy and capable of being custom-fitted.
Continuum
If we drew a scattergraph of human shape distribution, there would be clumps of dots around each of the body shapes described above. But there would also be lots of dots not near these shapes. In other words, lots of people don't match these descriptions, and lots of these shapes shade off into one another.
For example, even the hourglass-that most distinctive of shapes--can shade off into other shapes. A short-waisted hourglass, especially when paired with rounded shoulders, looks an awful lot like an apple, the narrow waist being hidden by the bust above and the hip below.
For another example: is the figure drawn below a pear? An hourglass? Long-waisted, or short-? Upward-cone? Downward-cone? Maybe even wide-shouldered tubular? It would take some careful work with the tape measure to answer that question. These examples show the limitation of the shape-classification.
 Of course, the closer is your dot on the graph to the pure type of any of these shapes, the more useful you will find the system, but the point really isn't to pigeonhole every person, nor could it be. Really, this is only a sort of a basic shape-vocabulary to make talking about fitting knitwear easier.
Knitting and fitting
The wonderful thing about knitting is that any shape at all can be accommodated very readily, and a good deal of this flexibility comes from knitting's stretchy nature. However, it is not necessary to rely only on stretch. Knit garments come in many traditional shapes and new shapes are being invented all the time.
Future topics in this series will lay out some of the different shapes knitted garments generally come in, and consider which garment shapes might be most advantageously paired with which body shape and features.
'til next time (and it might be a serious while... lots of non-knitting type things to do!)
TK
PS: Grumperina notes in the comments a very similar series now ongoing on a different knitting blog called "Stash, Knit, Repeat." The other series is illustrated with photos, so if you find photos handier or easier to understand than drawings, head on over and check it out.
Designing and fitting knitwear: some background considerations
TECHknitting is running a poll, asking you, dear readers, what subjects you would like to hear more about (not too late to leave a comment! fabulous prizes!) Quite a few comments touch on the mega-topic of designing knitwear, and the related issue of making garments which fit.

Frankly, without so many comments, I could never have summoned the gall to tackle so vast a subject. Yet the level of frustration and curiosity about this topic evidently runs high. So, with a big gulp, TECHknitting blog is heading into a series about designing knitwear/knitting garments which fit.
Today: some background considerations. Future posts will go into further detail. The series will end by laying out some resources and tricks to refine the process.
The complexity at the heart of knitwear design: textile creation meets patternmaking
There are formal courses available in designing knitwear, a subject at the intersection of textile design and patternmaking If you click through to any of the links in the foregoing sentence, you will see that these formal courses involve a 2- or 4-year undergraduate degree, complete with thick textbooks of mind-numbing complexity such as "Apparel Product Development," "Complete Guide to Size specification and Technical Design," and "Design and Patternmaking for Stretch Fabrics."

The reason for all this complexity is not far to seek: a successful knit garment requires:
- that a fabric be created (out of string!!)
- which is attractive in itself (textures? colors?)
- which is successfully garment-shaped (all the requisite parts: arms, front, back, all fitting together smoothly)
- which fits in the desired manner (shoulder style suits the body, neck line reveals or covers what is wanted and no more, arms of correct length and diameter, length correct to reveal or cover desired assets, front style as desired: cardigan, placket, pullover)
- that the fabric created suit the garment being made, and
- the whole must be infused with a certain style (cool? warm? high fashion? traditional peasant wear? form-fitting? Channel?)
When we add that the garment should be hand-knit, we up the already-complex equation by another order of magnitude. The fabric created from string is not going to be created by an infallible machine, featuring uniform stitches created by needles immovably set a fixed distance apart. No!
When we hand knit, we now add the requirement that the fabric be created stitch by stitch, with a pair of sticks! Aaaaand ... these sticks are going to be held by a human being--a person who, over the course of the knitting will cycle through the entire human range--relaxed, angry, tired, enthusiastic, distracted, neglectful and passionate. Not to mention, that the garment being knit must be customized to fit one person. And finally, the whole effort is a one-time shot: this garment must work right the first time, no do-overs are planned. Translated into technical terms, all this means that the fabric, size and style must be of such a nature as to allow for significant variation, yet result in a successful garment.
In sum, the complexity at the heart of hand knitting is that we are not only making fabric by hand with all the variability that entails, but, at the same time, we are making a garment. So we have to consider not only the fabric itself (color, texture) but at the very same time, we have also to consider the garment shape and all the baggage that goes with that (fit, fashion, function). And of course, the fabric and garment shape must complement one another.
Putting all this together is a pretty tall order, no? (And an especially tall order to consider over the course of a few posts in a on-line knitting blog!) Nevertheless, we're going to take a shot at untangling some of this complexity: In this series we'll start at the beginning, by looking at some body types. We'll next name the different knit garment shapes and consider their pros and cons for each body type. We'll also consider the fundamentals of fabric creation and the balancing act between garment shaping and fabric creation. The series will wind up with a series of resources and tricks you can use to make knitwear which fits and flatters.
'til next time
--TK
Thursday, May 6, 2010
A computer interlude: how to search TECHknitting blog (or any other website)
TECHknitting is currently running a poll (with prizes!!) asking you, dear readers, to say what posts and subjects you might like to see in the future.
One comment coming through loud and clear is a measure of frustration at searching for posts on specific subjects.
There are several ways to search TECHknitting blog. One way is to make use of the several indexes in the right column ---->
However, there is a faster, easier way to search this, or any other blog or website: you can harness the power of the Google search engine to do the heavy lifting for you. Here's how in 5 easy steps.

1. (above) Go to the Google home page and enter the term you want to search. In this case, I've entered "TECHknitting," but this will work with any other website also. Click where it says "search."
2. (above) After you've gotten your search result, you will notice a little link which says "more results from blogspot.com." Click that link.

3. (above) when you click the "more results" link, the window will change and the Google search engine will fill in the search window for you with a "site:" prefix, followed by the site name, as shown.

4. (above) Add the text you want to search the site for. In this case, the search term entered is "stripes." As you will note, there was a colon typed before the search term. However, this is punctiliousness: it works equally well without typing the colon. After adding the search term, click "search" and Google will search the site (and only the site) for the term you've specified.
5. (above) After clicking, Google will open a new window filled with the search results. Every post on the searched site will show. In this example, all posts on TECHknitting blog about stripes have been found. You can now scroll and click to your final destination.
Admittedly, this is a blunt instrument for finding content on a particular site. However crude is is, though, it goes so fast that you can do a dozen site searches in the time it takes to scroll though a conventional index.
--TK
Monday, May 3, 2010
Upping the Ante
A few weeks ago, TECHknitting blog launched a post called: A poll with a chance at a prize. The poll asks you, dear readers, to indicate a subject you might like to see covered in a future TECHknitting post. As a "thank-you" for taking the time to comment, each commenter's name will be entered in a drawing for a prize. The original prize was to be a gift certificate for $20.00 to a yarn shop of your choice.

Now, Paradise Fibers has generously stepped in to up the ante: They have added an Addi Clicks interchangeable set to be part of the prize. Feast your eyes:
If you have already commented on the poll post, your name is automatically entered for this addition to the prize to be given away. If you have not yet commented, there is still time, the poll runs until May 15, 2010--the comments will be closed at midnight central (Chicago) time.
So, click on over the the Poll/Prize post and leave a comment, if you haven't already.
I am really enjoying reading everyone's comments, and storing up lots of new ideas for future posts. And, many thanks to Paradise Fibers for this generous addition to the prize.
The fine print:
1. One lucky commenter will have their name drawn for the $20 prize AND the Addi Clicks set (there will be only one prize: winner takes all).
2. The Addi Clicks set will be brand new, except that I will have opened it just to look and admire before it is sent it away to its lucky new owner. If you live outside of the USA, I will happily send you the set and the gift certificate, but customs duty (if any) will have to be your responsibility.
3. The winner will be chosen by random drawing, and posted publicly.
4. Please remember to leave a way to get in touch with you as part of your comment, if you want to qualify for the drawing.
5. All comments have to be left on the original post--the comments for this post are disabled, and only comments on the original post will be part of the drawing.
6. THANK YOU ALL VERY MUCH for considering what topics might interest you for the future. It will not be possible to cover all the ideas given, but what a gold mine of information to find out what subjects you would find interesting--I really appreciate it.
Good knitting! --TK
Friday, April 30, 2010
Buttonhole alternatives
If you have trouble knitting good-looking buttonholes, two main choices face you: You can improve your buttonholes, or you can find an alternative.
Today, we'll look at these alternatives.
TAILORING SERVICE: Although the neighborhood seamstress is an endangered species, machine-made buttonhole services are still available on-line and through many local yarn shops. A modern home sewing machine with buttonhole capability can work too, but try this out on a swatch before committing your precious sweater!
Upside: looks professional especially when paired with a grosgrain ribbon lining.
Downside: If sent out, it usually takes a while to get your sweaters returned , and this option can be expensive. Can be hair-raising to try this at home.
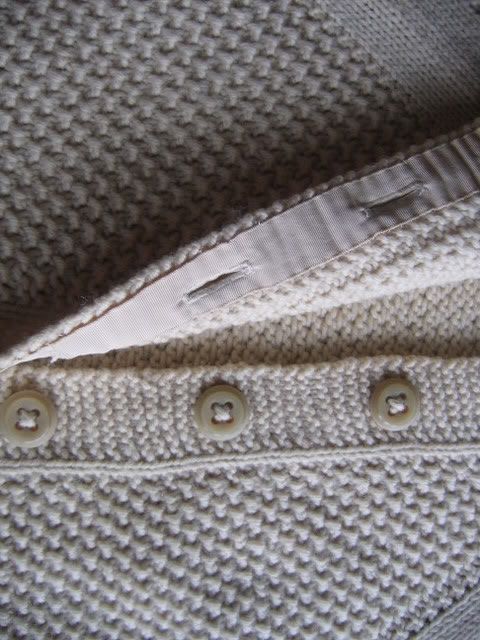
SNAPS. Many knitters want to try on the garment before deciding closure placement. One solution to accommodate this desire is snaps. After settling on placement, one half each snap is sewn into matching position on each front band. A decorative button can be sewn on over each top snap for a traditional look. Decoration buttons should not flop around, but should give the illusion they are buttoned through a button band, so use a button with holes (not a button with a shank!) and sew it on flat. Also, remember to sew decoration buttons onto the band which would ordinarily sport the buttonholes (men's: left; women’s: right) so that the sweater looks buttoned when snapped shut.
Upside: Looks good buttoned, allows you to defer closure placement until after the garment is finished and can be tried on
Downside: Doesn't look all that great when the garment is worn open: The half snap visible on the underneath button band may have that home-made look.
FROGS and CLASPS. Braid frogs (originally Oriental) and metal clasps (originally Scandinavian) are traditional non-button methods of holding garments shut. Both are widely available in many sizes and styles, both are sewn on at the end. These let you avoid buttonholes and can add a design element, also.


Upside: Like snaps, these allow you to defer placement decisions until after the garment is finished. These are easy to sew on. Both frogs and clasps add a decorative element. A plain sweater can be jazzed up to be quite unique by simply using these fasteners.
Downside: As the braid from which they are made stretches with wear, frogs begin to come open fairly easily. This requires sewing the loops smaller with secret tiny hidden sewing stitches. Although easy to sew on, it isn't always all that easy to sew an entire line of frogs on straight relative to one another.
As far as clasps go, these can be quite heavy, dragging down the front band of a sweater. Therefore, clasps work best when the sweater to which they are attached is knit firmly in a relatively heavy weight of yarn--DK and above, or when the clasp is small. Also, clasps can be expensive.
TOGGLES: These are like frogs, but feature a straight or curved button which fits through the loop, rather an a knot of braid as frogs have.
Upside: Like frogs and clasps, toggles are sewn on afterward, which lets you experiment with closure-placement after the garment is finished (i.e.: when you can try it on). Toggles have the potential to be an interesting design element.
Downside: Like frogs, you have to keep a close eye on your sewing to get all the toggles sewn on straight relative to one another on both bands. but more important, when the garment is worn open, the toggle swings loose, (annoying!) and may catch in things, especially the pointy horn-shaped toggles. Any kind of toggle is not so good for babies who may get the toggle in their mouths: a potential choking hazard.
SHAWL PINS. Originally used to keep elegant scarves and shawls together, these are increasingly used for sweaters, especially the swing-type held shut only at top. Great versatility is possible: in the evening, a bold jewelry-like pin can dress up the sweater which spent the day at the office looking demure under a plainer, smaller pin.
Upside: Beautiful, easy to use. Easy to change the look.
Downside: Works best on a sweater which can be worn with one (and only one) closure point--such as the top of a swing jacket, of the waist of a fitted sweater or jacket. On two-piece shawl pins--where the stick-like tang pokes through a shell (casing), but is otherwise not attached--the tang can fall out.
Good knitting! --TK
Related posts
Buttonhole series:
.Buttonholes in hand knitting, part 1: lore and tradition plus some nifty tricks
TAILORING SERVICE: Although the neighborhood seamstress is an endangered species, machine-made buttonhole services are still available on-line and through many local yarn shops. A modern home sewing machine with buttonhole capability can work too, but try this out on a swatch before committing your precious sweater!
Upside: looks professional especially when paired with a grosgrain ribbon lining.
Downside: If sent out, it usually takes a while to get your sweaters returned , and this option can be expensive. Can be hair-raising to try this at home.
SNAPS. Many knitters want to try on the garment before deciding closure placement. One solution to accommodate this desire is snaps. After settling on placement, one half each snap is sewn into matching position on each front band. A decorative button can be sewn on over each top snap for a traditional look. Decoration buttons should not flop around, but should give the illusion they are buttoned through a button band, so use a button with holes (not a button with a shank!) and sew it on flat. Also, remember to sew decoration buttons onto the band which would ordinarily sport the buttonholes (men's: left; women’s: right) so that the sweater looks buttoned when snapped shut.
Upside: Looks good buttoned, allows you to defer closure placement until after the garment is finished and can be tried on
Downside: Doesn't look all that great when the garment is worn open: The half snap visible on the underneath button band may have that home-made look.
FROGS and CLASPS. Braid frogs (originally Oriental) and metal clasps (originally Scandinavian) are traditional non-button methods of holding garments shut. Both are widely available in many sizes and styles, both are sewn on at the end. These let you avoid buttonholes and can add a design element, also.


Upside: Like snaps, these allow you to defer placement decisions until after the garment is finished. These are easy to sew on. Both frogs and clasps add a decorative element. A plain sweater can be jazzed up to be quite unique by simply using these fasteners.
Downside: As the braid from which they are made stretches with wear, frogs begin to come open fairly easily. This requires sewing the loops smaller with secret tiny hidden sewing stitches. Although easy to sew on, it isn't always all that easy to sew an entire line of frogs on straight relative to one another.
As far as clasps go, these can be quite heavy, dragging down the front band of a sweater. Therefore, clasps work best when the sweater to which they are attached is knit firmly in a relatively heavy weight of yarn--DK and above, or when the clasp is small. Also, clasps can be expensive.
TOGGLES: These are like frogs, but feature a straight or curved button which fits through the loop, rather an a knot of braid as frogs have.
Upside: Like frogs and clasps, toggles are sewn on afterward, which lets you experiment with closure-placement after the garment is finished (i.e.: when you can try it on). Toggles have the potential to be an interesting design element.
Downside: Like frogs, you have to keep a close eye on your sewing to get all the toggles sewn on straight relative to one another on both bands. but more important, when the garment is worn open, the toggle swings loose, (annoying!) and may catch in things, especially the pointy horn-shaped toggles. Any kind of toggle is not so good for babies who may get the toggle in their mouths: a potential choking hazard.
SHAWL PINS. Originally used to keep elegant scarves and shawls together, these are increasingly used for sweaters, especially the swing-type held shut only at top. Great versatility is possible: in the evening, a bold jewelry-like pin can dress up the sweater which spent the day at the office looking demure under a plainer, smaller pin.
Upside: Beautiful, easy to use. Easy to change the look.
Downside: Works best on a sweater which can be worn with one (and only one) closure point--such as the top of a swing jacket, of the waist of a fitted sweater or jacket. On two-piece shawl pins--where the stick-like tang pokes through a shell (casing), but is otherwise not attached--the tang can fall out.
Good knitting! --TK
Related posts
Buttonhole series:
.Buttonholes in hand knitting, part 1: lore and tradition plus some nifty tricks
Other button and buttonhole posts:
Friday, April 23, 2010
New information on buttonholes
Addendum, June 1, 2010: There is now a VIDEO about the new Tulips buttonhole--click here!
In the upcoming release of Interweave Knits, summer 2010, among the wonderful new designs and terrific articles, there is an article about buttonholes by TECHknitter (that's me!). Some older buttonholes will be reviewed and updated. Also, there will be some information about how to properly sew on a button and about buttonhole placement. But the most exciting thing (for me, anyway!) is that a new buttonhole technique will be revealed which I've been working on for years and years.
 Truthfully, after finally figuring out all the parts, it was not clear to me how it could be explained or illustrated, and I was ready to give up on ever bringing it to public attention. However, Eunny Jang, the editor of Interweave Knits, insisted on having a buttonhole article, and would not take "no" for an answer. Under her pressure, I kept plugging away at different methods of explaining it, and finally hit upon one. So, thanks to Eunny and her insistence, this new buttonhole is waiting to meet you all in the summer 2010 Interweave Knits.
 One year after this article comes out in Interweave Knits, the copyright reverts to TECHknitting blog, so watch this space in about a year for the complete illustrated details on-line. In the meanwhile, check out the print version, at your local bookstore or supermarket, or in your public library.
I hope you will like this new article and will try the new buttonhole.
Good knitting --TK
One year after this article comes out in Interweave Knits, the copyright reverts to TECHknitting blog, so watch this space in about a year for the complete illustrated details on-line. In the meanwhile, check out the print version, at your local bookstore or supermarket, or in your public library.
I hope you will like this new article and will try the new buttonhole.
Good knitting --TK
 Truthfully, after finally figuring out all the parts, it was not clear to me how it could be explained or illustrated, and I was ready to give up on ever bringing it to public attention. However, Eunny Jang, the editor of Interweave Knits, insisted on having a buttonhole article, and would not take "no" for an answer. Under her pressure, I kept plugging away at different methods of explaining it, and finally hit upon one. So, thanks to Eunny and her insistence, this new buttonhole is waiting to meet you all in the summer 2010 Interweave Knits.
 One year after this article comes out in Interweave Knits, the copyright reverts to TECHknitting blog, so watch this space in about a year for the complete illustrated details on-line. In the meanwhile, check out the print version, at your local bookstore or supermarket, or in your public library.
I hope you will like this new article and will try the new buttonhole.
Good knitting --TK
One year after this article comes out in Interweave Knits, the copyright reverts to TECHknitting blog, so watch this space in about a year for the complete illustrated details on-line. In the meanwhile, check out the print version, at your local bookstore or supermarket, or in your public library.
I hope you will like this new article and will try the new buttonhole.
Good knitting --TK PS: Don't forget, the Poll with a chance at a Prize is still running. Get your comments in by May 15 to qualify for a drawing of a prize--$20 gift certificate at the yarn shop of our choice.
Monday, April 19, 2010
Working in ends as you go along: same color or changing color
In this post are links to ten different methods (all illustrated) for working in ends, eight of which are as-you-go.
1. The Russian Join--this join is well-known as a simple method of joining two colors, but works just as well for same-color joins. An example of where you might want to work in two different colored ends is with stripes or with fair-isle methods. An example of same-color joining is where you run out of yarn and need to switch in a new ball of the same color. This join, like most the others on this page, not only secures the transition stitches, but also works the ends in as-you-go.
2. The back join is an improved Russian join--with the back join, it is possible to exactly choose the spot where the yarns will change--not the case with the Russian join. Another improvement is that the back join is WAY faster than the Russian join--no need to dig out a sewing needle! Like the Russian join, the back join is usually touted for changing smoothly from one color to another, but is also a nifty trick for same-color joins. Also like the Russian join, if you use the back join, there will be no ends to work in at the end--all you have to do is snip off the excess after blocking and you are done!
3. For same-color joins, there is also the overlap method. (scroll at link) This method is probably the very fastest of all. The overlap method will not work (or at least, will not work very well) for changing color, but for same-color joins, there is nothing simpler. With this method, and depending on the yarn used, it may be necessary to leave little tags (tails) on the inside where the yarn changed, but because the stitches are overlapped, these tags will never work free--the transition stitches will remain tight and good looking for the life of the garment. This method can be adapted for lace, also, without the tags.
4. Not to be confused with the overLAP method (above) we also have the overCAST method. For delicate work, or for thin yarn, this trick lets you work in the ends with no added bulk on the face of the fabric. Therefore, this method is to be preferred to the Russian- or the back-join when bulk is an issue: both of Russian- and the back-join add a bit of bulk to the fabric surface, which this overcast method does not. Like the Russian- and the back-join, with the overcast method, the ends are worked in as-you-go. You need only trim off the excess after blocking, and your fabric-finishing is complete.
5. Another great (if slightly icky) method for dealing with ends is the spit-splice, also called "felting ends" (scroll at link). This works best for same-color joins--for different color joins, you would have a length of yarn which had both colors at the same time. Felting ends is not so much a method for working-in ends--instead, felting actually eliminates the ends!
6. We also have two methods of working in ends using a sewing needle--an after-the-fact fix for loose ends. The first of these is the art of weaving in ends. With weaving, the end is worked into the fabric face along the same path as the underlying stitches--it is a species of duplicate stitch. A sub-set of weaving is how to weave ends in ribbing. Weaving is quite, quite secure, but it can add a little bulk on the fabric face, so if this is a concern, consider using the method below, instead.
7. The second method of working in ends with a sewing needle is the skimming-in method. This method is not quite as secure as the weaving-in method, but it avoids bulk on the fabric face, and so is better than the weaving-in method for thin yarns or delicate work. Both the weaving-in and the skimming-in method work with different color yarns OR same color.
8. A sub-set of the skimming-in method occurs when you are facing a very short tail--so short that you can't really thread the needle. For this problem, we knitters can adapt a classic dressmaker's tip for working in the too-short ends.
9. Another place where ends might be an issue is at the beginning of a circular knit. That tail hanging where the join occurs can work itself loose and get ugly. A trick for preventing this AND working the tail in at the join is the three-in-one TECHjoin. Further, the three-in-one TECHjoin also prevents the nasty "jog" where the first round meets the cast on.
10. We end with a quite-specialized trick for working in your ends on textured stripes. This trick shows how to make jogless stripes in textured fabric AND work in your ends-as-you-go. It's a nice time-saver for those who like to make stripy ribbed hats.
Good knitting! --TK
Subscribe to:
Posts
(
Atom
)