So far in this series, we've shortening ribbing knit bottom-up by
- removing the unwanted excess ribbing (which we're calling waste fabric) then
- catching the live loops, and then
- operating on the caught live loops to bind off a new bottom.
Part 1 shows shortening and binding off K1, P1 ribbing (also called 1/1) and part 2 shows shortening and binding off K2, P2 ribbing (2/2).
The bind off in both cases was done with an ordinary chain bind off--links here to the chain bind off on shortened K1, P1 ribbing, as well as shortened K2, P2 ribbing.
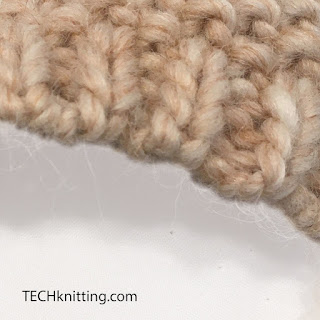
Today we'll step back one pace to just before that chain bind off. Here is what the situation looks like with the excess removed and the loops caught on the needle, but no bind off yet worked.
 |
1/1 ribbing with excess ribbing removed. (Recall that in the samples, I knit the excess fabric on purpose in two colors so it would be easy to see what was going on. Ordinarily, the excess [waste] fabric removed would have been knit in the same color as the rest of the ribbing.) |
 |
2/2 ribbing with excess [waste] ribbing removed |
See, chain bind off is sturdy and reasonably flexible, but it is not the only choice. There are other alternatives to bind off the caught loops or shortened ribbing, and that's today's post.
* * *
The two main categories of alternative edge treatments are these:
- Added edges. This works on 1/1 OR 2/2 ribbing. This class of tricks avoids chain bind-off by adding a different kind of edge. Because TECHknitting has posted about these various edges in the past, I'm not going to repeat all that here. Instead, I'm just putting in the links, and those links make part 1 of today's post.
- Self-edges. Ta da! This (new!) trick works only on 1/1 ribbing, but it works a treat. With this trick, the actual loops on the needles become a new bottom edge without adding any more yarn. Yes, strange as it may seem, it is possible to get a new non-raveling edge on your shortened ribbing working only with the loops you've caught on your needles in the shortening process--no extra yarn added.
Part 1: alternative bind off for 1/1 and 2/2 ribbing, three links
A. Curled edge
An easy alternative to chain bind off at the edge of the ribbing is to simply work a few rows or rounds of stockinette, and THEN bind off using the same chain bind off featured in the two previous posts of this series. Adding a few rows of stockinette before the chain bind off makes an edge which curls up and hides the chain bind off--a mysterious sort of curled up edging with no bind off visible. This "stockinette curl," is an undefeatable force of nature, the curl is permanent and will never flatten. Attractive in appearance, it looks a lot like an I-cord bind off.
Here are the instructions for this curled edge, and here are more illustrations of a curled edge on various fabrics.
B. Fake I-cord (FICBO)
Another alternative is FICBO--Fake I-cord Bind off. This trick IS actually worked on a chain bind off, but then MORE edging is added afterwards. Here are the FICBO instructions. There is also a link to a short video. The linked video shows FICBO on 2/2 ribbing. (Click & skip the ads as soon as you can! You-tube put those there, not me.)
C. (Real) I-cord bind off
The third alternative to binding off shortened ribbing is to work a real I-cord bind off. The linked post shows that alternative.
Which added edge where?
As between a curled edge and FICBO, the stockinette curl edge is stretchier and lighter. The FICBO and knit-on I-cord look more polished, but are heavier: great for a hat edge or a front band, FIBCO and I-cord may be too heavy for a bottom band. As ever, swatching is your friend.Part 2: Self-edge for shortened 1/1 ribbing--a new trick
When a K1, P1 ribbing is shortened by removing the excess rows from below the new bottom row, the new bottom row will not run out. As odd as this seems, it's true: the released bottom edge of 1/1 ribbing cannot and does not form ladders like ordinary stockinette fabric, and the edge simply will not run out.
So, hmmm....if these stitches are not able to run out into a ladder, is it possible to simply pull the needle out of the newly-caught loops of a shortened ribbing, or even not bother catching loops in the first place? Can you really leave the newly exposed bottom row alone, and NOT bind it off?
 |
| If you take the needle out of shortened 1/1 ribbing, the loops won't ladder out, but the resulting edge will ruffle and spread |
- First as noted above, this works only in 1/1 ribbing, and only if the ribbing is being shortened in the opposite direction to that in which it was knit. (The knitting-geek reason is because when you're working upside down in 1/1 ribbing, each column you pick up is technically composed of the tail connecting 1 knit arm and 1 purled arm. When each arm "points" a different way, the fabric is impossible to run out. With 2/2 (or higher) ribbing, the edge column of each rib is also half-and half, but the middle column of each rib is not. Instead, the middle columns are one knit arm + another knit arm (which equals one whole knit column) or 1 purl arm + another purl arm (which equals one whole purl column). As we know, knit columns and purl columns run out very well, so simply tightening a column like this does nothing to prevent running.)
- Second, the loops still have to be on the needle for this trick to be worked. If the loops have fallen off, it's unlikely you'll re-seat them prettily, so you'll have to get new loops by catching the stitches of the row above the fallen-off loops.
- Third, if there's a split stitch or a halo-snag anywhere along the run, the slack in the yarn can't be transferred from one loop to another. This trick works only in a smooth yarn, smoothly knit.
A "halo-snag" is when you're knitting a yarn with a halo, like mohair, and you knit through the "halo," or fluff of an already-made stitch while you're knitting. With fuzzing yarn like this, the error is usually to catch the running yarn not just under the loop of the stitch you're knitting into, but also to catch the yarn through the halo of that stitch, or sometimes through the halo of a neighboring stitch. If you're lucky, you can see where the halo-snag is located and cut loose the fluff of the halo without cutting into the underlying yarn, but generally the trick of pulling slack out of a snipped ribbing is harder to do with a halo'ed yarn.
With a split stitch, you could, theoretically, cut loose one or the other halves of the split, but this weakens the yarn. If the split is minor--one ply of a four ply yarn, for example, or a small fraction of a robust single-ply yarn like a lopi, you may choose to CAREFULLY cut the split loose, but if the split is major, your best bet is to re-target: move up a row, remove the row with the split and hope the new target row doesn't also have a split.
However, once you've gotten past these problems: once you have the 1/1 ribbing loops on your needle, and you've examined each and every loop to make sure it moves freely, here's how to pull out the slack and make a nifty self-edge along the bottom of the now-shortened ribbing.
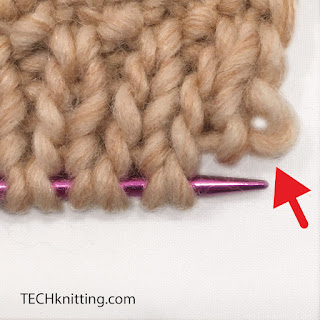
Step 1 (below): locate the lowest edge stitch which is FURTHEST from the tail. The red arrow shows this loop located and dropped off the needle, waiting to be operated upon.
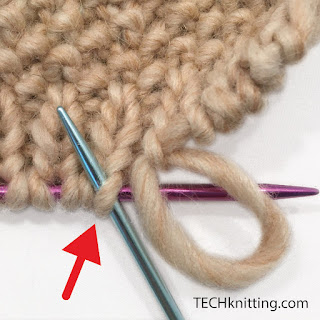
Step 2 (below): pull the loop of this stitch out until it becomes larger, as shown by the red arrow. How much to pull out is a matter of trial and error. You do not want the edge too tight, so when going up the learning curve, err on the side of too loose: you can always return and pull more slack out.

Step 3 (below): Switch to the next stitch (red arrow) then repeat pulling out the slack (blue needle).
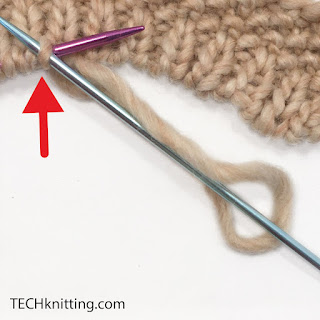
Step 4 (below): As you work your way leftwards along the stitches of the target row (red arrow) you can see that the loop of slack gets bigger and bigger, and the tightened edge begins to look mighty fine.
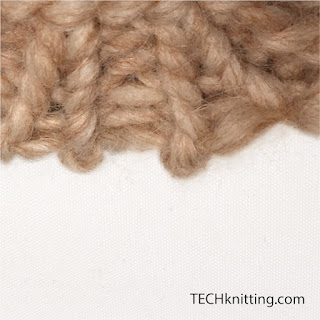
Step 5 (below): The final result--looks a lot like a tubular cast off, doesn't it? (And, although there is no "tube" has been made, this self-edge yarn does take a very similar path along the bottom edge as it would in a tubular cast off.)
--TK
--For the record: this situation in Ravelry's techniques forum (a knitter popped off ribbing without catching the stitches) is what inspired this series of posts.
__________________________________
--To shorten ordinary knitting (non-ribbed) check out this post:
Length reassignment surgery: lengthening and shortening knitwear
__________________________________