Friday, December 31, 2010

Curling scarf rescue mission--part four: lining the scarf

This TECHknitting series on curing curling stockinette scarves has looked at the problem, at solutions which don't work, and at two solutions which do work:  drop-columns and transforming stockinette into ribbing

poster child for stockinette curl
Today's poster child for curling is a multi-blue scarf.   Although you can't tell in its wound-up state, this scarf has two tapered ends and an applied edging.  Drop columns or forming ribbing would mean taking off, then reapplying the edging and unraveling, plus re-knitting one whole end--a LOT of work.  Further, with no excess yarn in stash, re-knitting and re-edging is a doubtful proposition: every inch of un-picked and unraveled yarn would have to be in perfect shape after unkinking for this scarf to come back together. Very risky!

Of course, this isn't the only sort of scarf which cannot be fabric-reworked.  Below are two other scarves-- a cheerful, beautifully-designed flower intarsia scarf and a lace scarf--which would be ruined by drop columns or ribbing. Luckily, however, all of these scarves have had their curl straightened by this post's solution: lining.

Stockinette curl cured with a polar fleece lining
LINING--materials
TECHknitting blog has already featured several tutorials for lining knitted garments--hats in headband style and in fully-lined style, mittens with side thumbs and front thumbs.  The lining recommended in those posts is polar fleece--a wonderful fabric which does not unravel when cut, so no hemming is required.  Also, polar fleece stretches--highly compatible with a stretchy fabric like knitting. However, polar fleece is not suitable to lace in style or elegance.  Therefore, this post also shows a lace scarf lined in silk.

LINING--how to
Here's how the multi-blue scarf was lined.  The first step was to steam-block the scarf.  This made it lay as flat as possible.  The scarf was then pinned to a big piece of cardboard to be measured--the pinning was necessary because measuring a scroll is impossible.  The lining material was cut a bit big, and then sewn in, turning a tiny bit of the fabric under as the sewing went along.  The work was done using ordinary polyester sewing thread and the overcast stitch. The fuzz on polar fleece rises up to hide the stitches, so if your sewing is not technically polished, no problem--the sewing is really truly invisible on the finished project. 

Unlike the little stitches illustrated in the post on overcast stitches, the stitches on the multi-blue scarf are rather large: one sewing stitch per each knitting stitch of the edging.  The thread was used doubled, and the needle was inserted between the yarn plies of the innermost line of edging stitches.  It would be possible to simply insert the thread under one arm of the knitting stitch, as well--whether to take the sewing needle through the plies of each knit stitch or under one whole strand of each knit stitch is a matter of personal preference.

The colorful and cheerful intarsia scarf shown below was knit by Sandra Woods, (Passionateknittr on Ravelry) and the photos are used by her permission. (Many thanks, Sandra!)

Intarsia scarf before lining--all rolled up

The before and after shows that lining was really the only option here.

Intarsia scarf after lining with polar fleece

Further, the lining on an intarsia scarf does more than simply cure the roll.  First, the floats on the back are hidden.  Second, the many ends can be securely fastened without having to make the back pretty. Finally, the bright red color of the polar fleece lining adds a strong design element.  A completely different effect would have been obtained, for example, by using a different color.  This opens design possibilities.  Matching scarves could be made for two sisters, say, of different temperament and personality.  Each scarf could be identical in the knitted work but quite different in finished effect via different colored linings.

Cotton lace lined with silk
The cotton lace scarf to the left was lined with silk.  Unlike polar fleece, silk is a woven fabric which must be hemmed after cutting and before being stitching in place on the scarf-back.  I hemmed the silk by hand, folding the edge under twice and backstitching the hem in place.  The hemmed silk lining was then overcast-stitched in place on the back of the cotton scarf, with the hem line on the inside, hidden forever against the purl face of the scarf being lined.  As you can see, this scarf was lined in a contrasting color--orange china silk on a fuchsia scarf. (Polyester lining or poly-silks work, too!) Thus, the lining not only cured the stubborn curl, but added an strong design element. Other views of this scarf can be seen here.  Addendum, 1-17-2011:  Lisascenic on Ravelry has kindly allowed me to link to her silk lined scarf, on which the lining was sewed differently--sewed over the edge of the knitting, which gives a very interesting look, too, almost like a knit-lined silk scarf!

Of course, linings are not restricted to hand-knit masterpieces such as intarsia or lace: they work very well in utility situations also.  On the last post, Fibercrafter-Sally left a comment about using a knitting machine to make simple stockinette scarves for charity.  Stockinette rectangles could be made on a knitting machine, then cured of their curl by being lined with polar fleece.  If the polar fleece lining were stretch-stitched on by sewing machine, these kind of machine-knitted scarves could be churned out by the dozen.  Some nice effects could obtained by the contrast between the yarn and the linings (and think of the matching lined flip-brim hats which could be made...)


Summary
The series started with three curly scarves, and ended with three flat scarves.
Before--three curly scarves


After--cured of their curl, hanging

After--cured of their curl--closeup


After--cured of their curl, laying flat showing front and back

With best regards for a happy and healthy new year--TK
* * *
This is part 4 of a four part series.  The other posts are:
Curling scarf rescue mission, part 1: the problem and the solutions which don't work
Curling scarf rescue mission, part 2: the drop-column method
Curling scarf rescue mission, part 3: transforming stockinette into ribbing

Thursday, December 23, 2010

Inserting no-sew zippers in knitwear--the video

Here is a link to an Interweave Knits video on a TECHknitting technique.  (The fully illustrated zipper installation article is here.)

As shown on the video, the trick to inserting no-sew zippers for knitwear is to use a "knitpicker," a tiny latch hook.


The video shows BOTH of the techniques illustrated in the above link, as well as the Winter 2010 Interweave Knits article on zippers.  Specifically, the chain method AND the live-loop method are demonstrated by Eunny Jang, the IK editor.  

Using these tricks, an item can be STARTED from the zipper edge--TECHknitting blog just featured a 3-part KAL of a little zippered purse started from the zipper edge.  Alternatively, the zipper can be added at the END of the project: once the zipper has been prepared by using the knitpicker either to make a chain OR to draw through live loops, the zipper becomes a knittable object--as easy to attach as seaming two pieces of knitting together, or attaching an I-cord edging to a sweater's button band.

I believe these tricks can make adding zippers to knitwear much easier than methods calling for sewing.  I hope you will enjoy the video tutorial of both of these new methods--chain as well as live loop. --TK

* * *

Addendum, December 26, 2010. 

Valsew on Ravelry offers this very clever trick for those of you who have sewing machines.  The idea is NOT to use the machine to sew with, but instead to use the sewing machine as a MARKING and PUNCHING tool along the edge of the zipper tape, as follows:
  • Why not use your sewing machine with a unthreaded topstitch needle for even hole spacing and prepunching, as well as a consistent distance from the edge of the zipper tape?  You may match your knitting gauge by sewing on a piece of plain paper (again with no thread in the needle) and adjusting the stitch length until it matches your gauge. 
Thanks, Val, for permission to re-print this valuable tip!

* * *
You have been reading TECHknitting blog on no-sew zippers, the video.

Tuesday, December 21, 2010

Curling scarf rescue mission--part three: transforming stockinette into ribbing

Here is today's problem: a tightly rolled stockinette dark blue scarf.

The previous post in this series showed how to transform a curling stockinette scarf like this one into a lacy and delicate drop-column fabric which lays flat.  However, this dark blue scarf is intended for a (not very fashion-forward) fellow--lace would not do in his particular case. Instead, this curling scarf was cured of its curl and transformed into a robust fabric, neutral enough to suit everyday fashion by all--a ribbed scarf.

The basic method begins just like the drop-column fabric of the last post: a ladder is dropped lengthwise down the scarf.  However,  instead of leaving the ladder in the fabric, we are now going to latch the ladder up again as a column of knits against a purl background.  Like the drop-column method, the ribbed scarf which results lays flat.  Unlike the drop-column fabric, the ribbed fabric is sturdy and can be worked in any fiber at all, from acrylic to merino to yak.

THE WHY
Stockinette curls because it is wider on the front (knit) side than on the (purl) back side. It therefore follows that if there were a more even number of knits and purls on BOTH sides of the fabric, the fabric wouldn't curl.   In fact, when you look at non-curling fabrics, you see this is the case: ribbing, garter stitch, welted fabrics, basket weave, seed stitch--it doesn't really matter in what arrangement the knits and purls are: as long as there are knits and purls on both sides of the fabric, the fabric won't curl.

Although many knitters may not realize, it has long been known that a 50-50 distribution of knits and purls is not necessary to break up the curl of a stockinette fabric. Many years ago, Meg Swanson (that knitting guru) introduced the "purl when you can" method for starting a color pattern right from the edge of a sweater. The idea is that working even a relatively few purls "when you can" operates to counteract curl. Applying this insight toward transforming a stockinette scarf into a ribbed one, it turns out that it is not necessary to have a 50-50 split of knits and purls on both sides of the fabric; luckily, because dropping and latching all those columns would be a lot of work. Experimentation has established that transforming every fourth column is sufficient to defeat the roll. Here is a closeup of the fabric front after the ribbing has been formed.

 Here is a comparison of the fabric front to the fabric back after the ribbing has been formed. 

THE HOW
 As stated above, the loose ladders are latched up using a crochet hook. The work proceeds from the back (purl) side starting with the loose stitch at the column bottom, and the ladder rungs are hooked up as a knit column against a purl background.

 You might find it easiest to hold the fabric folded in your hand, then latch up the loose ladder rungs which stick up at the fold by drawing each rung through the one below it.

As far as spacing of the columns, this is the same as for the drop column scarf--the three edge stitches are never touched to avoid tension issues, then every fourth column is dropped.  If your stitch count does not fit neatly into this system, no worries. The excess stitches are put between the scarf edges and the first dropped column where they will never show. If working out the column distribution gives you a headache, click over to this chart. which shows the best possible distribution of dropped columns across all stitch counts from 15 to 50.

Some other points: The idea for getting live stitches onto your needle, dropping the columns and binding off after reworking the fabric is identical to that for the dropped-column fabric. There are, however, three important differences in the work.

First, unlike the drop-fabric scarf,  the ribbing transformation of today's post does not require removing the cast on In other words, to transform stockinette into ribbing, you need only remove the bind-off, getting all the stitches of the scarf top onto a knitting needle or stitch holder, but you need not touch the stitches at the scarf bottom.

Second, it is best to drop only 1 column at a time, then latch it back up before going on to the next column, and this is especially important if your scarf is made in any fiber other than sheep's wool.

Third, the ladders are dropped to within FIVE stitches of the bottom, rather than two as for the drop-fabric scarf. Then, at the top of each latched up column, the crochet hook is taken to the knit side of the fabric and the last five ladder rungs are latched up as knits against a knit background, rather than against a purl background. This makes the top and bottom match, and gives a neat little width-wise curl at both ends of the scarf.

One final and very important point remains: blocking. A stockinette scarf being reworked is an item already quite set in its ways, the more so if it has previously been worn and/or blocked. As you'll see when you drop the ladders down, the yarn has taken on a strong set, as shown by the evident kink.  While a scarf originally worked in a k3, p1 ribbing would not curl, a scarf re-worked into this ribbing will, until you change its ways by blocking. Originally, I tried steam-blocking the model scarf of this post, but that was insufficient. Only wet-blocking with some pretty severe tugging succeeded in changing the yarn set. The scarf does now lay flat, but it did not until it was wet-blocked.

* * *

Still to come: Not every curling scarf can have its fabric reworked. A lace scarf on a stockinette ground, or a color work scarf, for example would be ruined by reworking, and it would be hard to rework a scarf which has a special bind-off.

Two down, one to go

In the last post of this series, we'll flatten a scarf with a special bind-off: that last model scarf hanging all curled up in the middle, between its two now-flat siblings. Til then, good knitting!

--TK

ADDENDUM 2011:
 Have a look at this post on the blog site "Completely Blocked" to see how blogger Cyd rehabbed her stockinette scarf to lay flat by converting ribbing.

ADDENDUM, January 2016:  
If you like the look of a drop-column scarf, you can take it to the next step with PINSTRIPING!  Have a look at this post and see what you think.

FURTHER ADDENDUM: 
Did you know that you can actually insert an afterthought cable into a stockinette scarf? It's even reversible! Have a look at this post: Afterthought reversible cable-ette border (April 27, 2016)
You have been reading TECHknitting blog on rolling scarf rescue, part 3

Sunday, December 19, 2010

Curling scarf rescue mission--part two: the drop-column method

Here is the problem, a curling stockinette scarf made of blue and purple sparkly yarn.

Today's post shows a method called the drop-column method, which cured the stockinette roll and made this scarf lie flat. The drop-column method could hardly be easier.  Every fourth stitch, a column of stitches is dropped down the scarf length to create a ladder.  Then, the scarf is steam blocked. Once blocked, the drop-column fabric goes from wildly curly to flat.  Here is a picture of the front and the back of the same scarf, after the drop-column method has been applied.

Front and back
Despite how easy the drop-column method is, I almost didn't include it in this series for five reasons.

  • It really was designed for WOOL.  If you try this method on any fabric except wool, you take the chance of RUINING YOUR SCARF, yes, maybe R.U.I.N.I.N.G. it FOREVER.  You have been warned--the drop column method is for wool alone!
  • The finished look is quite lacy, not a look suitable for all situations.    
  • The technique is rather primitive
  • The resulting fabric is delicate--it snags easily, for example
  • When the time comes to wash it, a drop-column scarf needs to be handled with the UTMOST care: hyper-gentle hand washing, laid flat to dry, NEVER, EVER in the washing machine.

Yet, despite these objections, in the end I decided to give this method its own post because it has three indisputable things going for it.
  • IN WOOL, it really, really works.  
  • It is really, really easy. 
  • It is really, really fast.  


Bottom line: if you want to cure the roll on a WOOLEN scarf knit in stockinette, if you would wear a lacy scarf and if you are willing to care for a delicate fabric, let's take a look at the drop-column technique of curing stockinette roll. (If this is not your situation, remember, there are two more posts to come in this series!)

MY SCARF IS ALREADY CAST OFF--CAN I RE-WORK IT NOW? 
Are you surprised to see a method using live stitches recommended for restyling an already-finished scarf?  Way back in 2006, in the second TECHknitting post ever, knitting's inner nature was discussed. That post stated that any single knit stitch maintains its connection with all the other stitches in its row and its column, even after the knitting process is complete.

In practical terms, this means that knitting can be restyled even years after it first comes off the needles.  In even more practical terms, this means that yes, you can put the stitches of an already-knit scarf back on the needles and re-work the fabric, transforming curly rolled-up stockinette into a non-rolling drop-column fabric.  Here's how.

CATCH THE LIVE STITCHES at the 
TOP and BOTTOM of the SCARF on 
KNITTING NEEDLES
Restyling knitting is actually fairly common.  For example, re-working the length of a garment (making it shorter or longer) has already been dealt with in an illustrated post. The first step in length-restyling is the same as in fabric-restyling: getting the stitches back on the needles.

Basically, there are two methods.  First, you can carefully unpick the original bind-off, catching each live stitch on a knitting needle as the bind-off is released.  Alternatively, you can carefully snip a single stitch in the middle of the bottom row, then unravel in both directions from the middle, again catching the stitches on a knitting needle as they pop loose.  Click over to the length post for further details and an illustrated how to. You only need to follow along in that post until you get the stitches situated correctly, right arm forward (third illustration, step 6).  After you've gotten that far along, come on back to this post!
 
For the drop-column method,  not only is the bind-off undone, but the cast-on is also undone.  Again, this can be unpicked or snipped, and again, the length post has illustrated details (removing the cast-on is the same process as removing the bind off.)  After you have the top and bottom of the scarf on knitting needles, it will look like the illustration below.


MAKE SURE YOU HAVE ENOUGH YARN TO USE IN YOUR BIND OFF
In the illustration above, note the mini-skein of yarn at both ends of the scarf.  If you don't have any excess yarn from the scarf in your stash, then when you put the live stitches on your needles, you must unravel an additional two rows, in order to have enough yarn to bind off the top and bottom when the restyling is complete.The model scarf used up all the yarn, so the mini-skeins represent the top and bottom two rows which were unraveled and are being held in reserve for the bind-off.

DIRECTION OF DROP
Usually, ladders are dropped in stockinette top-to-bottom, rather than bottom-to-top.  If you are having a hard time telling which is which, you will see that there is an odd sort of half-stitch at the very edge of the bottom, which is absent at the top. In the illustration below, the half stitch is shown--it is the little extra purple stitch peering around the left side of the "real" blue edge stitch.


However, if you can't tell top from bottom, it really isn't all that important:  Stockinette is essentially reversible, being only one-half column off between top-to-bottom and bottom-to-top (which is why, just like when you unzip a provisional cast on, you may find that you get one less stitch working "up" (top needle) than working "down" (bottom needle) . Whichever way you run out the column of stitches, though, you will get a ladder.

SPACING THE COLUMNS TO DROP
The edge three columns are not worked in any way--we leave them alone to avoid stirring up tension issues at the side edges of the scarf.  Across the rest of the scarf, the idea is to drop every fourth stitch (3 stitches undropped, followed by a ladder).  If your stitch count will not fit evenly into these constraints, not to worry--the excess stitches are hidden between the edges of the scarf and the first dropped column on each side.  The edge flips over 180 degrees at the first dropped column, perfectly hiding any excess stitches.

If math is not your strong point, you can click through to this chart which shows where to slip stitches and where to drop them in order to distribute the columns as evenly as possible for all stitch counts between 15 and 50.

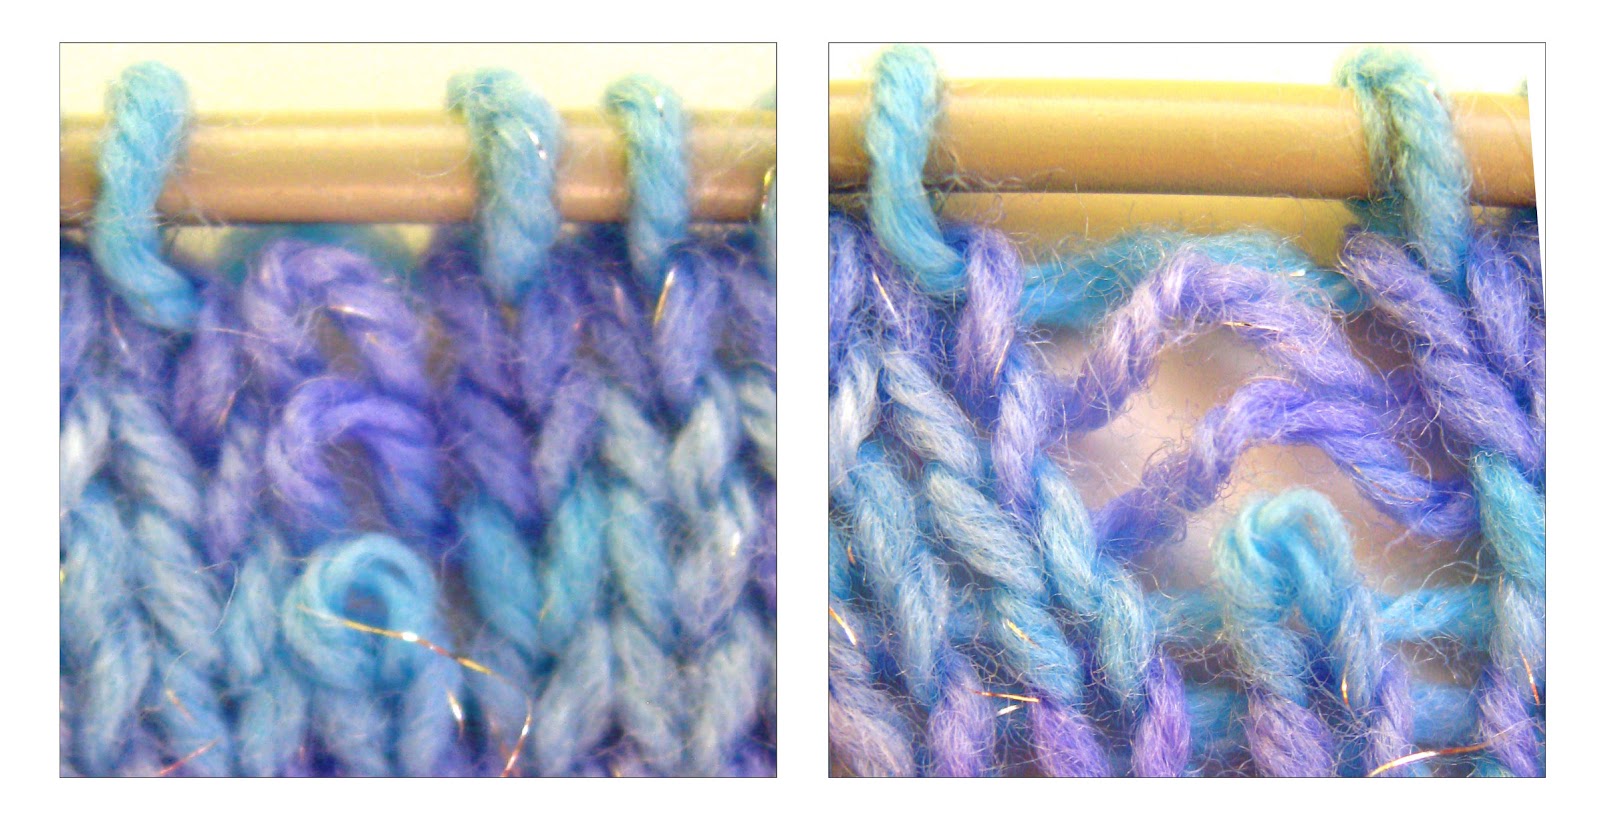
The illustrations below shows the chosen stitches dropped off the holding needle and run down three stitches.  The left picture is unstretched, the right, stretched.


At the bottom of each dropped column, stop the ladder two stitches from the bottom, and catch the loose stitch on a safety pin or stitch holder.  You don't want to get any closer than two stitches or you run the risk of making a hard-to-fix loopy mess.

 BIND OFF the SCARF BOTTOM
When you have run out all the columns, take a free knitting needle in your right hand, and the holder needle with the bottom stitches in your left hand, then bind off the bottom of the scarf--the chain bind off is very good for this situation. As you come to the loose stitch at each column-bottom sitting on its holder, undo the holder and place the held stitch on the tip of your left needle, then bind it off together with its left-hand partner, two stitches bound off as one.

BIND OFF the SCARF TOP
The next step is to bind off the top. Bind off the ordinary stitches in the usual manner.  When you come to the top of each ladder, grab it with your fingers and twist it into a backwards loop, then place the loop on the left needle.  This twisting maneuver transforms each ladder's top rung back into a stitch capable of being bound off.  Bind off all the top stitches including the twisted loops. Again, chain bind off is a good choice.

STEAM BLOCK the SCARF
The last step of all is to steam block the scarf. Below are before and after photos of the fabric--the before represents the look of the fabric when the columns have been run out, but not yet steam-blocked, the after shows how the scrunched-up ladder rungs blossom open from the blocking process.

The ladder rungs, before and after steam blocking

To get from "before" to "after," as you make each section of the scarf steamy with the iron, spread it apart with your hands by gently patting it wider.  When the steam dries away, the rungs will remain in the relaxed, open position shown in the after photo.

WHAT WILL MY SCARF LOOK LIKE?
The sparkly blue sample scarf corrected in this post came out quite loose and lacy. This is partly because it was knit loosely, partly because the yarn was of a nature to easily relax during the steam-blocking process. Pictured below is a different drop-column scarf, this one in red, which came out a bit differently.


If you compare the blue to the red, you'll see that the red scarf was knit tighter, and its yarn did not relax as much from the steam-blocking.  As a consequence, the red scarf's ladders are narrower and the fabric came out more wavy (bumpy) in cross section.  However, the stockinette curl has been cured on both scarves by the drop-column method, and both have been transformed from tight unwearable tubes into (delicate! lacy!) flat scarves.

STILL TO COME in this series
The next (third) post in this series will feature a method which works for all fibers, which is more robust than the drop-column method shown here, and which does not end up with a lacy look--a method more suitable to everyday use.  The last (fourth) post will show a method suitable for scarves which can't have their fabric re-worked: a lace scarf on a stockinette ground, for example, or stockinette color work.


'til next time, good knitting
--TK
You have been reading TECHknitting blog on curing curling scarves, part 2

Sunday, December 12, 2010

Curling scarf rescue mission--part one: the problem and the solutions which DON'T work

"Why does my scarf curl?" and  "How can I stop my scarf from rolling?" must be among the most common questions asked and re-asked on internet knitting forums everywhere.


The root of the question is almost always a plain stockinette scarf -- a rectangle of fabric made back and forth, knitting on one row, purling the next -- although sometimes the question arises from a lace scarf with a stockinette background.  The problem is not the yarn, nor the technique--the problem is inherent in stockinette stitch itself.  In other words, stockinette fabric rolls because that is its nature. 

Knowing this after the fact, however, doesn't solve the problem when you've got a tightly curled piece of knitting in your hand--a piece which seems a useless disappointment.

It makes me sad to think of all the excitement of a first project turning to disappointment like this, so I've been knitting around and around until three different solutions have been worked out.  Specifically, I've knit some stockinette scarves which curl like mad--three of them.

Over the next three posts,we're going to flatten each one of these and turn each into a lovely, wearable scarf.  No longer do curled scarves have to be unraveled or put in a drawer: from now on, they can be reworked or corrected.

However, before we get to the rest of this series and show solutions which work, let's take a quick detour into solutions which don't work, or at least, which don't usually work very well.

Blocking, and why it doesn't work very well


Blocking is often recommended for curling the stockinette curl, either steam blocking or regular wet-blocking.  This may possibly work on a slick fiber like cotton or bamboo which has been LOOSELY KNIT, and is worth a try in that situation.   Yet on animal fibers, or wool or woolly acrylic, this solution is of limited usefulness. The fact is, it is practically impossible to block the curl out of stockinette without taking a real chance that you'll have to resort to actually ironing it.  Once on this road, you might find you have to iron the life right out the knitting before it will consent to lay flat.  In other words, if you chose to cure stockinette's curl with blocking, then when you finally do succeed in getting the curl out, the knitting has a real chance of having become a limp rag.  More commonly, a severe blocking tames the problem temporarily, but the curl returns as the scarf is worn.

Edging, and why it doesn't work very well

Another popular suggested cure is putting a non-curling edging onto the scarf.  Seed stitch, moss stitch or garter stitch are often recommended.  It is true that these fabrics do not curl (and are therefore an excellent choice for the next scarf!)  However, the usual result from applying a non-curling edging to a curled scarf is that, although the edging itself does not curl, the scarf to which it is attached will continue to curl, taking the edging right along with it.  There are ways to attach an edging so that the edging will not curl, but this kind of edging, called zig-zag edging, has to be knitted in, it cannot be applied after the fact.

Another species of edging often recommended is to crochet an edging onto the scarf.  This also will not work for the same reason a knitted edging will not work: the crocheting itself does not curl, it is the knitting which curls, taking the crocheted edge right along with it.

In the next post of this series (drop columns, linky below) we'll flatten the curled-up sparkly blue scarf shown at left. 


PS:  This is part 1 of a 4 part series.  The other parts are here:
part 2--drop columns
part 3--forming ribbing
part 4--lining the scarf

Wednesday, December 8, 2010

Hems and facings: the inside front corner

A while ago, TECHknitting ran a 10-part series on knitting better cuffs and bands.  The fifth post of that series dealt with sewing shut hems and facings.  Recently, an anonymous commenter to that post asked:

  • I'm having trouble turning corners with the hemming of my cardigan. I have hems down the center of the sweater and then round to the hem of the bottom of the sweater. Your tips on hemming were helpful but when I try to make the turns they aren't very neat - any suggestions or tips?

This is truly a case where pictures are worth thousands of words, so here you go, Anon!

Above is the "ordinary" method of getting a tidy join on the inside of a sweater front where the front facing and the bottom hem come together.  The front facing is made as long as the front of the sweater, but the bottom hem is knit narrower than the width of the sweater front.  When both hem and facing are flipped into position and sewn in place, there is no overlap, yielding a quite neat turn.  I, personally, would use this ordinary method for sweaters with buttons and buttonholes, because the entire length of the front band is hemmed by a single length of fabric--there is no seam to conflict with the bottom button, as there would be with the mitered finish, shown below. 


Above is a different way of making the corner--both hem and facing are knit at at a 45 degree angle, using short rows.  When they are both flipped into place, they make a neat and pretty join at the bottom corner.  This mitered hem makes a very pretty finish for a swing jacket--the kind often held shut by a single button at the top.  In swing jackets, the hem is often in view, and the 45 degree miter is a pretty look for that application.


As shown above, it is also possible to knit a mitered hem and facing all-in-one, with matching double-shaping at the dots--matching left and right increases or matching left and right decreases, depending if you have started at the inner or outer edge of the all-in-one. 


Good knitting!
--TK

You have been reading TECHknitting blog on mitered hems for knitwear

Monday, December 6, 2010

A little felted purse KAL, part 3

This is the last installment of the little purse KAL. (Click here for the first part, and here for the second partclick here for the accompanying zipper-installation video tutorial.)  In this final installment, we are going to flatten the bottom of the purse, felt the purse and attach the zipper pull.

FLATTENING THE BOTTOM

Although I have tried very hard to avoid all sewing, there comes a time when even the sew-o-phobic must get out a sewing needle, and so it is for flattening the purse bottom.  But, rest assured--there are only 3 or 4 stitches necessary, and they can be as large, rough and untidy as you like since no one will ever see them, not even you.

The "before" illustration (top) shows the OUTSIDE of the purse when you have finished knitting it.


Next, turn the purse inside out.  Grasp the outside edge of the corners and draw the outer edges of each corner together over the middle of the center seam, as shown in the middle illustration.  Using the length of yarn you left dangling at the corner, tack the corners together with a stitch or two, then--using the same length of yarn--tack the joined corners to the center of the seam, also as shown on the illustration

When you turn the purse right side out again, you will find that you have created a folded-in flat bottom, and that the purls have become the fold line, as shown on the "after" illustration at the bottom.

The next step is to felt the purse, so here's ...

A LITTLE PRIMER ON HAND FELTING


Hand felting allows for greater control than felting in a washing machine, especially for a small object like this purse. Therefore, I highly recommend hand felting for this project.

Felting requires to things two happen simultaneously:  a) temperature change and b) agitation. In hand felting, temperature change is supplied by working at the kitchen sink with first hot, then cold water running on your project.  The agitation is supplied by you. 

Here's how:

Wear rubber dishwashing gloves or your skin could be abraded. Wet item thoroughly with hot water. Add two drops dishwashing detergent (the kind for hand washing of dishes, not the machine kind). Working under a trickle of hot water, knead and rub but do not wring. Try to knead and rub evenly over the entire surface of the purse to avoid distortion of the shape. When most of the detergent is gone, switch water to cold, turning the volume of water up briefly so that the temperature of your project will change quickly.  Once the project has become completely cold (a few moments for such a small project) turn the cold water back to a trickle, add more detergent and again knead and rub until detergent is out. Repeat the same procedure with hot water, then cold again, etc. 

Once every hot/cold cycle, inspect to be sure purse isn't cross-felting closed on inside.  Also, inspect the sides and bottom, and tug as needed to shape them as shown in the photo of the finished purse. 

Felting is a rather random process: sometimes it goes unbelievably quickly--one or two hot/cold cycles. Conversely, sometimes it goes worryingly slowly, but take comfort: all non-superwash sheep's wool will felt eventually although different colors or yarns might felt at different rates. The most amount of felting usually occurs when the cold water hits, but sometimes the hot water is more active.

As you can see from the below photo, the finished purse was felted only lightly--the original stitch definition is still visible.  Even so, however, this purse is stiff enough to easily stand on its own.

ZIPPER PULL DECORATION

Make a little felt marble by taking some scrap strands of yarn in your (dishwashing-glove-clad) hands, then repeatedly rolling them in your hands under hot, then cold water with dishwashing detergent as a lubricant, until the strands cross-felt together and the marble hardens. Attach the marble to the zipper pull with a length of yarn, attached decoratively onto the existing zipper pull.

The finished purse, felted, with zipper pull decoration attached

Thursday, December 2, 2010

A little felted purse KAL, part 2

The first part of this little felted purse KAL took the process as far as the top trim (lavender in color) which grows out of the zipper tape according to the new method of attaching knitting to zippers using a tiny latch-hook, called a "knitpicker."

This method is further described in the Winter 2010 issue of Interweave Knits.

This second installment of the KAL will show how to make the body of the purse, starting with the green yarn.  (Of course, you can make the whole purse one color, or striped in many colors--whatever you like!  The model just uses green as a contrast color to make clear which is the top and which is the bottom of the work.)

There are a lot of words and several illustrations, but only because it's SO much harder to describe in words and pictures what would take a moment to demonstrate in real life.  In other words, don't be put off by the seeming complexity, it really is very simple to DO, just hard to DESCRIBE.


Part 2: Body of purse
Superwash foundation round for feltable yarn: Cut a 60" length of superwash wool and double it. At the lowest level (where the fabric from the zipper tape lies) insert crochet hook from the outside of the tape (no teeth) toward the inside (where the teeth are), and draw doubled loops through the base of the superwash trim--purl side of trim should face you.


As shown in the above schematic, one doubled loop is drawn between each stitch originally picked up with the latch hook in part 1 of this KAL. If the work is tight and the crochet hook is not working very well, you can resort back to the knitpicker latch hook to pull the doubled yarn between the stitches, particularly the tight stitches on the ends of the zipper tape.

The yarn in the above schematic is illustrated in two colors so you can distinguish the two stands, but in real life, both strands are the same color as each other and the same color as the superwash trim.  This is so that the picked up stitches will not show in a different color against the trim.
Below is another take on the pick-up process, again showing how the loops of the body of the purse are being pulled through the base of the trim.  This is a double cut-away illustration.  The inner box (light background) shows the zipper tape with the purl fabric of the trim arising out of it.  In the outer box (darker background) the purl fabric has been cut away so you can see the relationship of the drawn-through loops to the underlying zipper tape, as well as to the trim itself. Note that in both the illustration above as well as the illustration below, the new loop is being drawn out between the bottom stitches of the trim, not through them.  (If you click on this--or any other--illustration, it will enlarge.)


The above illustration does not show the loops being deposited on the dpn because only the first draw-through is illustrated.  The schematic illustration earlier in this post, showing several stitches picked up,  does show how these loops are to be deposited on the dpn as you go around. The dpn set to use for this pick up is the smaller dpn's--the same ones you knit the trim with.

The opening schematic also shows where to begin the pick up.

Add additional dpn's as you draw loops up all around. You'll wind up with 32 doubled loops on your smaller dpn's.

Increase stitch count: Switch to larger dpn's and ordinary, feltable woolen yarn. Using a fifth dpn from the larger set, knit around the stitches picked up. Note that some doubled loops are to be knit each separately, so that the doubled loop gives rise to two stitches, while other doubled loops are to be knit by knitting both loops as one, so that the doubled loop gives rise to only one stitch.


Specifically, in the above schematic, where a red "2" appears, you are to knit each of the two loops separately to give rise to 2 separate stitches; where a blue"1" appears, you are to knit the two loops in that location as one, to give rise to a single stitch.  As you can see, there are only 4 single stitches, basically on either side of the center of the zipper tapes.  This long straight run of stitches does not require the ease necessary closer to the corners, which is the reason for the single stitches at this location. In all, you'll have 56 stitches, which could conveniently be arranged onto 4 dpn's of 14 st each.

As you go around, you may find it easier to open the zipper--this literally "opens up" the work, making the knitting much easier. 

Knit body of purse: Knit 4 rounds of contrast color (green on sample). Switch to main color. Work a total of 19 rounds altogether not including superwash foundation round.

Next, purl one round.

(The switch between colors, as well as the knit/purl switch can be made jogless.)

Next, knit 9 additional rounds, ending on a column centered under the zipper split in the zipper tapes. Place half the stitches on 1 needle, half on another, with the division between the stitches being parallel to the direction of the zipper.

In other words, the two needles are to be arranged so that one needle carries all the stitches arising out of the left side of the zipper tape, while the other needles carry the stitches arising out of the right side of the zipper tape.

Hold one needle behind the other. Using three-needle bind off, bind off both halves together VERY LOOSELY!  Your final result is represented by the below schematic.


Perfectionists can turn the purse inside out to bind off from inside.  Some finagling is needed to get the needles through the zipper opening, but it can be done. Leave a 10" tail after bind-off is complete.

In the next post, we'll flatten the purse bottom, felt the purse and attach the zipper pull.
--TK
* * *
This is the second in a three-part series.


You have been reading  TECHknitting on: Feltable Purse KAL part 2: no sew zippers in knitwear.

Tuesday, November 30, 2010

A little felted purse KAL, part 1

The current issue of Interweave Knits has an article (by me) about installing zippers without any sewing at all, using a very special kind of very small latch hook called a "knit-picker."  There are two different methods described in the article for installing zippers:  working from the zipper outward, or installing a zipper in an already-made item.  There is also an Interweave Knits video on the technique.

If you have a copy of the article, or have viewed the video, and would like to explore the method of working from the zipper outward, here is a pattern for a little felted purse using that technique. The project is presented as a KAL  (knit along) in several installments.  Today, we'll lay out the materials and get as far as the top trim.


With its flat bottom, this little purse is roomy beyond expectation: a cell phone and other necessaries fit neatly alongside bills and change. Made up in an afternoon, these are great for gifts too.

Materials, needles and gauge
*Scrap amount of superwash worsted weight yarn, the model uses Cascade 220 superwash--this is the lavender trim at the top of the purse
* Scrap amount of ordinary (feltable) woolen yarn in contrast color, the model uses Cascade 220 in green
* Approx 1/2 ounce ordinary (feltable) woolen yarn in main color, the model uses Cascade 220 in dark purple
*Closed-end nylon or polyester coil zipper in matching color
*"Knit-picker" type mini latch-hook--this is explained in the magazine article
*Crochet hook in size to match yarn
*large eyed sewing needle
*set of 5 small dpn's to give gauge of about 6 st/in
*set of 5 larger dpn's to give gauge of about 5 st/in

The average finished size is 3" (L) x 2.5" (H) x 2.25" (W) but this can vary by as much as 1/4 inch larger or smaller in each measurement, depending on how much felting you choose to do.

KAL Part 1: Zipper and Top Trim
Shorten zipper to 3 3/4 inches working length as shown in the Interweave Knits article, or however you usually shorten a zipper.

Per illustration 1 above, mark zipper tape for pick up--two dots across each end of each tape, and 12 evenly spaced between, as shown. (Zippers have seam guides woven into them, so finding a straight line along the tape is easy.)

Superwash top trim: Using smaller dpn's, mini-latch hook (aka "knit-picker") and the knitting needle method described in the Interweave Knits article, and using 1 dpn for each side of zipper tape, pick up 1 st for each dot.

Begin the pick up at the arrow, working down the left zipper tape first.  Ignore the square and different colors for the moment: for the purpose of picking up stitches, each dot equals one loop to be picked up through the zipper tape.


Per illustration 2, above, once you have picked up the stitches through the zipper tape, it should look like this, with one needle holding all the stitches on one side of the zipper tape, and a second needle holding all the stitches from the other side of the tape.

Arrange the picked up sts on 4 dpn's: 6 across each end and 10 along each side. Needle 1 holds purple dot stitches; needle 2, green dot stitches; needle 3, blue dot stitches; needle 4, brown dot stitches. You could re-arrange the stitches onto the four dpn's by sliding the six end loops around onto their respective needles, but these loops are tight, and it's easy to lose one.  Therefore, in practice, the easiest way is to re-arrange the stitches by is by knitting them off when working the second round.

Second round: In this round, besides re-arranging the stitches onto 4 dpn's, you'll also increase stitches using the kfb method, all along the sides of the zipper tapes.  This increasing gives the purse its boxy shape. Here's how:

Bring yarn through zipper tape opening at pink square and commence to knit in direction of pink arrow as follows: Work 1 st in each of the 3 purple dot sts on needle 1, kfb in each of the 10 green dot stitches on needle 2, work 1 st in each of the 6 blue dot sts on needle 3, kfb in each of the 10 brown dot sts on needle 4, end round by working 1 st on each of the 3 remaining purple dot stitches on needle 1, you'll have 52 total sts on needles.

(Click here for further information about kfb--knit front and back.)

Work for 7 add'l rounds, knitting plain. Bind off. Top trim made. Note: the trim lies purl side out, with the knit side curling towards the zipper teeth, as shown in the opening illustration.

(Click here for a method of binding off in the round which hides the gap appearing at the last stitch of an ordinary bind off)


This is the first in a three-part series.

Click here for the second part of the series
Click here for the third part of the series
Click here for the accompanying video tutorial 

Good knitting!
--TK

Friday, November 5, 2010

No-sew zippers

Would you like to learn to insert zippers into knitwear with NO SEWING?  If your answer is yes, you have several ways to learn!


Method 1:  On November 30, 2010, stop by your favorite newsstand and pick up a copy of Interweave Knits magazine.  In a "Beyond the Basics" feature article which I have written, the full instructions appear. I'm pretty excited about sharing this method with you--it's taken a lot of years to figure it out, and it's pretty nifty to be able to create zippered knitwear with absolutely no sewing whatsoever.  For real! None. Nada. No sewing.

Method 2: The second method to learn this new technique will take place on April 30, 2011, when you can attend a workshop on installing zippers at the Minnesota Knitter's Guild 25th anniversary "Yarn Over" teaching event.  In my first foray into teaching in a LONG time, I'll be giving two workshops, actually. One will be about lots of different tips and tricks of the kind popularized on this blog, and the other will be on buttonholes (including the tulip buttonhole) as well as buttonhole alternatives and zippers.

The sign up is not yet open, but if you are a member of the Minnesota Knitter's Guild, you get first dibs at signing up. For further information, you can also visit the Yarnover group on Ravelry.

Method 3:  (updated December 23, 2010) There is a new video featuring Eunny Jang, the Interweave Knits editor, demonstrating the no-sew zipper technique.


Here's hoping you will like the new method, and I hope to meet some of you in real life at the 25th anniversary Yarnover event button/buttonhole/zipper workshop (or the tips and tricks workshop!) April 30, 2011.

Best regards--TK

Thursday, August 19, 2010

A half-million LOTS and LOTS of views. Thank you, I am humbled

Today, TECHknitting reached a major milestone--a half-million LOTS and LOTS of views since inception. Thank you all so much for coming by. I am humbled by your patronage.

Edited 9-8-10 Actually...
Further investigation reveals that the number of page views is actually far higher than a half-million (something to do with what page/s the stat-counter counts). It is now estimated to be more than 1 million views, and maybe even more than 1.5 million?!? eep.

If it seems like things are winding down here at TECHknitting, don't believe it for a second. There are tons of projects taking place backstage here--mostly test knitting and development of patterns for small shaped things, such as gloves. Like the new Tulips buttonholes, some of these patterns have been in development for years and years, so a big push came on this summer to try and make some progress. And, of course, the series on style and body shape is "to be continued"--it's at a standstill now (too many other projects) but lots of new illustrations have already been done and these should come out this fall.

Also coming out this fall will be an article in Interweave Knits, winter edition, on how to install zippers with absolutely **no** sewing. It's all very hush-hush at the moment, but I'm hoping you'll like it--this new procedure will make zippered knitwear a breeze, instead of the sewing chore it presently is, and all will be revealed in due course.

So, thank you dear readers, for making TECHknitting a stop on your internet rounds and staying to visit for a while. We'll talk more soon.

Have a great rest-of-the-summer.

--TK

Wednesday, August 4, 2010

Felted Mitten Tutorial in Knitcircus e-Magazine

The new issue of Knitcircus e-magazine is out, and contains a tutorial by TECHknitter (hey, that's me!) for making felted mittens, as part of the fall pattern collection.

Here's the link.

These kids' mittens are very easy to make--very forgiving of mistakes. Although made by hand, these are actually superior in performance and durability to high-tech winter fabrics. The "alien eyeball" pair you see with purple cuffs are quite used: they were worn as the only hand-coverings for two entire winters by an active boy, here in the frozen north of Wisconsin before being photographed! Now outgrown, they are still good for further wear by another, smaller child.

There's just one little error in the pattern presentation: The e-magazine (which contains a sort of a catalog for the pattern download) indicates that the mittens are made with Blue Sky Alpaca, but they are not. The actual pattern in the download correctly identifies the mittens as being made with either Ella Rae Classic/Ella Rae Superwash worsted-weight yarns or Dalegarn Hielo /Falk DK weight yarns.

--TK

Sunday, July 4, 2010

Podcast Interview

Laura Neel aka (Math4knitters) who blogs for the Journal Gazette of Fort Wayne, Indiana, recently interviewed me for a podcast.

Some subjects include the 8-trick pocket hat, the work to glory ratio and body type and knitting.

If interested, click through to her post and listen along.

Happy 4th of July, everyone!

--TK

Tuesday, June 1, 2010

Tulips buttonhole: The video (and an interview on KD)

Interweave Knits has just produced a video featuring Eunny Jang, the IK editor, demonstrating TECHknitting's NEW buttonhole: the tulips buttonhole. The name came about because the buttonhole looks like "two lips" in stockinette.


The video is quite small here, but if you click on the lower right hand corner where it says "You tube," you will get a MUCH larger version--easier to follow, by far.

The video is also featured in a "Knitting Daily" interview with TECHknitter (that's me!) about how the Tulips buttonhole was invented.

The tulips buttonhole was originally featured in Summer 2010 Interweave Knits, "Beyond the Basics" column, which could be a handy reference to maybe keep with your knitting papers: it is a fully illustrated article, and shows the same steps as the video. The video is immensely useful, however, because the tulips buttonhole has a little change-up where the working yarn originally heads off in one direction, but is then unwound to head off in another direction: a bit difficult to show with illustrations, but beautifully demonstrated on Interweave Knit's video by Eunny Jang.

--TK

Related posts

Buttonhole series:
.Buttonholes in hand knitting, part 1: lore and tradition plus some nifty tricks 


Other button and buttonhole posts: