 |
| Two samples, shown sideways |
If this is your first exposure to this series, Infinity Loops are a way to knit self-contained figures, like Celtic knots, then transform the knitting so there is no distortion in the cable arms or in the background fabric. After transformation, the figure lies smoothly. This is not true of ordinary knitted knots, which are generally distorted in the arms and the background. The introduction and first of the series is here. The second of the series (introducing shortcuts) is here.
 |
| Double Bowen cross, shown as knitted (upright) |
DOUBLE BOWEN CROSS
Today's post is about analyzing complex forms like this one, to figure out transformation strategy. Does it make sense to use shortcuts or is it easier to transform the long way (half the figure)? If the long way, then we'll need to figure out how to transform long runs, including under a cable cross.
As usual in this series, the pattern comes first, then the description of the transformation. Read through to the end before casting on, though, because choosing to use shortcuts requires as-you-go action. If transforming the long way, however, you first knit through the pattern without interruption and all the excitement comes afterwards.
Materials:- scrap wool, worsted weight (5 sts/in) recommended
- knitting needles in size to suit wool
- crochet or latch hook to suit wool (latch hook works better imho)
- handful of bobby pins
- three 4-stitch scrap-yarn placeholders
- tapestry needle for grafting (large eye, blunt tip)
- coil-less safety pin or other small stitch holder (long way transformation only)
- dental floss or strong sewing thread (not yarn) (shortcut transformation only)
- several 2-stitch scrap yarn placeholders (shortcut transformation only)
- optional: crewel needle (large eye, sharp point) for quick-grafting head-to-head cables (shortcut transformation only)
Charted Pattern.
 |
| Click here to see chart in a large free-floating window which can be printed. Choose portrait orientation. Scaling may be required. |
Above, printable chart with stitch directions at bottom. Below, written pattern. Both allow a margin of 4 purl stitches either side of the actual figure itself, neither includes OPTIONAL side borders.
Written pattern.
The written pattern tracks the chart, adding one handy bit of info: stitch count. The third column in the written pattern shows the stitch count (st ct) and how you got there. For example, row 1 starts with 23 stitches, and then four stitches get added so the row ends with 27 stitches on the needle. For another example, row 37 begins with 35 stitches, but then eight stitches are removed in the course of knitting that row, leaving 27 stitches remaining. You could count this off the chart, but it is made explicit here. NOTE that the stitch count does not include any optional side borders you may choose to add.
Geek note about stitch count: As discussed in greater detail in previous posts, with Infinity Loops, the number of background stitches never changes. All the increases are strictly for the cable arms, and do not change the fabric width. So, for garment shaping purposes (neck or armhole decreases, for example) ignore the stitch increases for the cables, and use only the background stitch count for figuring percentages.
|
row ↓ |
Note: instructions for cable stitches are on chart |
st ct ↓ |
|
bottom |
co 23 (plus whatever side border stitches you choose--sample adds 3 garter sts each side). Work in garter stitch to make a bottom border to desired height. Switch to reverse st st and work a few rows, keeping borders (if any) in pattern. End on a knit row, turn work so purl side is facing you. |
23 |
|
1 |
p11, place first two loops of placeholder onto L needle and work 1 K st into each, p1, place last two loops of placeholder onto L needle and work 1 K st into each, p11. |
23+4 = 27 |
|
2 (38) |
in this and every even row, K the k’s and P the p’s. In this particular row, k 11, p2, k1, p 2, k11 |
27 |
|
3 (39) |
p10, R-p-T, p1, L-p-T, p10 |
27 |
|
4 (40) |
k10, p2, k3, p2, k10 |
27 |
|
5 (41) |
p9, R-p-T, p3, L-p-T, p9 |
27 |
|
6 (42) |
k9, p2, k5, p2, k9 |
27 |
|
7 (43) |
p9, k2, p5, k2, p9 (k the k’s, p the p’s) |
27 |
|
8 (44) |
k9, p2, k5, p2, k9 |
27 |
|
9 (45) |
p9, L-p-T, p3, R-p-T, p9 |
27 |
|
10 (46) |
k10, p2, k3, p2, k10 |
27 |
|
11 (47) |
p10, L-p-T, p1, R-p-T, p10 |
27 |
|
12 (48) |
k11, p2, k1, p 2,k 11 |
27 |
‡ 13 |
p6, place first two loops of placeholder onto L needle and work 1 K st into each, p1, place last two loops of placeholder onto L needle and work 1 K st into each, p4, work a LDC-5 on next 5 sts, p4, place first two loops of placeholder onto L needle and work 1 K st into each, p1, place last two loops of placeholder onto L needle and work 1 K st into each, p6 |
27+8 = 35 |
|
14 (26) |
k6, *p2, k1, p2, k4, repeat from * one time more p2, k1, p2, k6 |
35 |
|
15 (27) |
p5 ,* R-p-T, p1, L-p-T, p2, repeat from * one time more, R-p-T, p1, L-pT, p5 |
35 |
|
16 (28) |
k5, *p2, k3, p2, k2, repeat from * one time more, p2, k3, p2, k5 |
35 |
|
17 (29) |
p4,* R-p-T, p3, L-p-T, repeat from * two times more, p4 |
35 |
|
18 (30) |
k4, p2, *k5, p4, repeat from * one time more, k5, p2, k4 |
35 |
‡19 (‡ 31) |
p4, k2,* p5, RFC-4 repeat from * one time more, p5, k2, p4, |
35 |
|
20 (32) |
k4, p2, *k5, p4, repeat from * one time more, k5, p2, k4 |
35 |
|
21 (33) |
p4, *L-p-T, p3, R-p-T, repeat from * two times more, p4 |
35 |
|
22( 34) |
k5, *p2, k3, p2, k2, repeat from * one time more, p2, k3, p2, k5 |
35 |
|
23 (35) |
p5, *L-p-T, p1, R-p-T, p2, repeat from * one time more, L-p-T, p1, R-p-T, p5 |
35 |
|
24 (36) |
k6, *p2, k1, p2, k4, repeat from * one time more p2, k1, p2, k6 |
35 |
‡ 25 |
p6, *LFC-5, p4, repeat from* one time more, LFC-5, p6 |
35 |
|
OPTIONAL: repeat rows 14-25 TO ELONGATE figure (see chart). This is an OPTIONAL repeat which inserts a middle set of side loops into the pattern. (Note that none of the samples show this option.) |
||
|
26-36 |
Same as 14-24 This is the NON-OPTIONAL repeat which makes the top set of side loops |
35 |
|
‡ 37 |
p6, slip next 2 knit sts to bobby pin, p1, slip next 2 sts to bobby pin, p4, LFC-5, p4, slip next 2 knit sts to bobby pin, p1, slip next 2 sts to bobby pin, p6 |
35-8 = 27 |
|
38-48 |
same as 2-12. This is another NON-OPTIONAL repeat which makes the top loop |
27 |
|
49 |
p11, slip next 2 knit sts to bobby pin, p1, slip next 2 sts to bobby pin, p11 |
27-4 = 23 |
|
top |
continue for an additional few rows in reverse st st, then add any top border you choose. |
23 |
‡ If you want to do the shortcut tricks, rows 13, 19, 25, 31 and 37 are of interest. This is easier to see on the charted pattern (where they are also marked). See also the shortcut map, below.
About the "repeats."
--The NON-OPTIONAL repeat of rows 14-24 is the same as knitting rows 26-36. This is because both the BOTTOM SET and the TOP SET of side loops on the double Bowen Cross are knit identically for these particular rows.
--The OPTIONAL repeat of rows 14-25 ELONGATES the figure meaning you may choose to repeat row 14-25 in order to insert an EXTRA MIDDLE SET of side loops BEFORE working the repeat of rows 14-24 for the TOP SET of side loops. None of the samples were worked with this option.
--There is also a NON-OPTIONAL repeat of rows 38-48 which are identical to rows 2-12, meaning the TOP LOOP and the BOTTOM LOOP are the knit the same over these particular rows.
Bottom line. Three different repeats: one optional, two not.
_________________________________________
Begin at the beginning: map
 |
| Click here to enlarge |
The first thing when you set out to make an Infinity Loop Celtic knot is to sketch a map of which way the stitches run, based on a picture of the finished motif. See, you know that to knit a Celtic knot, the cable arms must split tail-to-tail at the bottom (red dots) and meet head-to-head at the top (green dots), You also know that the stitches go upwards, building the cable in horizontal slices, row by row. The picture must also show which crosses are over, and which under. So that's really all the info you need for the sketch. Above left, the Double Bowen stitch direction map.
The gray arrows show the upward direction of the stitches after knitting but before transformation. The red- and green-dot discontinuities are the target we want to eliminate via transforming stitch direction. Once transformed, the stitches (or all the ones we can see anyway) will all be laying in the same direction (no head-to-head or tail-to-tail meet-ups evident). Plus, there will be no background distortion either.
Transformation alternatives
With stitch direction map in hand, the next step is to figure out the transformation alternatives. The alternative easiest to conceptualize is generally the "long way," where half the figure gets transformed--as in the simple rings which started this series. However, we have at our disposal various shortcuts, as shown in the immediately previous post. So that's the other alternative, and we'll look at that first.
Shortcuts
As with the simple Bowen Cross post shortcuts on a smallish form like today's don't always make sense. This is because shortcuts exist to let you skip transforming diagonal-line elements (and, incidentally, crosses in those elements). In scrunched up figures, there aren't that many linear elements, proportionally speaking. However, if this double Bowen Cross were more stretched out so the loops were a lesser proportion of the figure than here, then shortcuts would make a lot of sense. This complex form today presents so you can figure out for yourself how to map shortcuts to determine whether they are going to make sense for your motif.
The shortcuts were laid out in (possibly exhaustive) detail in the Bowen Cross Celtic Knot post. But, if you don't want to have to flip back and forth between posts, there are links to the shortcuts in printable format below.
These shortcuts are:- Transforming tail-to-tail meetings at the bottom of a loop via a placeholder, which has the effect of moving the discontinuity along the beneath cable arm, to hide it under the over-crossing cable arm at the cable cross itself. (Printable Google doc link to the placeholder trick.)
- Using a dental floss to temporarily hold the under-crossing stitches of the beneath cable arm. When the other half of that beneath arm is transformed, the two halves meet head-to-head at the cross, under the over-crossing cable arm. Then, the head-to-head stitches of the beneath cable arm are stitched or grafted together. During transformation the floss acts as a barrier preventing the stitches from running out too far and holds them until they are ready to graft. (Printable Google doc to the floss maneuver.)
- (3) The rightmost cable cross on row 25 hosts a head-to-head meeting using the dental floss trick (purple star on shortcut map).
- (4) The leftmost cable cross on row 25 hosts a tail-to-tail meeting via the placeholder trick (gray hexagon on shortcut map).
One thing you would not avoid by choosing the long way transformation is drawing a map--you still have to do that, and here's why. As you see, transforming the long way has two options. Both end up with the same number of stitches transformed, but one version is significantly easier because you can actually see what you're doing more of the time. Just as with repairing a miscrossed cable by laddering it out then re-latching it back up, transforming a cross-OVER is easier than a cross-UNDER.
| Click here to enlarge |
Transforming an "under"
 |
| The transformed double Bowen cross |
Further info for adapting Celtic Knot patterns to Infinity Loops
To adapt a Celtic knot pattern to the infinity loop method, here's more info you might need.
All the infinity loops in this series, already published and to come (rings, Bowen cross, Double Bowen cross, hearts/lobed forms, spirals) are worked on two-stitch wide cable arms, and all the loops are started off with a purl spacer. That makes five stitches per loop:
- four stitches at loop base to be created onto scrap-yarn placeholders, then grafted away at loop-top
- one stitch--the purl spacer--requisitioned from the background fabric at loop base, then returned to the background fabric at loop-top.
Three-stitch wide cable arms I haven't shown these because, as they go around tight curves, the inner column of three gets tightly squeezed, while the outer column gets more stretched. If three-stitch wide cable arms are a must-have, adjust for these different radiuses (radii?) by knitting (and subsequently, transforming) a stitch or two fewer in the inner column, along the tightest part of the curve. In other words, slip a stitch when knitting on the inside of a tight curve, adjust the tension accordingly, and then remind yourself not to pick up the slipped strand by accident when transforming. I leave this sort of differential experimentation in your capable hands.
Side loops As mentioned in the last post, a certain kind of side loops need no shortcuts; not head-to-head, not tail-to-tail. This makes this sort of side loop pattern easy to convert from ordinary Celtic knot pattern-writing to knitting them Infinity Loop style. Specifically, as illustrated below, where the side loops have only ONE crossing (rather than two, as in the Double Bowen Cross), then shortcuts do not apply.
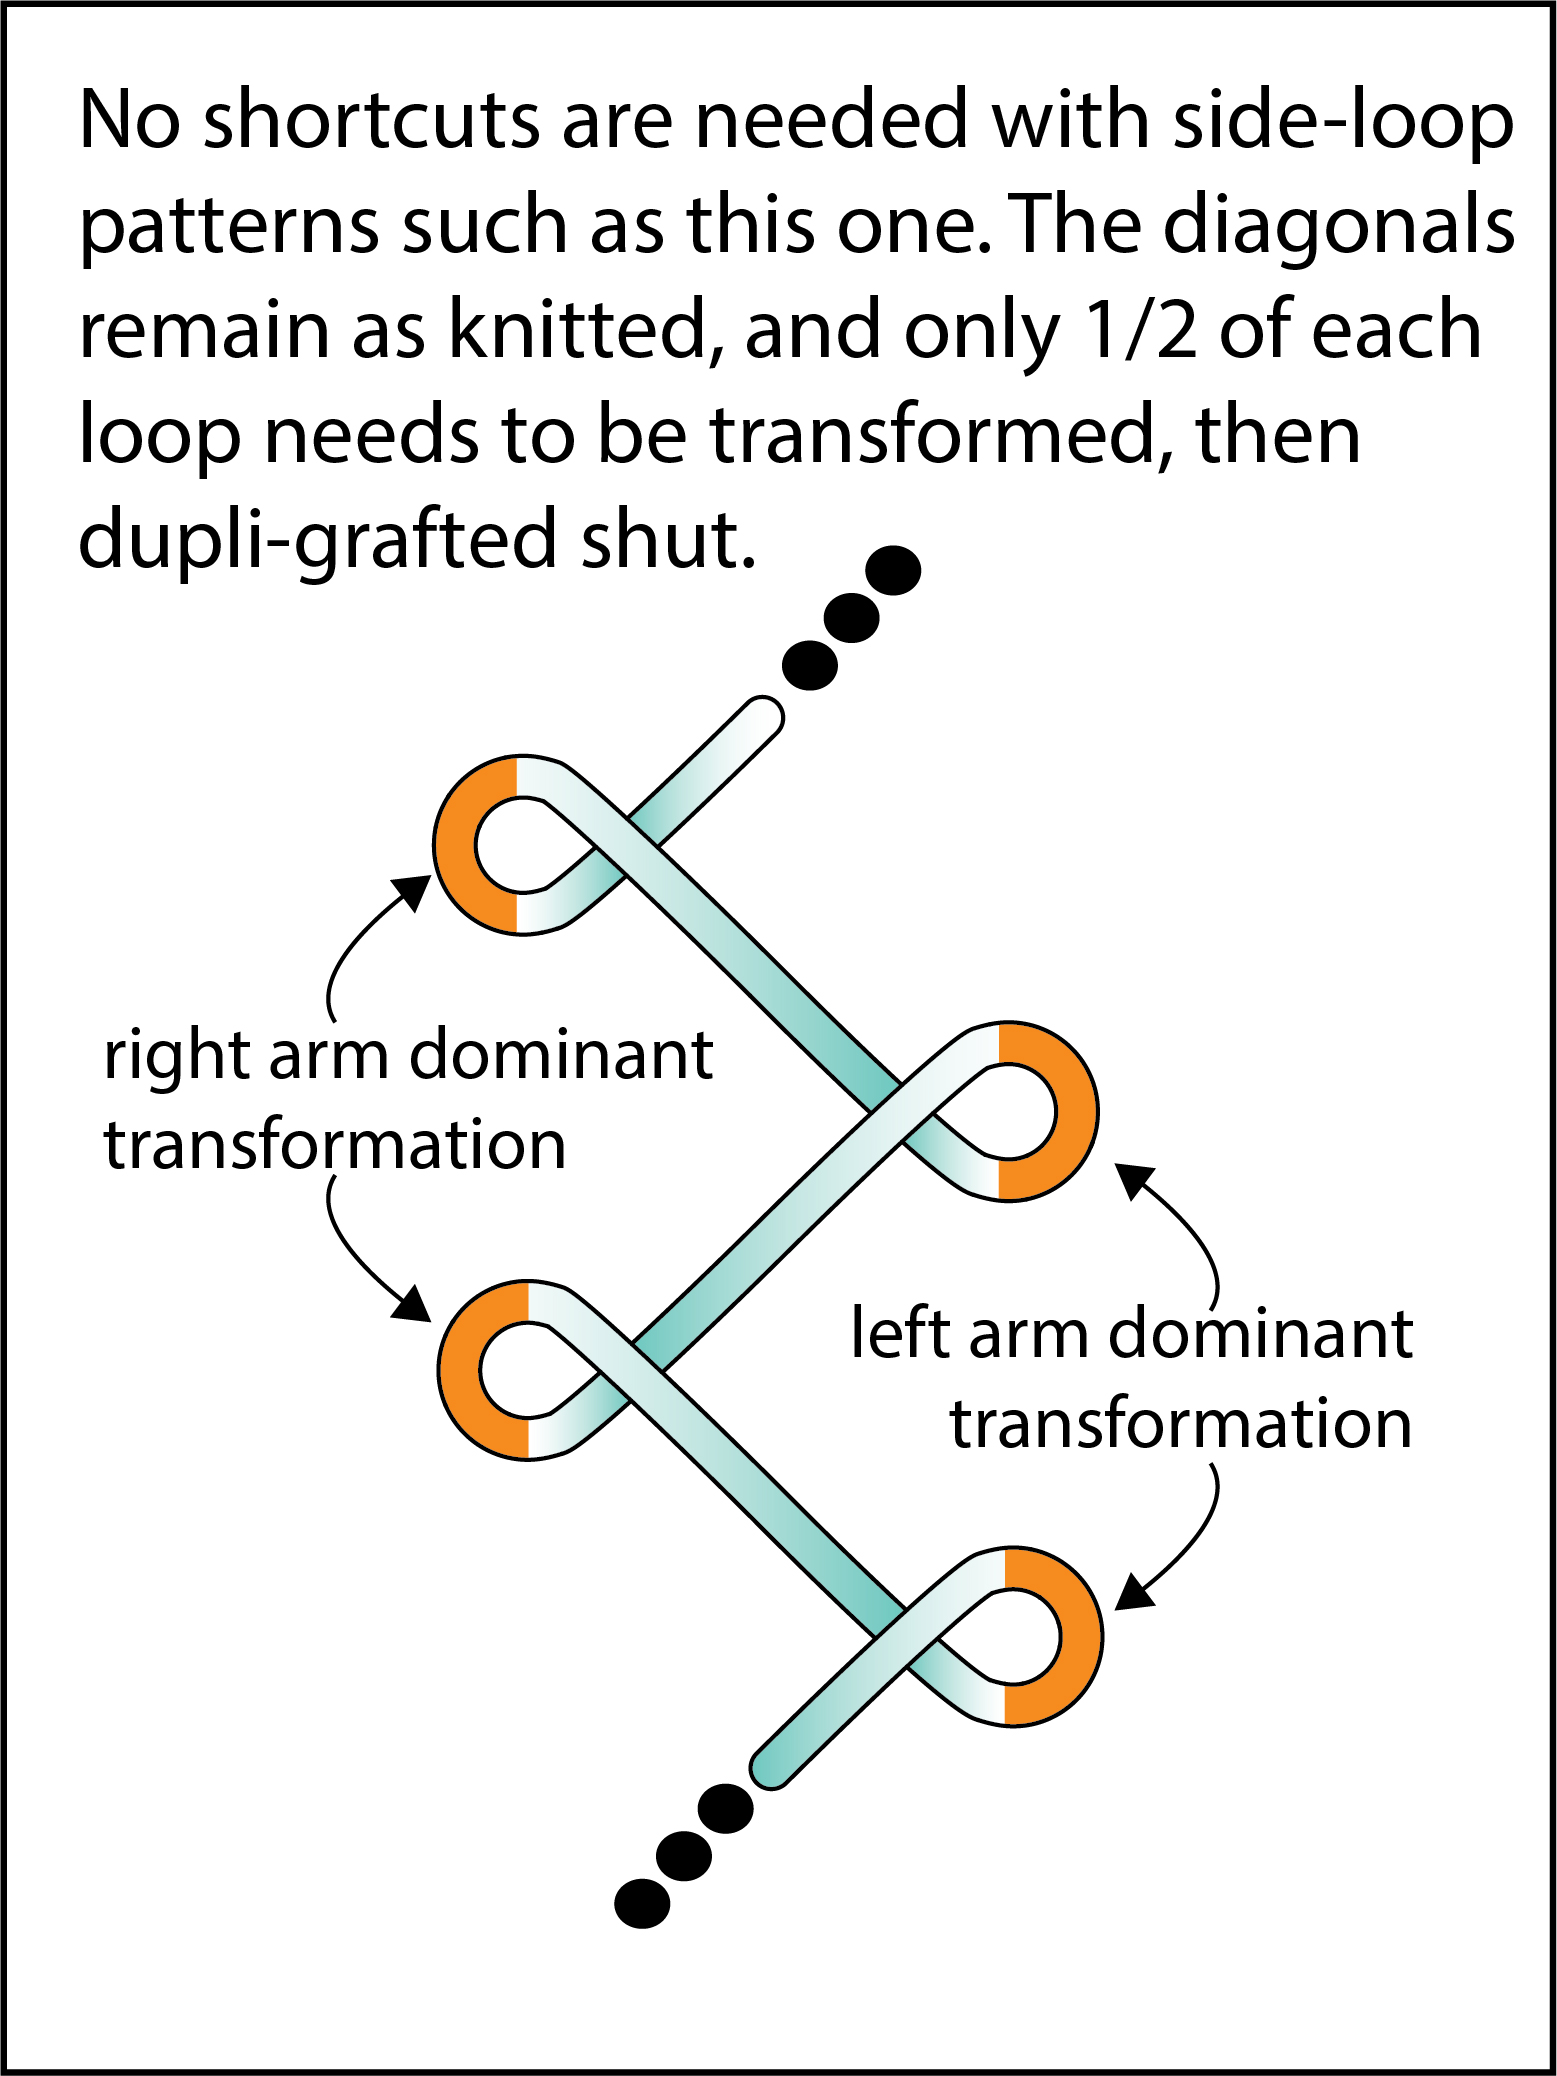
- The lack of shortcuts is because stitches of the diagonals in one-cross side loops are naturally continuous to the adjoining left or right side of the loop on which they enter and leave. It is only the stitches in the OTHER arm of the loop (colored orange, above) which lie opposite-wise and need transformation.
- A free-standing arm is easy to transform at top and dupli-graft at bottom, just like with the simple rings, with no shortcuts needed.
- Therefore, with one-cross side loops, only a small amount of transformation is required: one arm of the loop, either right or left dominant, as per the diagram. This is just as with the simple rings, and the diagonals remain as knitted.
For a real life example of a one-cross side-loop pattern, have a look at this sweater. (And, you know...that's a free pattern!)
- If those outer loops were started on on a scrap yarn holder instead of on M1's, and
- if the increase in the middle stitch was ignored and that stitch instead turned into the purl spacer, and
- if the arm was then transformed on the outer half of each side loop, and then dupli-grafted shut,
then the rest of this lovely sweater could be knit just as written, and you would have eliminated the distortion in loops or background stitches.
BONUS IDEA for using SWATCHES--eyeglasses case
After knitting two identical samples (the darker one with shortcuts, the lighter one with transitions the long way) I slip-stitched them together on three edges, and on the fourth, put a zipper in with my no-sew zipper trick. Before inserting the lining, I sewed it onto the zipper tape. Result: a Double Bowen Knot eyeglasses case. (Details on Ravelry.)

Next time, hearts and other lobed forms. Til then, good knitting
--TK
 |
| Questions? Feedback? Talk to me about this post on TECHknitting Ravelry forum. |