Improved Celtic Knots: Bowen Cross
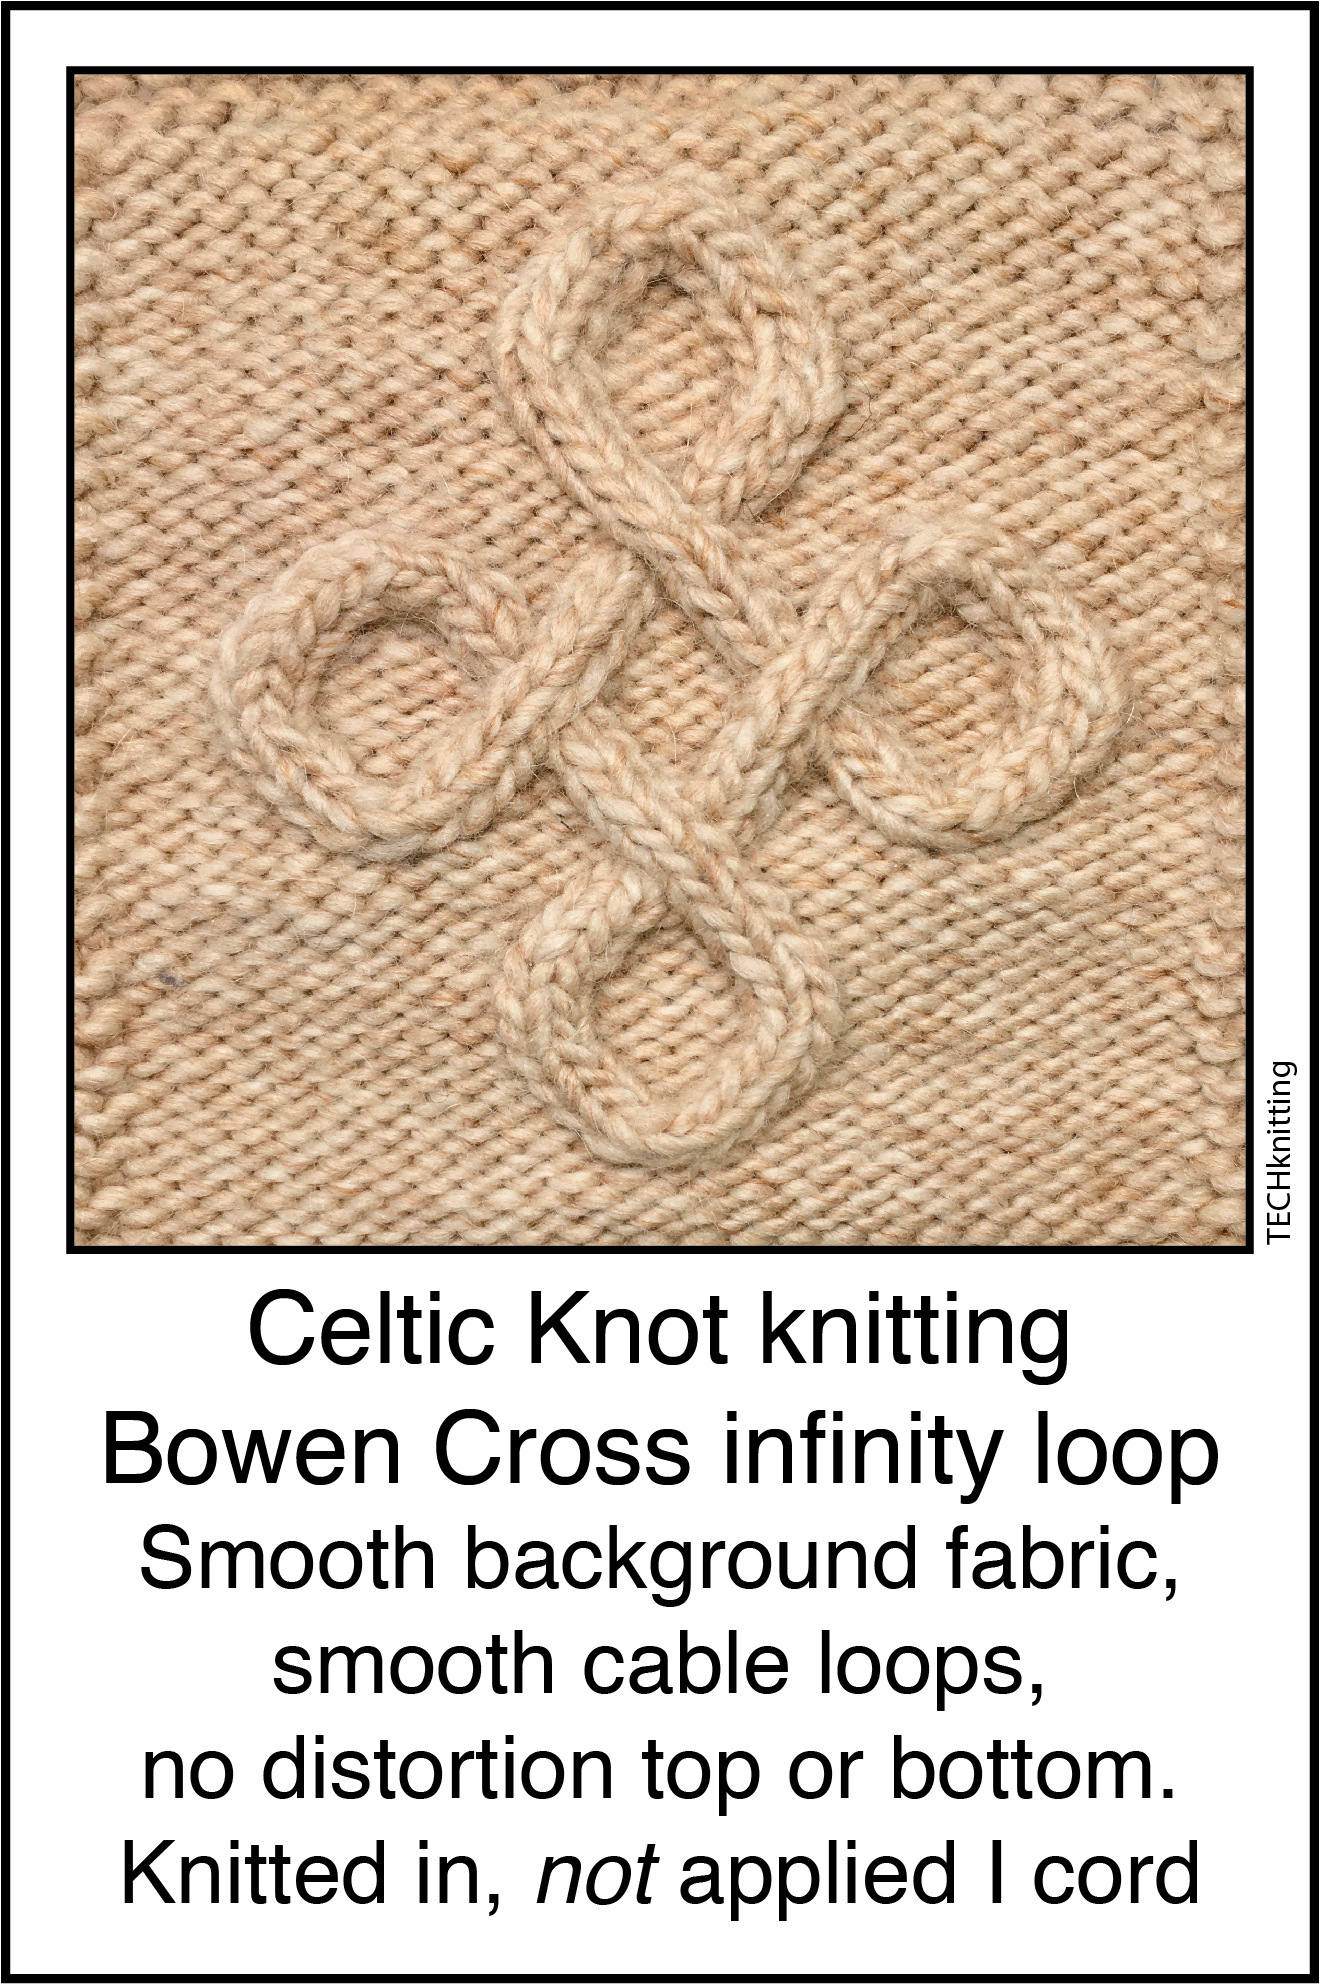
In part 1 of this series, we knit a little round infinity loop. It was an improvement over the usual motif knitting because it features no distortion of the background fabric or in the cable arm, which is unusual in Celtic knot knitting. If you haven't read that post, consider going there now--it is the basis for today's figure, which lays equally smooth and distortion-free.
 |
| Click here to enlarge |
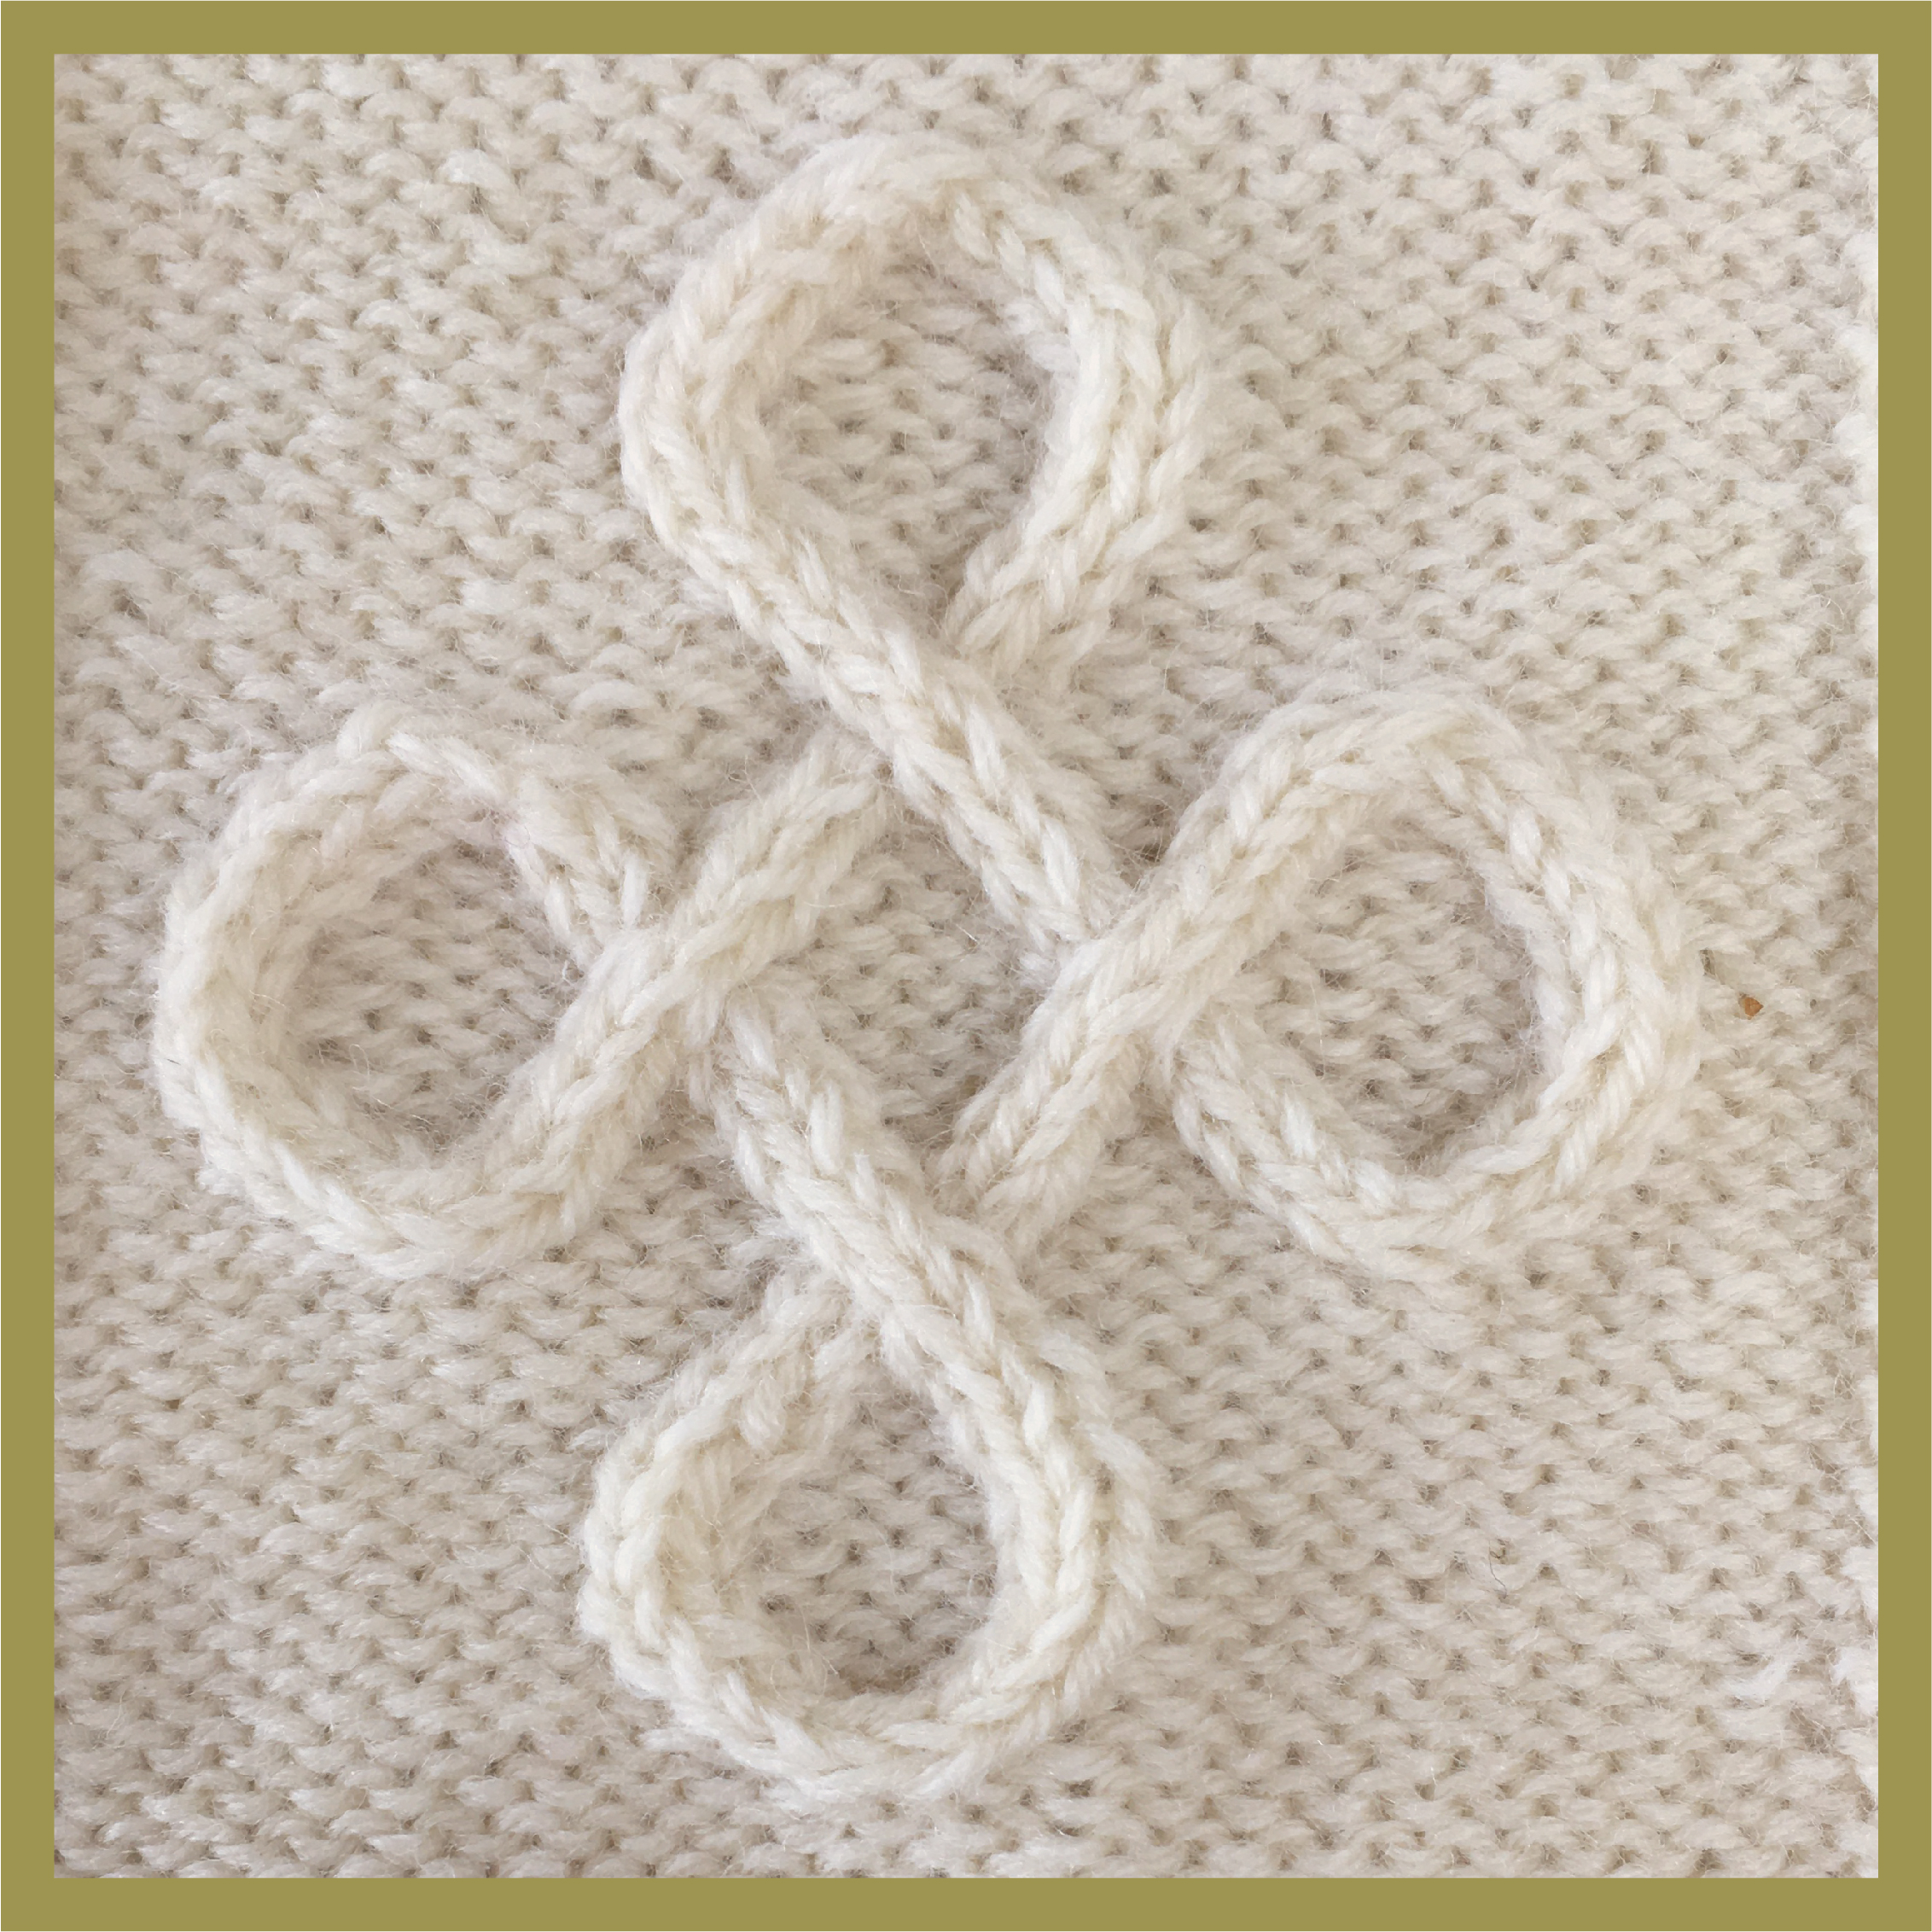
Like most Celtic knots, the Bowen cross features cable crosses. Where two traveling cable arms meet, one crosses over the top while the other passes underneath (blue dots). As you see, these crosses close the loops.
Stitch direction in the cable arm Working infinity loops where the loop is closed by a cable cross is similar in many ways to working on a simple ring. As shown in the diagram below, there are stitch-direction discontinuities in the tops (green dots) and bottoms (red dots) of every one of the four individual loops in the the Bowen Cross. These dots are where the traveling cables of the loops meet head-to-head or tail to tail.
When the stitches of the traveling cables meet head-to-head, or tail-to-tail, this upsets the stitch-direction pattern of the traveling cable as it goes around the loop: the little v's of the stockinette stitch don't nestle correctly.
Therefore, just like the simple ring, we'll rearrange the stitches by the method of transformation (reversing the direction of the stitch V's) until the stitches do nestle correctly. Or at least, and (this is where today's optional SHORTCUTS come in) we will re-nestle all those stitches which show. What happens on the fabric back, under the cable crosses, well, that may be a different matter. Read on!
 |
| Click here to enlarge |
Differences: so far, we have been talking about how the four individual rings in this Bowen knot are similar to simple rings: similar at top, at bottom, and in their background. Like the simple ring, the individual rings of a knot have lots of stitches entering and exiting, and the cable arms are discontinuous, meaning, they meet head-to-head or tail-to-tail.
However, there is a very major difference between a simple ring and the four rings in this knot. See, on the ring, the arms are completely exposed. On any fully exposed form like that, you always have to transform at least half the stitches. Recall that on the simple ring, one of the two arms--either left or right--had to be entirely transformed to make the loop-top and -bottom lay smoothly within a continuous stitch pattern.
Shortcuts and "the long way" (longcuts)
Now this difference between rings and the Bowen cross--these cable-crosses-- allow for what I have been hinting at above with mysterious allusions to SHORTCUTS. Where the entire form is NOT exposed--where there are cable crosses--then there can be secret meetings of discontinuous cable arms on the fabric back because the cable arms provide a potential hiding place.
So, in place of unlatching one-half of all the stitches ever knit into the whole figure, you can instead choose to shortcut that process by MOVING the discontinuity can just far enough to HIDE it under the nearest cable cross.
Before we go further with shortcuts, though, a clarification. You don't really have to hide discontinuities under the cable crosses. The fact is, shortcuts are never really required to transform Celtic knots knit the Infinity Loop way. As stated above, you could eliminate the discontinuities in the same way as was done in the simple rings. Specifically, the "long way" (meaning, the "longcut" or shortcut-less) method would simply transform one-half of all the stitches of this Bowen cross, just as one-half the stitches in the simple rings were transformed.
If you look at all the crosses in the figure, you see that at the top of the bottom loop, and at the bottom of the top loop, such transformations would require releasing and relatching stitches which run over or under a cable cross. Yet, except for the fact that you're re-latching the stitches upside down rather than in the same directions as originally, this would be no different than the trick of fixing a miscrossed cable by latching out one cable arm and then re-knitting it in correct position--annoying, perhaps, but eminently do-able.
If you would like to try your hand at transforming the Bowen cross the long way, consider waiting until the next post--Double Bowen Cross. That post features an illustrated guide to the long-way method, showing just what to unlatch, where. And, that post also shows how to plan the most effective direction of transformation. You can also skip 90% of what's still to come below, because the rest of this post is mostly about shortcuts.
So, the upshot is, shortcuts are optional. And on today's stubby little motif, the shortcuts aren't really going to save time. In fact, using shortcuts on a motif this compact probably takes more time than if you didn't! So the point of showing the shortcuts on the Bowen cross of today's post is only to demonstrate what they are and how they work. See, at some point, you might want to re-jigger an existing Celtic cable pattern to knit it Infinity Loop style (again, more next post). And for that, a knowledge of shortcuts would be handy.
After all this, what, exactly, would we be shortcutting if we chose to go down this road? The shortcuts comprise two tricks.
- The trick which takes a tail-to-tail meeting ( red dot, diagram below) from a loop bottom and relocates it a short distance away, under a nearby cable cross, is called the "placeholder trick." Yes--that's the same name as the trick at the bottom of the loop where you start the loop on a placeholder made of scrap yarn, and yes, it's pretty much the same trick in this context also--holding stitches on a scrap yarn placeholder until you can do something else with them. In this context, that "something else" is to engineer a tail-to-tail meeting under a cable cross (light green dots below).
- The trick which takes a head-to-head meeting (green dot) from a loop top and relocates it a short distance away under a nearby cable cross is called "the dental floss trick." It is called that because you insert dental floss to stop stitches running out during transformation. It has three parts: 1) insert floss, then keep knitting in pattern; 2) transform stitches in the flossed arm down to the point where the floss prevents any further transformation; 3) connect transformed stitches to floss-stabilized stitches, meeting head-to-head, with the meeting hidden behind a cable cross.
The point of both tricks is to reduce the need to transform the diagonal-line elements of a Celtic knot, colored teal in below diagrams. The more diagonal-line elements your Celtic knot contains, or the longer they are, the more these shortcuts make sense.

Again, today's figure is comparatively stubby, so its diagonal-line elements are not that significant. Shortcuts in this post are worked on quick-to-knit demo, not as a practical timesaver. But if this Bowen cross were expanded so there were longer diagonal lines in proportion to the loops, then shortcuts would be a timesaver.
- Geek note: Above the diagram, I said that both tricks serve to reduce the need to transform diagonal line elements of a Celtic knot. But, that was a bit of shorthand. For you see, shortcuts do not affect SIDE loops, they are only applied for top and bottom loops: side loops need no shortcuts. Therefore, I should have said "the point of both tricks is to reduce the need to transform the diagonal-line elements of a Celtic knot where those diagonal arms arise from or terminate in a discontinuity." If this is confusing, hang on! There is more about side loops coming up in the next post of this series, as well as a side-loop specific diagram.
Well, if I have convinced you on the virtue of at least learning shortcuts, then onwards to...
Shortcut knot tricks As stated, the side loops need no shortcuts--simple transformation is all that is required, worked on the outermost half of every side loop. It is the head-to-head meetups, or the tail-to-tail meetups in the TOP and BOTTOM loops which are going to get relocated under a nearby cable cross. Result: instead of transforming one half of the entire Bowen Cross, we have only to transform one-half of each of its four loops, and none of the linear elements.
Below is a map of a transformation. Where the figure is white, there need be no transformation at all. As you see, the diagonal-line traveling cable arms need not be transformed, nor does one-half of each loop. Where a diagonal-line element exits a half-loop which HAS been transformed (darker teal-colored end of diagonal arms on above diagram) the cable arms beneath the cross (called the "lower cable arms") meet head-to-head or tail-to-tail in the secret darkness of the fabric back: the blue triangle arrows on below chart point the direction of discontinuous meet up, the light green patch covers the meeting.
 |
| Click here to enlarge |
Per above, blue arrows mean the stitch pattern of the lower (underneath) cable arm is discontinuous, meaning, the stitches change direction as they emerge from the loop onto the traveling cable arm. The discontinuity occurs where the loop (which was transformed--orange) meets the arm (which wasn't--white), and hides under the cable cross. With both head-to-head and tail-to-tail, the upper cable arm (light green) bridging over the meetings lies smooth, as it was originally knit.
Time for the rubber to meet the road. Here's the pattern for the Bowen cross, with the SHORTCUT tricks explained, stitch by stitch, in the rows where they occur in the pattern.
Pattern for BOWEN CROSS CELTIC KNOT
 |
| scrap yarn placeholder |
Geek note about tracking stitch count. As noted in the intro post of this series, by starting all loop bottoms on scrap yarn placeholders, and grafting away all tops, the background stitch count of infinity loop motifs never changes. Yet, the overall stitch count changes surprisingly. That's because each time you start another loop, four stitches are added: two cable arms @ 2 apiece. So, after starting the first lobe on the Bowen cross, the overall stitch count for the figure (including the margin stitches) is 27, meaning 23 background sts+ 2 cable arms @ 2 apiece. After starting the two additional side-lobes, the stitch count swells to 35: 23 background stitches + 6 cable arms @ 2 apiece. At loop-tops, stitch counts decrease just as rapidly. In column 3, the chart tracks this overall stitch count.Tracking background stitches separately from cable arm stitches is important for garment construction. See, while the background stitch count for the figure doesn't change, the background stitch count of the overall garment is going to change for garment shaping--a decrease for an armhole or neckline, for example. To know where you are in the garment shaping, subtracting the stitches in the cable arms from total stitches on needle yields functional stitch count for shaping.
 |
| Click here to enlarge in free-floating window. Window is printable, choose portrait orientation. Scaling may be required |
|
R |
Bottom: Cast on 23 stitches. Work desired number of reverse stockinette stitch rows to form bottom background. |
sts on ndl |
|
1 |
Purl 11, place two loops of the four-loop placeholder on the L needle, Into these, knit two stitches. p1: this is the center purl spacer stitch. Place last two loops of the four-loop placeholder on the L needle. Into these, knit two stitches, p11 |
23+4=27 |
|
2 |
Knit the knits, purl the purls, repeat every wrong side row. On this particular row, the stitches to purl are the ones made into the placeholder. |
27 |
|
3 |
p10, R-p-T, p1, L-p-T, p10 |
27 |
|
5 |
p9, R-p-T, p3, L-p-T, p9 |
27 |
|
7 |
p9, k2, p5, k2, p9 |
27 |
|
9 |
p9, L-p-T, purl 3, R-p-T, p 9 |
27 |
|
11 |
p10, L-p-T, purl 1, R-p-T, p 10 |
27 |
|
13 |
Below is a map of this row. As you see, row 13 forms the top of loop 1, and the bottom base of loops 2 and 3. Correspondingly, the directions for this row are written in three parts: a, b, and c. |
see 13c |
 |
| Map of Row 13 |
|
13a |
P6, place two loops of a four-loop placeholder on the L needle. Into these, knit two stitches. Next, p1. Place last two loops of the four-loop placeholder on the L needle. Into these, knit two stitches. Next, p 4, then drop running yarn (yellow on below diagram) to back. Now follow written directions for the next part of this row, which is 13b. |
See 13c |
13b--TAIL-TO-TAIL TRANSFORMATIONS with PLACEHOLDERS
After dropping running yarn (yellow) to back, the cross at the top of loop 1 begins. Recall that from the map of transformations, this cross is the secret hiding place (blue arrows), where the tail-to-tail discontinuity of the lower cable arm will be. This means the part of this cable arm within the loop, and the diagonal line part exiting the loop, both meet tail to tail. If you think about it, what the transformation ultimately does is re-locate the tail-to-tail meeting currently at the top of loop 1 to a new and hidden spot under the cross. The below instructions show how to achieve this.
 |
| Click here to enlarge |
Yellow yarn (running yarn) has been slipped to back. Slip next 2 k's (A-purple, B-pink) together onto a bobby pin and drop in front.
Stitches A and B are the lead stitches in the outer and inner columns of the dominant cable arm. However, unlike the simple ring, we are not going to use these as the base for transforming the outer and inner arms of the non-dominant arm, headed by stitches E and D, respectively.
The non-dominant columns headed by E and D will indeed by transformed so the stitches in that cable arm are stood on their head, but, A and B will not be involved. Instead, A and B are going to hang out quietly on their bobby pin, waiting for the excitement to be over.
Slip next stitch (central purl spacer stitch, C-brown) to bobby pin and drop to back.
Slip following k stitch (D-dark red) to bobby pin and drop to front. There are now three bobby pins in work.
D and the next in line (E) are the lead stitches of the non-dominant arm. If this were a ring, the columns headed by E and D would be transformed using stitches A and B as their bases. However, we don't want to turn the loop into a ring. Instead, stitches A and B are held in reserve, waiting to serve as the bottom of crossing-over cable arm, the green patch on the transformation map. Our problem now is, with stitches A and B unavailable to be the base of the transformation of E and D, we nonetheless need something as a base for transformation! As it turns out, we are going to use a temporary base--just like we did with the loop bottoms--meaning we will use a scrap yarn holder, illustrated in green, above.
Transform the next stitch in line into a strand (E-orange) by inserting a crochet hook into one loop of the scrap yarn holder (light green) and drawing stitch E out of the stitch below it (F-blue). Once E is a strand, it is drawn through the loop of the placeholder. Stitch F will be next in line to be transformed into a strand, then drawn through E and so on down to the bottom of the column.
The result is, this is very similar to transforming the non-dominant stitches in the ring, the only difference being that stitch E is not drawn through stitch A, but instead through a loop of the scrap yarn holder as shown.
(By the way: Here's a link if you'd find a review of the transformation process helpful.)
Once the outer column headed by stitch E is transformed all the way down to the end, the bottom stitch is pulled out of the original scrap-yarn holder into which it was knit on row 1, and put on a bobby pin. Next, the bobby pin at the top of this arm is removed from stitch D and the inner column headed by that stitch is also transformed all the way down to the end, again being a stitch originally started off on row 1 by being knit into the scrap yarn placeholder.
When all the transformations have been done, the columns headed by D and E are secured at the bottom of the column on a bobby pin. There they remain, waiting to be grafted at the end of the project. Now, back to the top.
Once all the stitches are transformed, what happens next? It seems you could simply slide onto your left needle, the top ends of the stitches (D and E) which are fastened through the placeholder. After sliding, you would then remove the placeholder. These two stitches + stitches A, B and C would comprise the five stitches required to work a LFC-5, as for an ordinary cable cross. However, that's not quite right, because there is one remaining bit of excitement.
You see, when you re-orient stitches by drawing them upside down, the stitch pattern goes one-half stitch off. (This, by the way, is the same problem you have trying to knit in the opposite direction from ANY provisional cast on.) So, if you look at what you actually have on your placeholder, the strands formerly known as stitches D and E are no longer two whole stitches. Instead what you've got is a half-stitch + a whole stitch + another half-stitch. It all adds up to two stitches, just like Picasso's portraits add up to a face, it's just that the two stitches have become fractionated.
As it turns out, for various arcane structural reasons, the only part of this assembly which could run out is the middle whole stitch. The two outer half-stitches aren't ever going to go anywhere. If you want to geek out over this phenomena, there's more info in this post about shortening 1/1 ribbing. (1/1 ribbing is all half-stitches when you try to work it upside down). But otherwise, take on faith. After transformation of a two-stitch wide cable arm, the half stitches on either side of the whole stitch simply cannot run out.
- Geek Note: this also means you cannot simply unravel a fabric in which a column or columns have been transformed. You must unpick all the transformations, turning them back into strands before you can unravel.
- Ultra-geek mini-note: you can use this otherwise annoying feature to your benefit. See, spaced correctly, standing columns of stitches on their heads--transformation--helps make outdoor sweaters more "run-proof." If you get a big hole from a rock or something, the upside down column slows the process of unraveling.
Now, the bobby pin holder trick comes back into service. As you (carefully!) cut the scrap stitch holder and transfer those stitches to a bobby pin, simply drop into thin air the half stitch with a purple stripe, as marked on the diagram (furthest away from the center purl stitch, C). Yes, just drop it off and forget about it, because, again, it isn't capable of running out. Transfer to your bobby pin, only the whole stitch (which is formed from the tail between stitches E and D on the above diagram) and the other half-stitch (the one adjoining the center purl stitch, formed from the tail between stitches C and D). If you find that the half-loop nearest the purl is floppy, you can twist it up like an m1.
 |
This diagram is color-keyed the same as the previous. The half-stitch to drop is the one with the stripe (left red arrow) which is furthest from the central purl (you can just see the brown edge of that purl at the extreme right). After the stitches are caught, carefully cut the loose both loops of placeholder--little scissors icon. Click here to see this diagram in a large floating window. |
Ta da! You now have three accomplishments.
- At the top of the work, waiting on bobby pins, are all 5 stitches about to be worked into the upcoming cable cross: the cross which will close off loop 1.
- Via transformation, you have effectively moved the discontinuous tail-to-tail meeting--originally at the bottom of loop 1--to a new location at the top of the non-dominant arm, there to be hidden for all time by the upcoming cable cross.
- At the bottom of the work, the stitches of the non-dominant arm have all been transformed and are waiting on their bobby pin to be grafted at project end, a graft which will meld them perfectly, head-to-tail with the stitches of the dominant column.
- the center purl on its bobby pin is brought to the front.
- the two loops which used to be stitches D and E are transferred from their bobby pin to the left needle and knitted off.
- the purl stitch is transferred from its bobby pin to the left needle, then purled off.
- stitches A and B are returned to the left needle and knitted off.
Now work the last part of this row, 13c, below.
|
13c |
This is the third and last section of row 13. Per the map of the row, it includes the bottom base of loop 3. p4, place two loops of a four-loop placeholder on the L needle, Into these, knit two stitches. Next, p1, Place last two loops of four-loop placeholder on the L needle. Into these, knit two stitches, then p6 |
27+8=35 |
|
15 |
p5, *R-p-T, p1, L-p-T, p2, repeat from * one time more, R-p-T, p1 L-p-T, p5. |
35 |
|
17 |
p4, *R-p-T, p3, L-p-T, repeat from * two times more, p4 |
35 |
|
19 |
p4, k2, *p5, RFC-4, repeat from * one time more, p5, k2, p4 |
35 |
|
21 |
p4, * L-p-T, p3, R-p-T, repeat from * two times more, p4 |
35 |
|
23 |
p5, *L-p-T, p1, R-p-T, p2, repeat from * one time more, L-p-T, p1, R-p-T, p5 |
35 |
|
25 |
This row is in five sections (a-e) per map below. The two outer sections (a and e) are the 4-stitch-wide purl margins. The inner portions of row 25 (b, c, and d) form the top of loop 2, the cross at the base of loop 4, and the top of loop 3, respectively |
see 25e |
 |
| Map of row 25 |
|
25a |
Purl 6. Now follow directions below (25 b-d) |
See 25e |
In this section, the top of loop 2 is worked closed, plus a left transformation on the half loop (orange on above row-map). The light purple wall of text below is the stitch-by stitch of the transformation. Skip to the bullets at bottom of this section if you're confident in your transforming skills by now. (BTW: here is a quick diagram-only review of transformation.)
Drop running yarn to back. Park next knit stitch on right needle. Place the following knit stitch on a bobby pin, drop to front. Place next purl stitch (a center purl) on a bobby pin and drop to back. Place next knit stitch on bobby pin and drop to front. 3 bobby pins in work, each with a single stitch.
There should now be a single knit stitch at the tip of your left needle. (If you've been following along with this series, this is the first instance of a left-arm dominant loop.) Insert a crochet- or latch hook into the front of this stitch, checking it is not twisted. Release the stitch parked on tip of R needle. With a slim dpn, pick this stitch loose from the stitch below it, so it becomes a strand. Draw the strand through the loop on your crochet/latch hook, transforming the strand back into a stitch, but now upside-down. Continue "strandifying" and then transforming each stitch below, all down this column, to the bottom. The last stitch is drawn out of the scrap-yarn placeholder at the column-bottom, transformed and then put on a bobby-pin holder.
There are now two stitches on bobby-pins in the front of the work. These are the inner columns of the cable arms which make up the loop. Again, the left stitch-column will be dominant, so, after removing the bobby pin holders, insert the crochet- or latch hook into the stitch at the top of the left column. Make sure the stitch is in no way twisted, then strandify and transform each stitch in the inner right stitch column, all the way to the bottom, where the last stitch can join the stitch already there on the bobby pin. Draw the now-empty loops of the scrap-yarn placeholder to back, out of the way. We will leave the grafting to project end. Now, return to the loop-top.
•Replace the center cable stitch on L needle and purl it off. Having just gotten the knit stitches out of the way (as they now stand above the background fabric) means this is your opportunity to re-adjust the tension in the background stitches. Tighten the center purl as well as its neighbors east and west.
• End this section by purling an additional 4 stitches.
25c DENTAL FLOSS MANEUVER FOR HEAD-TO-HEAD TRANSFORMATIONS--part 1: preparing for transformation by inserting floss
In this section, a left front cross-5 (LRC-5) is performed on the next 5 stitches. This forms the bottom of loop 4. Recall from the map of transformations, that this is one of the spots where the underneath cable arm lies discontinuously under the cross (blue arrows). The little maneuver with the dental floss below prepares the way.
Slip next 2 k stitches to bobby pin and drop holder to front of work. Slip next p stitch to bobby pin and drop holder to front of work. Thread a blunt needle with 6" dental floss and, without removing these stitches from the left needle, pass the floss through the next two knit stitches. Tie floss into a loop, drop loop off to back. With the floss remaining in the stitches, yet ignoring the floss as if it were not there, k2. Return central purl stitch to left needle, then purl off. Return last 2 stitches on bobby pin to left needle, knit off. FYI: These last 5 stitches worked formed a LFC-5.
End this section by purling 4.
25d
In this section, the top of loop 3 is worked closed and a right-transformation is worked on the half-loop shown in orange on the row-map (black map, 25d). Again, the light purple wall o' text is mostly the stitch-by-stitch of the transformation. If you've got that, skip to the bullet at the bottom of this section.
There are five stitches in the left loop top. This will be a right-arm dominant transformation. Drop running yarn to back of work. Slip the next knit stitch to right needle. This is the top outer stitch of the dominant arm. Place next knit stitch on bobby pin, drop to front. This is the top inner stitch of the dominant arm. Place next stitch (center purl) onto bobby pin and drop to back. Place next knit stitch on bobby pin and hold in front of work. This is the top inner stitch of the non-dominant arm. The next knit stitch waiting at the tip of the left needle is the top outer stitch of the non-dominant arm. Insert crochet or latch hook into stitch held on tip of right needle. Using crochet hook and dpn as previously described, strandify the stitch held at the tip of the left needle, then draw strand through loop on hook, thus transforming it back into a stitch, but now upside down. Continue in like manner, strandifying and transforming stitches down the outer column of the non-dominant arm, drawing the last stitch to be transformed out of the scrap-yarn placeholder. Place last stitch on bobby pin when transformed.
There are now two bobby pins in front of work. Insert crochet- or latch hook into topmost right stitch, which is the top inner stitch of the dominant arm. Remove pin. Remove pin also from top stitch of non-dominant arm. Use dpn to to strandify non-dominant stitch, then pull this strand through the loop on the hook. Continue in like manner, strandifying and transforming stitches down the inner column of the non-dominant arm, drawing the last stitch to be transformed out of the scrap-yarn placeholder. Place last stitch on the bobby pin holding the outer stitch when transformed, two stitches on bobby pin at loop-bottom. Grafting is left to project end.
•When transformation is complete, and the transformed stitches are parked on bobby pins at loop bottom, turn to the top of work, and slip center purl to left st. Again, this is the opportunity to adjust the tension of the background stitches. You are now ready to finish row 25.
|
25e |
Row 25 is in five parts, of which this is the last. Purl 6 Here at the end of this (complicated!) row, you should have 11 purl stitches as a margin on each side of the work, with 5 stitches of a just-made LFT in the middle. At the back of the work, there should hang a loop of dental floss. |
35-8= 27 |
|
27 |
p10, R-p-T, p1, L-p-T, p10 |
27 |
|
29 |
p9, R-p-T, p3, L-p-T, p9 |
27 |
|
31 |
p9, k2, p5, k2, p9 |
27 |
|
33 |
p9, L-p-T, p3, R-p-T, p9 |
27 |
|
35 |
p10. L-p-T, p1, R-p-T, p10 |
27 |
|
37a |
This row is in three sections (a-c). It is the top of loop 4. For this, the first section of this row, purl 11 stitches. Next, follow the directions below for row 37b. |
see 37c |
37b
In this section, the top of loop 4 is worked closed and a left transformation is worked on the half-loop shown in orange on the map of transformations. Yet again, the light purple wall o' text is mostly the stitch-by-stitch of the (left!) method of transformation. If you've got that, skip to the bulleted portions of this section.
Drop running yarn to back of work. Park next K stitch on tip of R needle. This is top outer stitch of non-dominant column. Place next K stitch on bobby pin and drop to front. This is top inner stitch of non-dominant column. Place next stitch--center purl--on bobby pin and drop to back of work. Place next K stitch on bobby pin and drop to front of work. This is top stitch of dominant column. Insert crochet- or latch hook through K stitch on tip of L needle. Making sure this stitch is in no way twisted, proceed to transform the outer stitch column of the non dominant (R) arm, beginning with the stitch parked on the tip of the right needle.
(DENTAL FLOSS MANEUVER, part 2)
• Continue strandifying and transforming this outer column until you are forced to stop because you have come to the barrier formed by the stitch tied off with dental floss.
Wiggle the last stitch loop you have freed to the fabric back with your hook, and place it on a bobby pin.
• Next, return to the loop top and there remove the bobby pin from, then insert the hook into, the head of the top inner stitch of the dominant column. Making sure this stitch is in no way twisted, repeat the strandifying and transformation process on the stitches of the inner column of the non-dominant arm.

• Again continue strandifying and transforming this inner column until you come to the barrier formed by the other stitch tied off with dental floss. Wiggle the last stitch loop to the fabric back with your hook, and place it on a the same bobby pin holding the other bottom stitch.
• On the inside of the fabric, under the cable cross, you have just engineered a head-to head meeting of a traveling cable column. There will be four loops: Loops 1 and 2 on a bobby pin, and loops 3 and 4 held on dental floss.• Leave grafting this meeting until the end, and now return to the top of the work. Return the center purl stitch to the needle and purl it off, again taking the opportunity to correct the tension on the center purl and its neighbors, east and west.
|
37c |
Purl 11. At the end of this row, the motif is finished. The stitch count has reverted to the original number cast on (23) |
27-4 =23 |
Top: Work the desired number of reverse stockinette rows above the top of loop 4, then any decorative top border, then bind off.
Grafting head to tail
Finish the bottoms of loops, by "dupli-grafting" which is the same process as used for the simple ring (although it is worked in mirror-image for loops where the left arm was dominant).
Grafting head-to-head (DENTAL FLOSS MANEUVER, part 3, conclusion)
For the head-to-head graft on the fabric back at the base of loop 4, you can work any kind of an improvised graft--no need to work a real graft as this meeting on the fabric back will never, ever show. Another choice would be to sew the four loops together with yarn. If you do graft or sew, the yarn ends can be worked in under the bridges of the loop per usual.
Alternatively and easier, just run a yarn strand through all four loops, making sure to bury the strand-ends very well in the fabric, using a sharp needle to skim them in.
Whichever method you use to finish up this head-to-head meeting, the important thing is to make sure every loop is securely caught in some way. The final step is to cut loose the loop of dental floss.
Order of work, timesavers
Waiting til the end to do the transformations, just as with the grafting
The first transformation (top of loop 1, leading to cable cross) must be performed mid-row as written, or the cable arm would have no base from which to exit the transformed loop. However, once you've worked a few Celtic knots infinity loop style, it becomes evident that where loop-tops dead-end against the background fabric, it's not actually necessary to work the top-of-loop transformations in the middle of a row. I wrote the pattern that way so it's clear how to do what to which cable arm where. But just because the pattern is WRITTEN that way, you don't have to DO it that way. In fact, I never do myself.

To do this trick on this motif: at the tops of loops 2 and 3 on row 25, as well as loop 4 on row 37, you'd follow the knitting directions, but not the transformation instructions. Instead, slip the cable arms off onto bobby pins, as shown in photo, left.
 |
| Transformation and grafting done after knitting is finished |
Quicker "strandifying"
Another timesaver: you don't actually have to use a dpn to "strandify" the loops before transforming them upside down. You could simply use the hook itself to undo the stitches, thus strandifying, then hooking them in one smooth motion. This is very much like hooking up a let-down ladder, just with the added motion of first unpicking the stitch, and (again) is very like the controlled drop of this post. The only caution here is to unpick from the strand between the two stitches of the cable arm. Working from the outside or inside of the cable arm runs the risk of grabbing a background strand. Of course, the background strand won't come undone--it is not part of the column--but a mistaken yank like that can cause distortion.
Pointy tops/bottoms
As with the row 18/19 modification in the rings of the previous post, if your stitches are tall, you may find that the tops of the loops are turning out pointy. To correct, work as follows.
When you are on a BACKSIDE row with only the original purl spacer left between the arms (arms have converged) then instead of purling the purls (working into the stitches of the cable arms one last time) instead, slide the stitches of the cable arms off onto a bobby pin, knit the purl spacer (the opposite of the purl is a knit--you are on a backside!) and again slide the stitches of the second cable off onto a bobby pin. This reduces the height of the loop-top by one row, thus pulling four stitches out of the (inclined to be pointy) top. In this pattern, you would work this trick on the tops of loops 2 and 3 on backside row 24 and the top of loop 4 on backside row 36. Row 25 would then feature purling 11 at both margins, and row 37 would feature purling the entire row. You would also have to work the transformations after the fact, per above shortcut, if you use this trick.
If you have pointy bottoms, you can work this trick in reverse by picking up the stitches for the cable arms on a backside row one row higher than the instructions call for. You would purl the loop-bottom stitches onto the scrap yarn holders, rather than knit.
Bonus idea: modified Bowen cross under a V-neck point
This is a boy's "chain-mail" seed-stitch sweater, knit in part-lurex yarn for the metallic look. This modified Bowen cross is the "shield-device" on this "suit of armor." I think it forms a handsome sort of flourish under the point of the V neck. What do you think?
 |
* * * |
Next post will be about the DOUBLE Bowen cross, with info on--
- adapting Celtic knot motifs found elsewhere to Infinity Loop method
- determining where and whether shortcuts make sense
- transforming the long way--illustrated how-to
- mapping the direction of unlatching
- transforming under a cable cross, working the long way
- more about side-loops
Til then, good knitting--TK
 |
| Questions? Feedback? Talk to me about this post on TECHknitting Ravelry forum. |
-Celtic Knots, improved: Bowen Cross and introducing shortcuts (Infinity Loops part 2)
-Celtic Knots: adapting Infinity Loops to complex forms--double -
Bowen Cross (Infinity Loops part 3) (THIS POST)
-Celtic hearts and teardrops Infinity Loops (Infinity loops, part 4)
-Infinity loops in color: Celtic Valentine's heart (Infinity loops part 5)