Thursday, February 27, 2025

Double fold back steeks
for wall hangings or cushion tops

Double fold back steeks are a trick where all the prep work is done ahead of time. They come in two versions: with and without borders. In both versions, when the steek is cut, the edges spring away from the scissors with the cut-tails already firmly tucked under. No additional work has to be done to hide the cuts. The cuts can't be seen, and, worked in wool, won't come undone. 

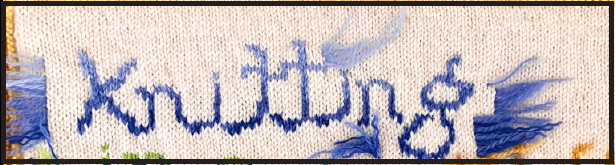
Below is a sample with dark blue borders ("B" and "E"). It has been folded so you can see inside and outside (small inset). The cut tails are hiding under "D," the folded-back steek. 

Small inset: a steeked and bordered sample, folded over. 
In closeup:
--A, outside stockinette fabric 
--B, right garter stitch border, seen from outside 
--C, inner reverse stockinette fabric 
--D, folded-over steek ("steek facing") hides the tails. 
--E, left border seen from inside 
Click to enlarge.


Brief background 

"Steeking" is a trick for tubes knit in the round. After knitting, the tube is cut with a scissors, so it lies flat. The above example was knit in the round, then afterwards steeked. Securing the cut edges is the chief concern in steeking. That's where today's trick, double fold-back, comes in. 

Like all steeking, this method is really intended for wool, meaning the fiber that comes off the back of a living sheep. This is because wool is grippy. Steeking slippery yarns is asking for trouble. If I absolutely HAD to steek a slippery yarn, such as cotton or acrylic, double fold-back is the method I would choose. Nevertheless, you have been warned! Steeking works best in wool.

Double fold-back is quick and sturdy. However, due to its thick edge, its highest and best use is where bulk is of no concern, but a quick sturdy method is just the ticket: wall hangings, cushion tops, and perhaps, blanket edges.

In a way, this post is actually third in a series of TECHknitting posts about wall-hangings, especially those with words and sayings on them. However, double fold-back is not restricted to knitted sayings, but will work for any kind of wallhanging or cushion where the edge is knit in one color

As mentioned above, double fold-back steeks come in two versions: plain and bordered. We'll look at the plain version first: the bordered version is merely a fancier variation. 

Plain double fold-back steeks, the concept

In this top-down view of the finished product, the fold-back is two folds. Each fold is made along a "fold column," colored bright blue below. Each fold is held in place by a very thin crocheted chain stitch, shown in red, below. In the real world, the chain would be worked in a matching color, a yarn split of the original yarn, perhaps. The red is for visibility / demo purposes only. 

Large asterisk *  marks the outer fold,
Small asterisk =inner fold, 
Bracket } = steek facing. This is "D" in the opening photo

The outer fold becomes the new fabric edge, marked with the large asterisk above. In the plain (unbordered) version, this new edge is what the world sees: a tightly turned column of stitches, firmly flipping the fabric back on itself. 

The inner fold, marked with a smaller asterisk above, tucks the cut ends between the fabric and the first fold. The cut ends are indicated by the little spikes. Two 180 degree turns have hidden the cut-tails forever: a jelly roll stuffed with yarn ends. 

Viewed from the inside, the stretch of fabric between the folds is called the "steek facing." ("Facing" = a bit of fabric turned back along the inside of an edge.) It is indicated by the bracket, above. 

This real-life sample (below) is pinned back on itself to display the steeked edge from both inside and outside. The red yarn fastens the top edge of the steek facing, the small asterisk points at the inside edge of the steek facing, the large asterisk indicates at the outside fabric edge as seen from both inside (orange arrow) and outside (purple arrow). The bracket again indicates the span of the steek facing.  

The large asterisk marks the outer edge as seen from the inside (orange arrow) and the outside (purple arrow). The small asterisk marks the inner edge and the bracket spans the steek facing. 

Four folds and how they curl up--top view

This sketch shows there are four fold columns: two on either side of the cut line. The fold columns themselves are highlighted in bright blue, and again, the red "stitches" show the top view of where the crocheted columns pull the fold columns shut on themselves.  

The pink scissors show where the cut will be made. 
Green borders the outer left (OL) fold column, 
 yellow borders the inner left column (IL). 
Red borders the inner right (IR) fold column,  and
 tan,  the outer right (OR) fold column.  

The arrows show how the fabric folds up after the cut--two flips. As with the opening sketch, the lower part of the illustration shows the cut ends (little spikes) trapped inside the jelly roll of folded columns. And, it really is a jelly roll: as soon as you cut, the edges spring away from the scissors to roll over automatically. Large asterisk= outer edge, small = inner edge

As you cut up the middle between the two sets of inner folds (pink scissors) the arrows show the direction in which the fabric folds back on itself . In the folding, the cut-tails (little spikes, bottom row of diagram) curl to the inside where they cannot be seen and do not unravel. 

Spacing of the columns

In this real life demo, a line of beige yarn was run up the middle of the cut column. The rest of the below photo is color-coded same as the sketch. 

OL: outer left fold column (green) 4 columns to left of cut column
IL: inner left fold column (yellow) adjacent to cut column
PINK ARROW: cut column (beige yarn--steek will be cut open up the middle of this column at the end)
IR: inner right fold column (red) adjacent to cut column
OR: outer right fold column (tan) 4 columns to right of cut column

As in the sketch, the fold columns themselves are highlighted in bright blue.


With this spacing, a double fold-back steek requires a "bridge" of 9 stitches, but other spacings are possible. For example, the inner fold column could be located one full column away from the cut column or even more, for extra security with slippery or thin yarns. As the inner fold column moves outward from the cut line, the outer fold line can also move. 

It is also possible to re-locate the fold columns by half-steps. By squinting, you can see the V's in stockinette columns as upward-pointing (Λ) instead of downward-pointing (V). By switching back and forth between seeing upward Λ's and downward V's, you can move the fold columns over by a half-column at a time.

The actual spacing is knitter's choice. It depends on the slipperiness of your yarn and the item you are making. The yarn in the samples is Patton's Classic: a 100% non-superwash wool yarn with good gripping power. Therefore, locating the inner column adjacent to the cut column was a fine idea. Further, this being 100% wool, I intended on afterwards needle-felting the steek-facing to the back fabric face, so the steek facing would not be able to flip open under any circumstances. And further, this was meant to represent a pillow edge, where the back would never be exposed or get any wear. If this was a slippery yarn in a more exposed position--a blanket edge, perhaps--the column spacing ought to move out from the cut line accordingly. The take-away here is to figure out your column-spacing in your yarn, then cast on enough extra stitches for the bridge, according to the spacing chosen.

How to

Begin by fastening the red yarn.

Left below: draw a loop of red yarn through the fabric just above bottom edge, in the space between the cut column and the inner fold column. Thread the yarn tail through the loop 
Right below: tug on the tail to tighten. 


Left below: using the running  yarn and the crochet hook, draw a loop through the fabric just above the bottom edge, on the outside of the inner fold column. 
Right below: grabbing the running yarn from the fabric back with the hook, draw a second loop through the first. Tugging on the second loop tightens the first. (BTW: Drawing one loop through another like this is the set up for an actual crochet stitch called "single crochet.")

With tightened loops over the fabric edge bordering both sides of the inner fold column, it is secured against unraveling when the cut is made. 


Slip stitching inner and outer folds in place


The work continues by firmly folding the fabric back on itself using slip stitching.

Fold the fabric so the inner fold column lays along the top of the fold. 
Left below: insert the crochet hook from front to back, under both arms of the column's first stitch. Right below: draw a loop of the thin yarn through the loop around the hook, as well as under both arms of the stitch. 

The new loop has pinned the old loop against the back of the fabric, and folded the column back on itself. The new loop is now on the front fabric face, towards you, and the thin running yarn is behind the fabric.


Insert the hook through the second stitch of the column and catch the hook around the running yarn. Draw this new loop of thin yarn through the column stitch and through the old loop. This is a slip stitch. Continue slip stitching along the entire folded column. Here is a half-minute video of the process--it is silent (no transcript).


If you prefer illustrations, below is the idea as laid out from the front of the fabric. In other words, if you could flatten out the work, it would look like this. The bright blue column is the fold column, and the red yarn is worked into a chain under this column, with the brown crochet hook.

Click to enlarge. The pink arrow shows where the crochet hook will insert next.

If you fold the work, below illustration shows the path of the yarn under the arms of the fold column.

When you reach the top edge of the fabric, again secure both sides of the inner fold column. Next, continue securing across the top of the fabric until you reach the outer fold column, using the same single crochet maneuver as was worked at the bottom.  


Once the reinforcing has reached the outer fold column,  fold the fabric in the same manner as before, this time with the outer fold column at the top of the fold, and again proceed with slip stitching down the column as shown in the video. Below is the outer fold column in progress, laid flat so you can see what's going on. 


Continue to the bottom of the outer fold column, then secure along the bottom edge of the fabric between the inner and outer fold columns, again with single crochet.

 Here is what one side looks like when the inner and outer fold lines have both been worked. When both sides are done like this, it is time to cut. Upon cutting, the inner fold column (top of photo) flips to hide the cut ends, while the outer fold column (bottom of photo) flips to become the outer edge of the fabric. The fabric in the columns between becomes the facing. 

View of the fabric front before cutting. 

To avoid repetition, I am holding off on showing the actual cutting. In the next section (bordered double fold back) there is a video of cutting, and the action is the same. So for cutting demo, read on.

Part 2: Border stitches picked up


In this variation, the inner fold column is worked identical to the no-border variation, with the spacing the same as shown on the set up photo, above. However, the outer fold back column is a real 2-for-1 trick. By picking up stitches right through the fabric, not only do you get the live stitches for the border, but you also create the outer fold-back. This means that the outer fold back column must be picked up in the same color yarn as the background, because these are the stitches which form the foundation row of the side-borders. 

Before working the outer columns, both inner fold-back columns are worked. This is the same as was done on the plain-edge version.  For demo purposes, I again used red heel reinforcement yarn for both inner fold-back columns. The fold columns are so tightly worked that a photo of the flat fabric would not show details, so here is a fifteen-second video of rotating the fabric, so you can see the two inner fold columns when done. 


Transcript: As you can see, both inner columns have been worked. 


After the two inner fold back columns are worked as shown above, it is time to work the outer fold-back columns, picking up live stitches. 

Picking up the stitches


 This 30-second video shows the process of picking up the live stitches through the outer fold column. 


Transcript: Here, I’m creating the outer fold column by picking up stitches, color matched, on the crochet hook and then transferring them to the knitting needle. And, these are the live stitches on which the border will be knit. 


You may be wondering what is going on with that strange fluffy yarn. Why not use regular yarn as it comes off the ball?

You may also be wondering why every single stitch in the outer fold back column is getting a live stitch picked up through it. As you know, the row gauge and the stitch gauge for knitting rarely match: there almost always more rows per inch than stitches per inch. With a one-to-one pick-up, there would be too many stitches across the row ends: if every picked up stitch were knit, the border would ruffle and look terrible.

The problem is that a fold column doesn't fold evenly unless every single stitch is folded back. Therefore, we cannot skip around, picking up fewer live stitches (the usual solution) to match row- and stitch-gauge. If we skipped a stitch here and there in the fold column, a puffy spot would develop where the stitch hadn't been folded by working through it. So, this trick uses a two-part work-around. 

 First, the stitches are indeed worked one-for-one through the row ends, but using thinner yarn. This accounts for the strange fluffy yarn in the video. Again, the main work is in Pattons Classic, an all-wool worsted-weight yarn spun of three plies, but I picked up the stitches using a two-ply split. Result: the picked-up stitches are only two-thirds as thick. 

The second part of the work-around occurs after pick-up. In working the SECOND row or round, the stitch count is adjusted to match the stitch gauge by working decreases at the appropriate rate. On row 2 of the sample with the dark blue border, I used the dark blue to knit two picked-up stitches normally, then worked the following two stitches together as a knit-two-together (k2tog) decrease. This decreased away one stitch of every four; a twenty-five percent reduction, and one which matched my stitch gauge. 

The picked up stitches were worked in the main color--the lighter teal blue--rather than in the darker-blue border color. The dark blue was added in one row / round above this foundation row. In this way, the decreases show less because they blend into the mass of background color. If the live stitches had been picked up on darker blue, the texture-disturbance caused by the decrease would have been more obvious.

Here's another important point. To pick up live stitches for the outer fold column, the hook is inserted TOWARDS the cut line → ፧  ← for both borders. This makes the border flip inwards when cut. 

Insertion TOWARDS the cut line (red yarn) ---> (L-to-R)
(on the other border, towards the cut line would be <--- (R-to-L)

The direction of needle insertion is different than previously. On the outer fold column of the plain-edge version, and the inner fold columns of both versions, it simply does not matter which way the hook is inserted--whether towards or away from the cut line. However, in the bordered version, it does matter. The border will flip the WRONG WAY-- outwards instead of inwards--if you pick up the live stitches on the wrong side of the outer fold column. 

Here is a sketch showing the same situation as the above photo, but with the pick-up yarn added. The live stitches are picked up in the same color as the background, but here the live stitches are outlined in pink so you can see them. The inner fold column is demo'ed in red, the cut line drawn in the thicker red "twist," second column from right. 

The crochet hook (brown) reaches under both arms of the outer fold column (bright blue). It picks up the live stitches (pink outlined) and places them on the knitting needle (gold). The  inner fold line (bright blue) has been previous worked in slip stitch (red). The cut line in the thicker red. Click to enlarge. 

After the live stitches are on, it's time to knit the borders. (Note that, if you plan to work an all-around border, the borders are worked in a bit different order, more on this alternative below.)

In the below example, the inner columns have been worked, the outer columns have been worked, the border is on. Here is the situation just before the cut--on this sample, as on the sketch, the cut line is marked in red wool.


Instead of pasting labels all over this photo, here is a half-minute video identifying the entire finished assembly as it looks before the final step of cutting.


Transcript: What we’re looking at here is, the outer fold column, the inner fold column, the cut column, the other inner fold column and the other outer fold column. From the outside, there’s the band, it’s on the outer fold column, then inner fold column, cut column, inner fold column, outer fold column and the outside of the other band. 


And now, ta da! it is time to cut. Here are the action videos: The first, a minute long, shows the cut; the second, which is shorter, shows the aftermath. 

Cutting: the video 


Transcript: Now we’re going to cut up the cut column. So, remove the marking and now, carefully cut, not cutting through the reinforecement yarn…so, snip snip. And again, you want to make sure you’re not cutting through the reinfrcement yarn, so make sure you know where that is before you cut. 


After cutting


After the last snip, everything folds right up: it could hardly be otherwise. The fold columns have been tightly pinched back on themselves. The work only laid flat because the fabric between the columns exerted an upwards pressure. Once the cut releases the pressure, the pinching slip-stitches force the outer fold column back and the inner fold column under. Result: a jelly-roll of knitting, with the cut ends for a filling. 


Transcript: OK, now everything is going to just fold over automatically. This inner fold column is going to fold over, with the cut ends inside of there, and the outer fold column is going to fold over. On the other side, the same thing: inner fold column, outer fold column, and here is the item inside, with the columns folded over, and outside, with the borders or bands on the outside. Thank you very much for watching. 


More about borders


Most of these examples show the border worked in garter stitch because that doesn't curl. Further, garter stitch is a great choice because its 3-D nature really pulls tight to the adjoining fabric, hiding the transition, and this is true whether the garter border is self-color or contrast-color. At left below, the border is stretched back over a finger, showing what the transition would look like if the garter border did not scrunch up to hide it. At right, two views of a garter border, one self-color, one contrast color. Seen close or far, the garter stitch border bellies up over the transition. In all three photos, the partial red dotted line marks the transition line between main work and border.


.All-around borders


In my little blue samples, I didn't pick up a border across the top or bottom. If you do want a continuous border all around the entire work, you would pick up one stitch per row-end along the cut edges as shown earlier, and also through each bound-off stitch along the top and bottom edges. Alternatively, you could start the work on a provisional cast on, then work the top and bottom borders on live stitches. 

Another option for all-around borders is work both inner fold columns, then pick up the border stitches on both sides, put each set on a holder, cut along the cut line, slip the live side stitches back onto the needles from the holders, then work the border all around, on the now-flat piece. Cutting before knitting all-around borders actually makes working corners (much) easier. 

All the first round of stitches would be picked up / worked in the background color, as explained earlier. Here is a real-life photo of a garter stitch border which goes all the way around a steeked banner. This is an inside view of a banner from this post


Another successful border plan is I-cord edging in contrast color. For this trick, you also pick up the edge stitches in the main background color, here, white. Then, you work the second row or round in the contrast color, here, black. The second row in black forces the white contrast dot to the back of the fabric, as shown in below photo. 


The black round is the base to which the I-cord is attached. In other words, the I-cord is then worked around the entire edge with its third (innermost) stitch knitted together (k2tog'd) with each black stitch of the second row or round. (Further directions on I-cord edging). 

If second row or round hadn't been worked in black before working the I-cord, that speck of white background color would peep out in every round of the I-cord, instead of being trapped on the fabric back where no one can see it but you. 

Stitch count adjustments made across the row-ends are done in second round, when you first switch to the black (or other contrast color). 


Corners


Any kind of all-around border must take into account corners. 

For a garter stitch border, the corners must be mitered, by increasing every second round, on either side of each corner stitch. This is similar to working a raglan increase on a top-down sweater.

For an I-cord border, the  I-cord must be worked loose for a round or two going around the corner.  The red circle in the below close-up marks the corner stitch (white dot). If you look closely at the blue arrows on either side of the corner stitch, you see that where the I cord goes around the corner, there are no white dots. This is because the black I-cord was detached for a round or two in these locations. 


The inside facing


Holding down the facing formed by the folded back steek on the inside is not really necessary, especially on a wall hanging or cushion top, where the back gets no wear.  The outer fold column firmly flips the whole assembly back so the columns between the inner and outer fold-backs become a self-facing. However, for a sure hold where the back will get wear--a blanket, perhaps--then a quick and painless hold-down would be to needle-felt the facing in place. 

One final thought: left and right borders


When oriented bottom edge down, borders as seen from the fabric face are opposite to how they appear when creating. Fold columns left of the cut line become the right border. Those right of the cut line become the left border. Good to remember for buttonhole placement.  

* * *

Good luck with this and remember, however you use double fold-back steeking in real life, it is secure, sturdy, and quick, but bulky. 

--For wall hangings and cushions: perfect--the highest and best use for this trick. 
--For blanket edges: good, but do needle felt the facing onto the back of the fabric (wool) or even consider sewing if wool-blend. 
--For cardigan front bands: maybe? Would work better if you fasten down the facing some way--maybe even sewing. 
--But for an armhole steek: miserable--this would be too thick around the underarm and shoulder. 

--TK


Other posts about steeks:


Questions? Feedback? Contact me at 
Blue Sky  @techknitter.bsky.social or  
talk to me about this post on Ravelry TECHknitter forum

Friday, February 14, 2025

Love, Hearts, Infinity Loop videos
and your birth certificate

Happy Valentine's day! Here's a heart, knitted Celtic-knot style, for you! 

Happy Valentines!

I've already shown how to knit pretty hearts this "infinity loop" way, so I won't repeat all that here. But! readers have been writing, saying they would appreciate video of some of the more unusual infinity loop procedures. So, hearts for Valentine's day. The bottom part of post is really part 2 of the original heart post: it features 3 video clips of the Celtic heart process, as requested.

HOWEVER!  The top part of this post is more important. On this Valentine's day, I write my married U.S. readers about your love, your marriage and, believe it or not...your birth certificate. 

See, if you are in majority of American married women, you probably changed your name on your beautiful wedding day. Love, roses, a new life, a new name. A family name for your children. 

Yet now, that name change might mean something very different. It might now prevent you, an American citizen, from voting. Yes, believe it or not, if you are married, and if you changed your name upon marriage, then that name change you did in the name of love? Well, it might stop you from voting. 

The "SAVE" act

Currently before Congress is something called the "SAVE" act. It's supposed to fix things so non-US citizens can't vote in US elections. The idea is that you have to present a birth certificate or your passport, to prove you are a US citizen before you can register to vote. Most people use their birth certificate. Eleanor Roosevelt, married her fifth cousin once removed  so her maiden and married names were the same, but that is unlikely to be your case.

There's nothing in the SAVE act saying that your marriage certificate can be presented along with your birth certificate to prove that you are you. The way the bill is currently written, it requires your current name to be the same as what's on your birth certificate in order for you to register to vote. Which, unless you are Eleanor R., it isn't. 

Now, perhaps this isn't all that big of a deal. 

--Perhaps a judge will fix this after someone brings a lawsuit. 
--Perhaps the act will be changed to allow proof of marriage name change before it is passed into law (especially if you call your representative and senators). 
--Perhaps the "SAVE" act will not pass into law at all. 

But, here's another "perhaps." 

-->Perhaps we ladies are on our own in this matter<--

 It certainly wouldn't be the first time we've been on our own, and you know it won't be the last time, either. But there IS something we can do about it right now, without waiting for any other "perhaps" to happen, or some similar gosh-darned foolishness to come down the pike next year. 

Get a passport

If your birth certificate is the document you would ordinarily choose to use, and if your married name is different, the solution is a passport. A passport establishes your citizenship and your name. Even under the SAVE act as currently written, there's no question that a US passport serves as ID for voting. So, on this Valentine's day of love, if you love your country and want to leave no doubt about your ability to do your duty as a citizen and vote, consider applying if you haven't got one already.

To get a passport, you'll need to have at least your birth certificate and a passport photo.

If you know where your birth certificate is, great. If you need a new copy, here's how to get one, and here's a list of every states' vital records offices." Vital records offices" are the ones staffed by the same kind of helpful folks who registered your birth in the first place. 

As to the passport photo, any old photo won't do, it has to fit certain requirements. Maybe, the next time you're at the drugstore (Walgreens, CVS) or sending a package (Fed Ex, UPS) or getting a photocopy (Staples) maybe stop by the service desk and have them take two US passport-sized photo of you! Or, if you're handy with your computer, take a clear photo of yourself, and then you can create proper  passport photos from home (Walmart, PhotoBooth).

A passport would make lovely Valentine's gift to yourself. Perhaps, if you had one, you could take a romantic trip somewhere with that handsome guy you changed your name for! And, you know, also retain your right as an American citizen to vote regardless of "SAVE" or any other foolishness coming up. 

💙💚💕💖💗💘💛💜

Celtic Heart Valentines--some video clips

And now to the knitting portion of today's heart-related post! The requested video clips. If you're only going to watch one, watch clip number 3, the last one--that's the real action shot, IMHO.

The easiest way to integrate these video clips might be to return to the original Celtic Heart post, which I have now updated to include links to the video clips below in the appropriate part of the narrative. However, if you have already internalized the steps for my new "infinity loop" method of knitting Celtic knots, I also present the video clips here, below. 

Below (but not in the original heart post) I've also pasted a transcript of each clip. Readers in other countries have written to say that You-tube does not translate the subtitles into their language, but Google does translate written text of the blog. (To better read the tiny type, copy and paste into a word processing program or note app.)

Clip 1: Getting the bottom four stitches onto the placeholder

All Celtic Infinity Loops start with four stitches knit into "placeholders." The written and illustrated information about those is in the original (first) infinity loop" post, and again in the Heart post. However, starting columns on placeholders is not a usual knitting technique, so here is a video which may explain better than the written links do.

If the below video does not play for you, view it directly on you-tube via this link


TRANSCRIPT: Hi Techknitter here, showing how to knit the contrasting color Celtic heart. Please forgive my hoarse voice, I’m just getting over a cold. So, what I’m doing here is putting on two stitches from this blue placeholder, I’m putting them onto my left needle. Now this red yarn here in the back is the color that I’m going to knit the heart, and this is the bottom of the ninety-inch fold, as is explained in the pattern. So, now what I’m going to do is knit two stitches, one, two, into the placeholder, there they are. Now, I’m going to make sure that this white yarn here is actually not under, but instead is over this whole assembly. So there it is, it’s over. And, I’m going to purl one stitch, which is the spacer stitch—that’s explained in the pattern. There’s the spacer stitch, and now I’m going to put two more stitches from the placeholder onto the left needle. I’m going to grab them with the right needle just because I find that easier, and then transfer them: transfer one, transfer two. I’m now going to lift the left strand of the ninety-inch red over the white, and I’m going to knit two more stitches—one, two—so these stitches are knit into the placeholder, they’re not knit into the underlying main color. I’m again lifting over the main color background and I’m purling to the end of the row. So, let me show you what I’ve done, what it looks like on the back—let me just get past here. So, here we are the—this is the right arm, and this is the left arm, and they’re on the placeholder, there’s the (blue) placeholder, there’s the (white) spacer, and then we’ll see you at the next clip. 


Clip 2: crossing the stitches over one another in contrasting color work to prevent holes, as shown from the back.

As you knit in a contrasting color, there's always the problem of twisting together the yarns on the back, so holes don't develop. Here's a little clip showing the twisting process as viewed rom the back fabric face. I chose to show this from the back fabric face because that's where the crossing actually takes place, making it easier to see. However, the process is the same when performed from the front fabric face. In other words, when you do the left- or right-purl twist (per pattern) you also cross over the new contrasting color yarn the same way. Again, the cross is on the back fabric face, so the difference is, it's harder to see what you're doing because all that crossing is going on behind the fabric, away from your eyes. 

If the below video does not play for you,  view it directly on you-tube via this link


TRANSCRIPT: Hi! TECHknitter here and this is clip number two of the contrast color Celtic hearts. So, you see I've knit the bottom of the heart and I've divided for the lobes. In both cases where the red starts, it starts on these blue placeholders. Now,  I'm working on the back and I want to show how you change the color, how you pin it down when you change the color. So, I've already done this arm and this part of the lobe here. I'm now knitting the white again.  On the front of the fabric, the white is a reverse stockinette, so when I'm working on the back of the fabric, as I am now, I have to do the opposite, and knit. So, now I've dropped the white, I picked up the red and I crossed the red over. Right here, where I'm pointing to with my finger, the red crosses over the white and that's the important part. Again, we're doing the opposite of how it looks on the front, so I have to purl the Red. Purl, purl. Now I'm changing color again and so I drop the red and I pick up the white, and I want to always make sure with the reds that I'm working with the correct dedicated strand. Like I don't want to take this strand and by accident knit this! So I have to make sure always that I have the correct strand here. I'm confident now that I did that with the right strand, with the correct strand, so I'm going to knit my way over to the last red and then we'll cross over one more time just to make sure how it's done. So now we're ...Hmmm!  Here let me get that Stitch a little better! There we go! Now I'm dropping the white I'm picking up the red again. I'm confident I have the correct strand (I have to check that!) and now I'm going to purl with the red. And again you see, right here between my two thumbs, that the red cross is over the white. So,  it's purl, purl, drop the yarn, pick up the white. Again between my thumbs you see that the white is now crossing over, and now I'm going to knit with the white.  So that's how you cross the colors on the back, and we'll see you at the next little clip.


Clip 3-- unhooking, standing the stitches on their heads, and re-hooking them.

Per above, this is really the action shot IMHO. It is kind of fascinating to stand the stitches on their heads! Please don't be discouraged by how slow this seems to be. For one thing, the camera was in my way and for another, you can work batchwise, which makes things go oh! so much faster. 

Again, remember that the entire method is laid out in several previous posts ("infinity loop" method of knitting Celtic knots, Celtic Heart post). These videos only touch the high points. 

If the below video doesn't load for you, here's the direct You-tube link


TRANSCRIPT: Hi! TECHknitter here with a third of three little clips about transforming contrast color Celtic Hearts knit in the infinity loop style. Now what I want to do is,  I want to connect the points here-- the points here the top of the lobe here, and the top of the lobe here, and this is a process called transformation. It's explained and Illustrated in the blog but people have been asking for a video so here's a very brief video. (Edit: lol, not really very brief!) 


You can see that the problem is that, if I were to connect this and this, the stitches wouldn't really look very nice where they're connected at the top. These stitches point down and the heads point up, these stitches point down-- the tails point down and the heads point up. And, if they were connected, they wouldn't fit into one another.  They are both going UP and one needs to go DOWN. 


So I'm going to transform just a little bit of this, because once you've seen how it's done, it's not very hard. So the first thing I do is, I take out the bobby pen out, only the outer column is released. So, I'm going to put the bobby pin back into the inner column, and I want to catch that outer column here on my needle before it gets away from me. So, there it is, and now I just want to get this down. There we go. Now the same situation on the other side. This time I'll catch, catch the stitches before I let them go. That'd be smarter huh?  So there we go, and I'm going to put the inner loop back on its holder: we're not going to deal with that now.


 So now we have the two loops on a needle, and we're going to transfer this loop here to a crochet hook. So this is called the dominant column, and now comes the tricky part! So the dominant column is on the crochet hook and the non-dominant column is now going to be transformed from a stitch that points up into a stitch that points down. So here's what I'm going to do: I'm going to actually pull this out. Now I have this stitch that was below, and I have this loose loop here. And so what I'm going to do is, I'm going to stand this loose loop on its head! I'm going to turn it into a stitch that points down. See? Now it points down. Let me do it again. I take this out, I'm going to pull out the strand here. I'm going to going to catch that back on the needle and now I'm going to pull this stitch through this loop. And, I'll do it one more time. Out comes the strand, it's picked out very carefully.


There it is the loop below, it  goes back on the needle for safekeeping, and the crochet hook grabs the loose loop and pulls it through. So there you have transformation. Now if you look closely at what I've done, you can see that now the stitches are walking around in a very nice curve. They're all pointing in the same direction, and after I do that here, so I have to transform this and then when I get here, these ones will be going the right way, but then all these ones will be going the wrong way. So all these ones here have to be transformed. All that explained with pictures and words in the blog but I just did want to show the process of transformation. Uh, we'll just do it one more time so you can see it again. I'm picking out the strand out of the stitch, I'm catching the stitch so it doesn't go anywhere, I am catching... so I had the dominant column on my crochet hook. I'm catching this non-dominant stitch and I'm drawing it through (or at least I'm trying to draw it through!)  Alright, so there it is: a very nice line of stitches is developing. Thank you very much for watching, we'll see you back at the blog.


💙💚💕💖💗💘💛💜


Happy heart day, go get yourself a passport! A Valentine's day gift to yourself.

--TK

PS: Last time I promised you the new "double fold back steek," and that's coming up next. But somehow, Valentine's day snuck up on me so I had to get this blog entry out first. Stay tuned... double fold-back really is coming up. 


Questions? Feedback? Contact me at 
Blue Sky  @techknitter.bsky.social or  
talk to me about this post on Ravelry TECHknitter forum

Sunday, February 9, 2025

Working in LOTS of ends in Banner Knitting

Banner knitting (subject of the last post) is a constellation of tricks for efficiently knitting words on a plain background. It is worked with a color strand for every row, but no filler designs. With no filler designs to carry the yarn to the next round, the yarn has to end where the words do. This leaves a serious number of tails to work in, all of which end close together, both row-wise and column-wise.  So, that's today's topic--working in ALL those ends.

I start with two ideas. First, that you have worked your banner project in wool. This is because wool has many properties which make fastening down ends much easier. The second idea is that you have "parked" the ends on the fabric face as you went. If you did not park your ends, you can try these tricks anyway, but if you find they aren't working for you, all is not lost--it's not too late to park the ends even if you didn't do so at the time of knitting. 

Parking--a set-up method for working in lots of tails in Banner Knitting

To summarize briefly, parking means you temporarily "park" the color-ends on the front fabric face, usually done during the knitting process. No dangle = no tangle, meaning, parking prevents the tails from dangling on the back, where they'd be just waiting to tangle with the running yarn. Specifically, these tails are drawn to the front fabric face along one column, so the front and back look like the photos below. 

Click to enlarge. On this particular banner, the letters were all worked with two separated strands of yarn, so that each "tail" is actually composed of two strands of yarn. 

From a distance, the work-front looks like this. 

The ends emerge onto the front fabric face from the "parking columns"

Once the ends are parked,  and the main knitting over, the finishing process begins. Per the legend under the top photo, on this particular banner, each tail is actually composed of two splits of yarn held together. (How splits are madewhy knit with splits.) However, when it comes to working in the tails, each two-split tail is going to be worked in as a single end. In other words, in the photos and instructions below, both strands of any one tail are treated as if they were a single, unitary tail. 

Old school: working tails into the fabric


The old school method of working ends into a fabric works just fine. 

--Use a large, sharp-pointed large-eyed sewing ("chenille") needle. 
--Below▼both strands of one end (red arrow) have already been taken out of parking, brought to the back and worked in. 
--The tail next to be worked in (green) has been taken out of parking but has not yet been worked in: it waits its turn on the fabric back. The arrow is double-headed because, as stated above, the letter-stands were originally split, then knit as one yarn. Therefore, both strands are brought to the back where they are to be worked in as one strand, as you saw by red arrow.  
--The remaining strands (blue arrows) wait their turn, still parked on the fabric front.
--Yellow indicates the needle eye. 

Click to enlarge

The chenille needle is longer than the end to be worked in, so the needle must be "staged." You can see above ▲ that the needle is worked into the fabric before it is threaded. 

As shown further below ▼
--Staging means the needle is pushed into the fabric along the path in which the end is to go, until the eye (outlined in yellow + yellow arrow) is close to the (green arrow) end. 
--By staging, the (green) end now easily reaches the (yellow) eye--large black magnifying glass. 
--The needle merely skims through wisps along the back fabric--small orange magnifying glass. 
--If in doubt whether you've scooped up too much wisp, flip the fabric over to make sure the needle never reaches the front fabric face. If you can't see the needle from the front, you won't be able to see the worked-in tail, either. 
--As shown in the large magnifying glass, only perhaps a quarter of the tail is drawn through the eye. The loose loop remaining (green arrow) makes it easier to draw the needle through the wisps and prevents over-tightening the knit stitch from which the tail comes. Adjust tension afterwards.


Final result is shown ▼ below. "A" shows the ends before trimming, "B" after. Once the ends are trimmed, run a fingernail over them: fluffed up like this, they'll never pull loose. 

The old school method is excellent for banners, pillow tops and also to use where the fabric-back will be subject to wear, such as sayings and slogans worked on garments. 


One last thing: note that the ends are splayed out a little over the fabric back, meaning, only the very middle ones are worked into the row in which they were knit. The upper and lower radiate outwards. If you have room, splaying helps avoid distortion on the front fabric surface by spreading the strain along the fabric back.

Tacking

Another way of holding down parked ends is called tacking, and this comes in many variations. 

Base method, tacking, shown worked with with sewing thread

Tacking (also called freeform pinstiping) is a trick for fastening down long floats or ends. The base method is summarized in this little video below: this is tacking parked ends, demonstrated using sewing thread.

If video doesn't load, follow this link (click)                              ->: https://youtu.be/9ds5EczA8us
(sorry about the darn ads--You-tube puts those on there. Click "skip" asap) 


Variation: double thread tacking, ends left free


In this variation, the ends are double-tacked, meaning two lines of tacking were worked over the parked ends. After the ends are "unparked" by being pulled to the back, they were trimmed somewhat long, then fluffed up by running a fingernail over them. In this particular photo, the tails are left loose on the back. Double tacking with loose ends would be a good trick to use on a banner, where there is not going to be any wear or tension on the back or the front. For a pillow-cover (wear on front) or a garment (wear on front and back) this variation isn't the best choice. 

Variation: felting, with or without thread tacking


A few posts ago, I showed needle-felting as a means of controlling long floats. However, you can also felt ends. Felting ends would hold them onto to the fabric back.  The felting is worked from the front, meaning, plunging the felting needles through from the fabric front to the fabric back. As shown below, felting can be used as an adjunct to tacking. Try not to work right through the thread tacking, however, for fear of cutting the thread with a felting needle. In fact, since the front fabric face is basically unchanged by the needle felting process, you could work the thread tacking after felting the tails down. 


Felting alone might be strong enough for a banner (neither fabric face subject to wear). However, if you both felted and tacked, this ought to be strong enough for a pillow-back, and perhaps even for a garment--the ultimate strength of this method depends on the yarn used. 

Hairy, rustic, natural colored yarns in a heavier weight felts down better than smoother or highly-dyed yarns in a lighter weight. The Dale Hilo and Peer Gynt yarns from which this sample banner were knit are hairy long-staple Norwegian yarns, and the illustrated tack + felting is certainly secure enough for a garment when worked in yarns like this. 

However, your milage may vary: where your yarn falls on this spectrum between rustic and highly processed determines whether tacking plus felting would be strong enough to securely hold ends onto a garment (fabric-back subject to wear) or whether pillow-tops is the best use you can achieve (back gets no wear, but front does get wear). 

Variation: tacking with yarn


In this variation, the ends are tacked with yarn. I have written of this before at greater detail, but the short version is, you work in the same manner as the video on thread tacking, only instead of polyester sewing thread, you use a split of the background yarn to do the tacking. The advantage is how much more strongly this variation grips the ends: wool-to-wool is grippier than could be achieved with thread. The disadvantage is that it isn't as perfectly invisible on the fabric front as thread-tacking.  Nevertheless, even though it isn't perfectly invisible, experience strongly suggests that no one but you will ever notice it

See for yourself: here is a closeup of the same tacking from the front. 

Front view (I've darkened this photo to highlight the detail but it really is the front of the above photo, despite the apparent color difference).
Click here for peek-a-boo

The photos shows straight-up yarn tacking, but you could, of course, combine this with a bit of needle felting for an even grippier hold. Yarn-tacking + felting is strong enough even for a garment back, where wear is to be expected. In this variation, there is no problem about felting right through the wool tacking. 

Tacking plus "work-back"

In this variation, the tails are doubled back on themselves and worked back in the way they came. This trick is especially slick worked over a double thread tack line. It can be worked with a tiny latch hook called a "knit picker," as shown, or with a chenille needle via staging, as shown earlier

Click to enlarge

The idea is that tail (blue circle) folds back on itself over the outer line of tacking (green arrow). Doubled back like this, it is caught under the inner line of tacking (yellow arrow) then worked back into the actual strand from which it came. The red arrow shows the path over the outer tacking and under the inner. In the above photo, the lower tails have been worked back, while the upper tails wait their turn. 

Again, as with the old school method, only the very end of the tail is caught and drawn through, thus leaving a loop, the tension being adjusted afterwards by gently tugging on the tail. Adjusting the tension in two stages like this prevents the work-back from tugging on the line of tacking, which would distort the fabric surface. Note that the fold-over isn't drawn tight up to the tacking, but allowed to fold over some small distance away. 

This "work-back" variation on tacking is extremely sturdy, fit for use on garments. It will hold in the slickest, most highly processed woolen yarns. Once steam blocked and given a few pokes with felting needles, the fold itself is induced to lay flat. 

Tacking, with ends hidden under a nearby steek

In the previous post about banner knitting, I said that it was best worked by combining working in the round with steeking. Several readers on Ravelry asked why I did not mention working flat (back-and-forth) as an alternative. The fact is, having a steek is actually an advantage for banner knitting. In places where the words end near the edge of the banner --which could be all the words, depending on design -- the steek provides a great spot to hide the ends. In this photo, the ends were tacked down with a double row of thread. The steek has been felted down using needle felting. Then, the ends were drawn, one-by one under the flap of the steek, using a staged sewing needle as shown above. 


Hiding ends under the flap of a steek would work great for a banner or a pillow top, but not really for a garment: a steeked garment would have very thick seams

Geek note: the type of steek shown above is called a "double fold back steek" and features no cut ends showing. It will be the subject of the very next post.
 

Holding down ends in the fold made by picking up stitches for the border

Similar in concept to the idea of hiding ends in the steek, this trick traps ends behind border stitches picked up along the banner-edge. The steek is cut after the border stitches are picked up, because the way in which the border stitches are picked up makes the flap of the steek bend back sharply. 

It works best where there is only a narrow margin of background stitches between the beginning / end of the words and where a picked up border is planned. In this situation, arrange for the tails to be parked on the surface one column OUTSIDE where this border is to begin. 

For example, on this banner, the letter "E" ends 4 columns from where the tails were parked, and the border will start 3 columns from the edge of the letter. Using a crochet hook, and holding a length of background yarn BEHIND the work, draw up loops from this length sideways through the third column.

In this banner, the letter "E" ends 4 columns from where the tails were parked, and the border will start 3 columns from the edge of the letter. The stitches are picked up sideways through the fourth column, as shown.


In one stroke you have fastened down the tails on the back as well as picked up the stitches on which to knit the border. Thereafter, transfer the loops to a knitting needle in preparation to knit on a border.

Left: close up front view of stitches picked up on crochet hook
Right: back view of picked up stitches tacking down the tails
In one stroke you have tacked the tails and picked up the stitches for the border

The stitches are picked up at a 1:1 ratio, meaning, each stitch in the column (row-end) gets a stitch picked up through it. However, as you know, row gauge (vertical) and stitch gauge (horizontal) are rarely the same: the row gauge is almost always greater (more stitches/inch) than the stitch gauge. In this banner, there were 5 stitches/inch, but 7 rows per inch. Therefore, in the first round of knitting, decrease as required to match the row gauge to the stitch gauge. On this banner, before applying the edging, I k2tog'd two stitches in every five along the row ends to reduce the 7 st/inch pick up to 5 st/in, the correct gauge for knitting the border. This post on picking up stitches has more details. On this particular banner, a red I-cord edging was worked on the white picked up stitches. 


Picking up for the border forces a fold in the back fabric, so that the excess flaps from the steeking, as well as the ends, all fold backwards. Folded back like this, the tails and excess fabric are will never show from the front, particularly after the edging has been worked. 

The ends were drawn to the back fabric face after they were tacked. The excess borders from the steeking fold over to hide them. The steeked flaps are held down by needle-felting them in place.  Here is a photo of the back,


Geek note: No cut ends show at the edge of the steek flap. Again, the very next post will be about this kind of steek, which is called a double fold back steek.

Fusible interfacing 

Interfacing was originally a stiffening material meant to be caught between two layers of fabric for structural purposes, hence the "inter" part of the name. However, fusible technology changed the game so that today, in certain circumstances, interfacing can be used directly as a backing rather than as a sandwiched-in stiffener. This is a heat activated item: as you iron it on, the adhesive on the back melts (fuses) the interfacing to the back of a fabric. 

Fusible interfacing used as an exposed patch is fragile because the heat-activated glue does not hold tight along the edges. Inside a sweater, the corners would curl up and the whole patch would peel off after a while. If you really want to use interfacing on the inside of a garment, you can go old-fashioned and sew down edges of the interfacing patch--before fusible technology, all interfacing was sewn down (or at least, sewn into the seams). At any rate, a fusible interfacing patch sewn down along its edges will not peel up inside a garment.  For a banner or cushion top, there is no wear on the back. Therefore, fusible interfacing is a good choice for these, no sewing required. Just make sure the interfacing extends a good way past the edges of the tails so the more fragile edge of the interfacing isn't just along an edge where tails would push on it, as shown below.


Best practices to tack the ends before fusing on the interfacing, and that was done on the above example.  See, once the interfacing is fused, the tails can't be further adjusted. If a loose (not tacked) end acts up during fusing, oopsie, there's a permanent loop on the fabric surface. So, tack, adjust the ends and then iron, carefully fusing into place through a pressing cloth. (Pressing cloth = a flour-sack type kitchen towel which helps distribute the heat and prevents scorching.) Start with a low heat setting, upping the heat slowly until you've found the lowest level at which the iron will activate the heat-sensitive glue. 

Another thing about the glue. Often it is applied in little dots, which are easy to see: you put the dotted side down. But, sometimes, the glue is sprayed on in an even layer. In that case, make sure you know which is the glue side before starting, so you don't fuse the interfacing to your iron, instead of the knitting! Ironing a scrap of interfacing between two paper towels reveals which side goes down. 

Fusible interfacing comes in all weights. If you want your knitting to remain stretchy and flexible, buy thinner, most flexible interfacing. Conversely, in a cushion top, you might not consider knitting's stretchy nature much of a plus. The same might be true of a larger wall hanging which might sag. For a stiffer less stretchy finished project, it is possible to fuse the entire back of your project with a much heavier item called fleece interfacing. This stuff is not archival--in fact NO fusible interfacing of any weight is archival, so I wouldn't do this on a family-heirloom type item. However, for everyday use like a sofa cushion, this is a good trick. That's what was done with this crossword-puzzle knit, a cushion-face project which, similar to banner knitting, features long floats and narrow lines. 

Again: to hold all the ends in place before fusing, best practice is to tack first and trim the ends. But sometimes, well! You might be tempted to use this stuff without first tacking the ends. And, truthfully, you could. As long as the edges of the interfacing extend far beyond the tails, it does have good sticking power. For an experiment I fused down an absolute rat's nest of tails from three-color picture knitting and voilà! In a few seconds all the tails were fastened down and the project done. 

A rat's nest of red, orange and yellow ends, fused down.

A "quick and dirty" approach for the back of a banner or even a cushion top. (I won't tell if you don't!) But *don't* try this inside a garment--the lumpy mess left behind would be uncomfortable, even supposing you could get the patch to stick in place and not peel off. And this sort of dodge really isn't for an item which will be washed very often, either. 

Looping and knotting: "two-part floats" avoid ends altogether


This is a trick to avoid ends altogether by knotting two sets of adjoining ends into a single float, spanning from one word to another.  It is useful where two different colors of yarn come together on the fabric back, such as where two different-colored words adjoin. This was covered fully in the previous post, together with other methods of dealing with floats (as opposed to ends). I just mention this particular trick here again because turning ends into floats also comes under the heading of dealing with ends. And, like all floats, these "two part floats" can be tacked down--here is a view where wool tacking was used. 


This trick is more for banners and, perhaps, pillow-covers. On a garment, those knots would surely find some way of rising to the surface. 

Lining


Along with every method above, there's one more optional finishing step for your banner. If you want everything neat and tidy from back view, then for a professional look, sew on a lining. Here is a banner back with polar fleece lining sewn on using the overcast stitch


_____

So there you have it--tricks for dealing with all the ends generated by banner knitting--a few variations and methods. Hope one or another will suit you. 
 _____

Next time, the subject is a new kind of steek called a "double fold back." It's a neat and handy steek for the back of a banner or a cushion top. Until then, good knitting!

--TK
Questions? Feedback? Contact me at 
Blue Sky  @techknitter.bsky.social or