Banner knitting (subject of the last post) is a constellation of tricks for efficiently knitting words on a plain background. It is worked with a color strand for every row, but no filler designs. With no filler designs to carry the yarn to the next round, the yarn has to end where the words do. This leaves a serious number of tails to work in, all of which end close together, both row-wise and column-wise. So, that's today's topic--working in ALL those ends.
Parking--a set-up method for working in lots of tails in Banner Knitting
Briefly stated, parking means you temporarily "park" the color-ends on the front fabric face, usually done during the knitting process. No dangle = no tangle, meaning, parking prevents the tails from dangling on the back, where they'd be just waiting to tangle with the running yarn. Instead, these tails are drawn to the front fabric face along one column, so the front and back look like the photos below.
Click to enlarge. On this particular banner, the letters were all worked with two separated strands of yarn, so that each "tail" is actually composed of two strands of yarn.
From a distance, the work-front looks like this.
The ends emerge onto the front fabric face from the "parking columns"
Once the ends are parked, and the main knitting over, the finishing process begins. Per the legend under the top photo, on this particular banner, each tail is actually composed of two splits of yarn held together. (How splits are made, why knit with splits.) However, when it comes to working in the tails, each two-split tail is going to be worked in as a single end. In other words, in the photos and instructions below, both strands of any one tail are treated as if they were a single, unitary tail.
Old school: working tails into the fabric
The old school method of working ends into a fabric works just fine.
--Use a large, sharp-pointed large-eyed sewing ("chenille") needle.
--Below▼both strands of one end (red arrow) have already been taken out of parking, brought to the back and worked in.
--The tail next to be worked in (green) has been taken out of parking but has not yet been worked in: it waits its turn on the fabric back. The arrow is double-headed because, as stated above, the letter-stands were originally split, then knit as one yarn. Therefore, both strands are brought to the back where they are to be worked in as one strand, as you saw by red arrow.
--The remaining strands (blue arrows) wait their turn, still parked on the fabric front.
The chenille needle is longer than the end to be worked in, so the needle must be "staged." You can see above ▲ that the needle is worked into the fabric before it is threaded.
As shown further below ▼
--Staging means the needle is pushed into the fabric along the path in which the end is to go, until the eye (outlined in yellow + yellow arrow) is close to the (green arrow) end.
--By staging, the (green) end now easily reaches the (yellow) eye--large black magnifying glass.
--The needle merely skims through wisps along the back fabric--small orange magnifying glass.
--If in doubt whether you've scooped up too much wisp, flip the fabric over to make sure the needle never reaches the front fabric face. If you can't see the needle from the front, you won't be able to see the worked-in tail, either.
--As shown in the large magnifying glass, only perhaps a quarter of the tail is drawn through the eye. The loose loop remaining (green arrow) makes it easier to draw the needle through the wisps and prevents over-tightening the knit stitch from which the tail comes. Adjust tension afterwards.
Final result is shown ▼ below. "A" shows the ends before trimming, "B" after. Once the ends are trimmed, run a fingernail over them: fluffed up like this, they'll never pull loose.
The old school method is excellent for banners, pillow tops and also to use where the fabric-back will be subject to wear, such as sayings and slogans worked on garments.
One last thing: note that the ends are splayed out a little over the fabric back, meaning, only the very middle ones are worked into the row in which they were knit. The upper and lower radiate outwards. If you have room, splaying helps avoid distortion on the front fabric surface by spreading the strain along the fabric back.
Tacking
Another way of holding down parked ends is called tacking, and this comes in many variations.
Base method, tacking, shown worked with with sewing thread
Tacking (also called freeform pinstiping) is a trick for fastening down long floats or ends. The base method is summarized in this little video below: this is tacking parked ends, demonstrated using sewing thread.
(sorry about the darn ads--You-tube puts those on there. Click "skip" asap)
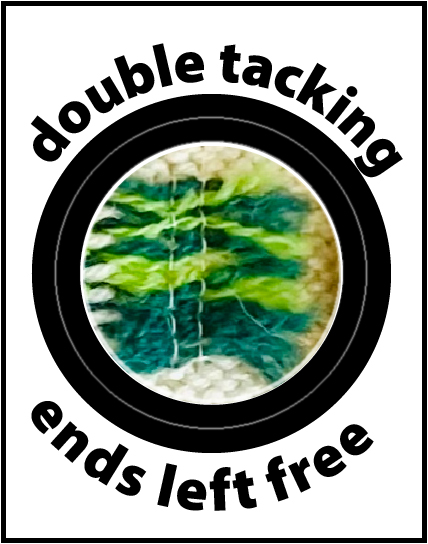
Variation: double thread tacking, ends left free
In this variation, the ends are double-tacked, meaning two lines of tacking were worked over the parked ends. After the ends are "unparked" by being pulled to the back, they were trimmed somewhat long, then fluffed up by running a fingernail over them. In this particular photo, the tails are left loose on the back. Double tacking with loose ends would be a good trick to use on a banner, where there is not going to be any wear or tension on the back or the front. For a pillow-cover (wear on front) or a garment (wear on front and back) this variation isn't the best choice.
Variation: felting, with or without thread tacking
A few posts ago, I showed needle-felting as a means of controlling long floats. However, you can also felt ends. Felting ends would hold them onto to the fabric back. The felting is worked from the front, meaning, plunging the felting needles through from the fabric front to the fabric back. As shown below, felting can be used as an adjunct to tacking. Try not to work right through the thread tacking, however, for fear of cutting the thread with a felting needle. In fact, since the front fabric face is basically unchanged by the needle felting process, you could work the thread tacking after felting the tails down.
Felting alone might be strong enough for a banner (neither fabric face subject to wear). However, if you both felted and tacked, this ought to be strong enough for a pillow-back, and perhaps even for a garment--the ultimate strength of this method depends on the yarn used.
Hairy, rustic, natural colored yarns in a heavier weight felts down better than smoother or highly-dyed yarns in a lighter weight. The Dale Hilo and Peer Gynt yarns from which this sample banner were knit are hairy long-staple Norwegian yarns, and the illustrated tack + felting is certainly secure enough for a garment when worked in yarns like this.
However, your milage may vary: where your yarn falls on this spectrum between rustic and highly processed determines whether tacking plus felting would be strong enough to securely hold ends onto a garment (fabric-back subject to wear) or whether pillow-tops is the best use you can achieve (back gets no wear, but front does get wear).
Variation: tacking with yarn
In this variation, the ends are tacked with yarn. I have written of this before at greater detail, but the short version is, you work in the same manner as the video on thread tacking, only instead of polyester sewing thread, you use a split of the background yarn to do the tacking. The advantage is how much more strongly this variation grips the ends: wool-to-wool is grippier than could be achieved with thread. The disadvantage is that it isn't as perfectly invisible on the fabric front as thread-tacking. Nevertheless, even though it isn't perfectly invisible, experience strongly suggests that no one but you will ever notice it.
See for yourself: here is a closeup of the same tacking from the front.
Front view (I've darkened this photo to highlight the detail but it really is the front of the above photo, despite the apparent color difference). Click here for peek-a-boo
The photos shows straight-up yarn tacking, but you could, of course, combine this with a bit of needle felting for an even grippier hold. Yarn-tacking + felting is strong enough even for a garment back, where wear is to be expected. In this variation, there is no problem about felting right through the wool tacking.
Tacking plus "work-back"
In this variation, the tails are doubled back on themselves and worked back in the way they came. This trick is especially slick worked over a double thread tack line. It can be worked with a tiny latch hook called a "knit picker," as shown, or with a chenille needle via staging, as shown earlier.
The idea is that tail (blue circle) folds back on itself over the outer line of tacking (green arrow). Doubled back like this, it is caught under the inner line of tacking (yellow arrow) then worked back into the actual strand from which it came. The red arrow shows the path over the outer tacking and under the inner. In the above photo, the lower tails have been worked back, while the upper tails wait their turn.
Again, as with the old school method, only the very end of the tail is caught and drawn through, thus leaving a loop, the tension being adjusted afterwards by gently tugging on the tail. Adjusting the tension in two stages like this prevents the work-back from tugging on the line of tacking, which would distort the fabric surface. Note that the fold-over isn't drawn tight up to the tacking, but allowed to fold over some small distance away.
This "work-back" variation on tacking is extremely sturdy, fit for use on garments. It will hold in the slickest, most highly processed woolen yarns. Once steam blocked and given a few pokes with felting needles, the fold itself is induced to lay flat.
Tacking, with ends hidden under a nearby steek
In the previous post about banner knitting, I said that it was best worked by combining working in the round with steeking. Several readers on Ravelry asked why I did not mention working flat (back-and-forth) as an alternative. The fact is, having a steek is actually an advantage for banner knitting. In places where the words end near the edge of the banner --which could be all the words, depending on design -- the steek provides a great spot to hide the ends. In this photo, the ends were tacked down with a double row of thread. The steek has been felted down using needle felting. Then, the ends were drawn, one-by one under the flap of the steek, using a staged sewing needle as shown above.
Hiding ends under the flap of a steek would work great for a banner or a pillow top, but not really for a garment: a steeked garment would have very thick seams
Geek note: the type of steek shown above is called a "double fold back steek" and features no cut ends showing. Depending on how you want to finish your banner, you may wish to steek before working in the tails.
Holding down ends in the fold made by picking up stitches for the border
Similar in concept to the idea of hiding ends in the steek, this trick traps ends behind border stitches picked up along the banner-edge. The steek is cut after the border stitches are picked up, because the way in which the border stitches are picked up makes the flap of the steek bend back sharply.
It works best where there is only a narrow margin of background stitches between the beginning / end of the words and where a picked up border is planned. In this situation, arrange for the tails to be parked on the surface one column OUTSIDE where this border is to begin.
For example, on this banner, the letter "E" ends 4 columns from where the tails were parked, and the border will start 3 columns from the edge of the letter. Using a crochet hook, and holding a length of background yarn BEHIND the work, draw up loops from this length sideways through the third column.
In this banner, the letter "E" ends 4 columns from where the tails were parked, and the border will start 3 columns from the edge of the letter. The stitches are picked up sideways through the fourth column, as shown.
In one stroke you have fastened down the tails on the back as well as picked up the stitches on which to knit the border. Thereafter, transfer the loops to a knitting needle in preparation to knit on a border.
Left: close up front view of stitches picked up on crochet hook
Right: back view of picked up stitches tacking down the tails
In one stroke you have tacked the tails and picked up the stitches for the border
The stitches are picked up at a 1:1 ratio, meaning, each stitch in the column (row-end) gets a stitch picked up through it. However, as you know, row gauge (vertical) and stitch gauge (horizontal) are rarely the same: the row gauge is almost always greater (more stitches/inch) than the stitch gauge. In this banner, there were 5 stitches/inch, but 7 rows per inch. Therefore, in the first round of knitting, decrease as required to match the row gauge to the stitch gauge. On this banner, before applying the edging, I k2tog'd two stitches in every five along the row ends to reduce the 7 st/inch pick up to 5 st/in, the correct gauge for knitting the border. This post on picking up stitches has more details. On this particular banner, a red I-cord edging was worked on the white picked up stitches.
Picking up for the border forces a fold in the back fabric, so that the excess flaps from the steeking, as well as the ends, all fold backwards. Folded back like this, the tails and excess fabric are will never show from the front, particularly after the edging has been worked.
The ends were drawn to the back fabric face after they were tacked. The excess borders from the steeking fold over to hide them. The steeked flaps are held down by needle-felting them in place. Here is a photo of the back,
Geek note: No cut ends show at the edge of the steek flap. Again, the very next post will be about this kind of steek, which is called a double fold back steek.
Fusible interfacing
Interfacing was originally a stiffening material meant to be caught between two layers of fabric for structural purposes, hence the "inter" part of the name. However, fusible technology changed the game so that today, in certain circumstances, interfacing can be used directly as a backing rather than as a sandwiched-in stiffener. This is a heat activated item: as you iron it on, the adhesive on the back melts (fuses) the interfacing to the back of a fabric.
Fusible interfacing used as an exposed patch is fragile because the heat-activated glue does not hold tight along the edges. Inside a sweater, the corners would curl up and the whole patch would peel off after a while. If you really want to use interfacing on the inside of a garment, you can go old-fashioned and sew down edges of the interfacing patch--before fusible technology, all interfacing was sewn down (or at least, sewn into the seams). At any rate, a fusible interfacing patch sewn down along its edges will not peel up inside a garment. For a banner or cushion top, there is no wear on the back. Therefore, fusible interfacing is a good choice for these, no sewing required. Just make sure the interfacing extends a good way past the edges of the tails so the more fragile edge of the interfacing isn't just along an edge where tails would push on it, as shown below.
Best practices to tack the ends before fusing on the interfacing, and that was done on the above example. See, once the interfacing is fused, the tails can't be further adjusted. If a loose (not tacked) end acts up during fusing, oopsie, there's a permanent loop on the fabric surface. So, tack, adjust the ends and then iron, carefully fusing into place through a pressing cloth. (Pressing cloth = a flour-sack type kitchen towel which helps distribute the heat and prevents scorching.) Start with a low heat setting, upping the heat slowly until you've found the lowest level at which the iron will activate the heat-sensitive glue.
Another thing about the glue. Often it is applied in little dots, which are easy to see: you put the dotted side down. But, sometimes, the glue is sprayed on in an even layer. In that case, make sure you know which is the glue side before starting, so you don't fuse the interfacing to your iron, instead of the knitting! Ironing a scrap of interfacing between two paper towels reveals which side goes down.
Fusible interfacing comes in all weights. If you want your knitting to remain stretchy and flexible, buy thinner, most flexible interfacing. Conversely, in a cushion top, you might not consider knitting's stretchy nature much of a plus. The same might be true of a larger wall hanging which might sag. For a stiffer less stretchy finished project, it is possible to fuse the entire back of your project with a much heavier item called fleece interfacing. This stuff is not archival--in fact NO fusible interfacing of any weight is archival, so I wouldn't do this on a family-heirloom type item. However, for everyday use like a sofa cushion, this is a good trick. That's what was done with this crossword-puzzle knit, a cushion-face project which, similar to banner knitting, features long floats and narrow lines.
Again: to hold all the ends in place before fusing, best practice is to tack first and trim the ends. But sometimes, well! You might be tempted to use this stuff without first tacking the ends. And, truthfully, you could. As long as the edges of the interfacing extend far beyond the tails, it does have good sticking power. For an experiment I fused down an absolute rat's nest of tails from three-color picture knitting and voilà! In a few seconds all the tails were fastened down and the project done.
A rat's nest of red, orange and yellow ends, fused down.
A "quick and dirty" approach for the back of a banner or even a cushion top. (I won't tell if you don't!) But *don't* try this inside a garment--the lumpy mess left behind would be uncomfortable, even supposing you could get the patch to stick in place and not peel off. And this sort of dodge really isn't for an item which will be washed very often, either.
Looping and knotting: "two-part floats" avoid ends altogether
This is a trick to avoid ends altogether by knotting two sets of adjoining ends into a single float, spanning from one word to another. It is useful where two different colors of yarn come together on the fabric back, such as where two different-colored words adjoin. This was covered fully in the previous post, together with other methods of dealing with floats (as opposed to ends). I just mention this particular trick here again because turning ends into floats also comes under the heading of dealing with ends. And, like all floats, these "two part floats" can be tacked down--here is a view where wool tacking was used.
This trick is more for banners and, perhaps, pillow-covers. On a garment, those knots would surely find some way of rising to the surface.
Lining
Along with every method above, there's one more optional finishing step for your banner. If you want everything neat and tidy from back view, then for a professional look, sew on a lining. Here is a banner back with polar fleece lining sewn on using the overcast stitch.
_____
So there you have it--tricks for dealing with all the ends generated by banner knitting--a few variations and methods. Hope one or another will suit you.
_____
The edges of these banners were worked with a new kind of steek called a "double fold back." It's a neat and handy steek for the back of a banner or a cushion top, and was used with very banner shown in this post and the previous.