click picture
 Knotingale asks "can you explain the 'jogless' join method for stripes knit in the round? I can't understand the instructions I've found thus far."
As we say here in Wisconsin, "yup, you bet!" But, it all depends on WHAT KIND of stripes you're planning to make.
--->For one or two round-high stripes worked in the round, using the same two or three colors throughout consider trying the barberpole (helix) method.
--->For one round-high stripes where every round is a different color, consider working the smoothed circle way.
--->For stripes with designs in them (such as Fair Isle) worked in the round, consider trying the picture-frame method which disguises the ends of the rows, while allowing you to stay in pattern.
--->For stripes which are three or more rounds high worked in the round, try this nifty method described below:
JOGLESS STRIPE HOW-TO
(a new way)
(a new way)
- On color change rounds, change colors by knitting the first stitch of the new color as you usually would. Then, knit the rest of the stitches to the end of the round.
- On the next round, slip the first stitch of the new color, then knit the rest of the stitches.
- On every following round, knit every stitch as usual
STACKING the COLOR CHANGES
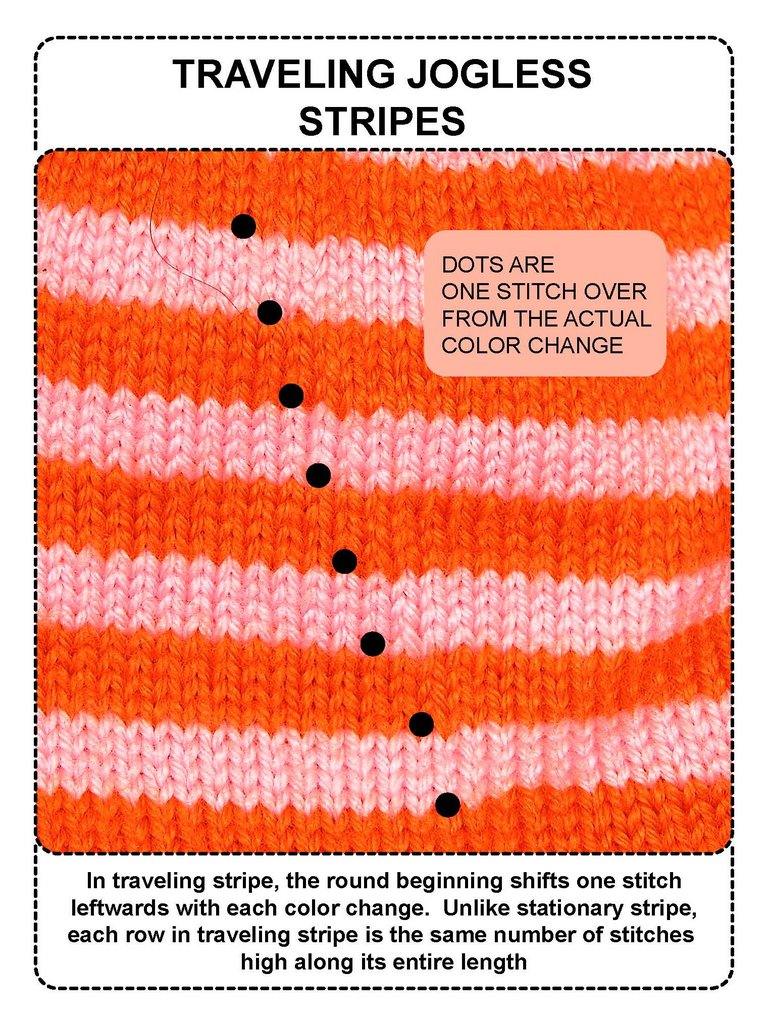
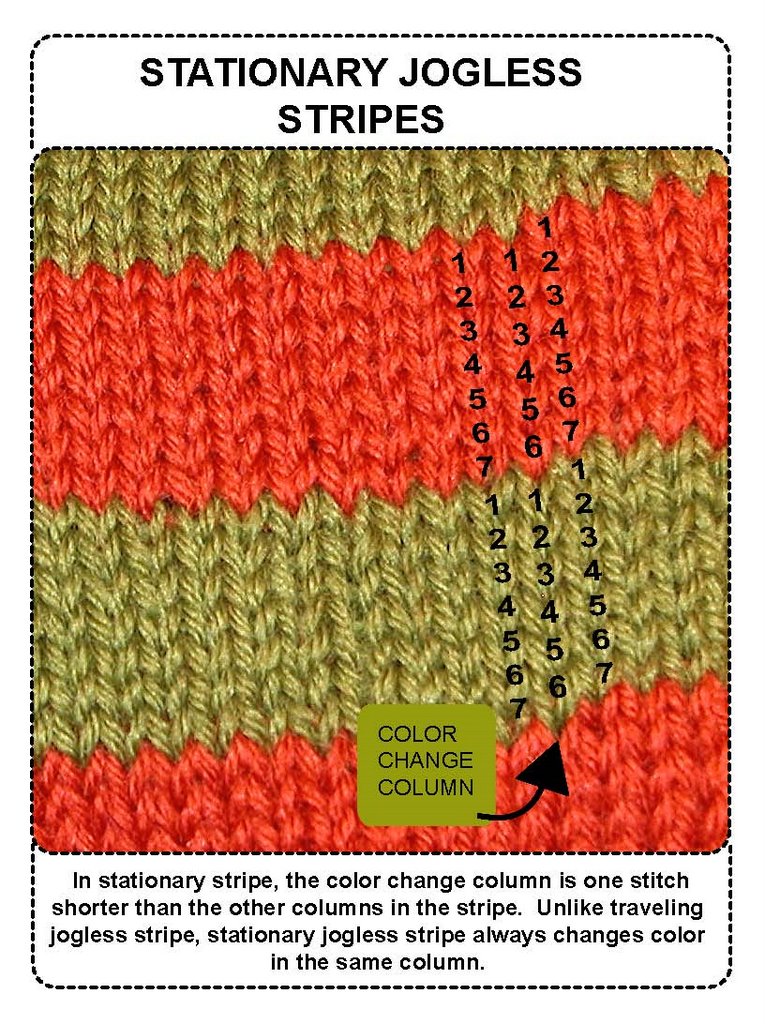
The only thing at all complicated in jogless striping is how you choose to stack the color changes. If you choose to let the beginning of the round travel one stitch to the left with each color change (this WILL make sense as soon as you try jogless stripes with needles) then every part of every row will be the same height and have the same number of stitches. Such jogless stripes are called "traveling stripes." If you choose to hold the beginning of the round in the same place, then at one spot on every stripe, there will be one fewer stitches. Such jogless stripes are called "stationary stripes."
Here it is, one more time, slower, with complete step-by step directions and more photos.
TRAVELING JOGLESS STRIPES
- On the round BEFORE you intend to change colors, insert a stitch marker at the place you intend to change colors.
- On the color change round--slip the marker, then change colors by simply starting to knit with the new color.
- On the following round, when you come to the marker, slip it. Then, slip the first stitch of the new color from the left needle to the right needle WITHOUT KNITTING IT (and without twisting it--this is called "slipping purlwise"). Knit all the rest of the stitches of the round.
- Knit as many rounds as you desire for the stripe, knitting every stitch.
- One the round BEFORE your NEXT color change, shift the marker over one stitch to the left.
- Make more stripes by repeating steps 2 though 5.
- ADVANTAGE: Every part of every round is the same height.
- DISADVANTAGE: The round beginning "travels" one stitch leftward with every color change.
click picture
STATIONARY JOGLESS STRIPES
- On the round BEFORE you intend to change colors, insert a stitch marker at the place you intend to change colors.
- When you come to a color change round, slip the marker, then change colors by simply starting to knit with the new color.
- On the following round, when you come to the marker, slip it. Then, slip the first stitch of the new color from the left needle to the right needle WITHOUT KNITTING IT (and without twisting it--this is called "slipping purlwise"). Knit the rest of the stitches of the round.
- Knit as many rounds as you desire for the stripe, knitting every stitch.
- Make more stripes by repeating steps 2 through 4.
- ADVANTAGE: the color change remains in the same place.
- DISADVANTAGE: at one part of each round, that round will dip one stitch lower.
click picture
WHICH TO CHOOSE?
With stationary stripes, each stripe dips one stitch lower at the color change. With thin stripes, and/or in thin wool, you'd soon have substantially fewer stitches along this column, so the fabric might start to "pull" along that column of stitches. However, with thick wool (5 st/in or fewer) and/or thicker stripes, this isn't an issue because the knitting stretches enough to solve the problem. Therefore, stationary stripes are best for thick wool and/or thick stripes.With traveling stripes, a faint spiral pattern will develop along the diagonal of the color change, so be careful not to pull your yarn too tight, especially if you are carrying the yarn behind from stripe to stripe. This spiral pattern is more obvious in heavy fabrics and less obvious in thinner fabrics, so the traveling stripes are better for thinner stripes and/or thinner wool.
If you have thin stripes in thick wool, or thick stripes in thin wool, you'll have to make up your own mind.
JOGLESS STRIPES AND GARMENT SHAPING
If you choose stationary stripes, you have no problem you wouldn't have with regular (non-jogless) stripes--you begin the garment shaping as directed in the pattern. If, however, you choose to let the round beginning shift by one stitch with each stripe--what will happen when you come to shape the garment?Suppose your directions require that, "at the beginning of the next round," you must increase (or decrease) to shape the garment. If you've been using traveling stripes, where the heck IS the beginning of the round? Is it where the COLOR beginning of the round is, or is it where the cast-on ACTUAL beginning of the round is?
Long answer short: if you've used the 3-in-1 TECHjoin to start your circular knitting, you won't really be able to tell where the cast-on beginning of the garment is. This frees you to use the COLOR beginning as the beginning of the round. You start your shaping opposite the last color change (double-headed arrow photo below). When you start the shaping, you switch gears. In other words, once shaping begins, you hide the color change IN the shaping (the right part of the photo below). This keeps the color beginning of the round from wandering further and avoids complications.
click picture
 Are you wondering how the spiral shift of traveling stripes will affect the shape of the finished garment? Will the one part of the garment be longer than another? The short answer is "no problem." Many knitted garments face this issue--to match shaping, the left front and the right front of a cardigan are almost always off by one row. The same thing with shoulder shaping--that too is almost always off by one row between the left and the right shoulders. Even a circular-knitted sock is one row off between the left side and the right side of the heel tab, or on either side of a short row heel. Knitting stretches, and a spiraling round beginning will not cause any greater problem than do any of these.
WHY ARE OTHER INSTRUCTIONS SO COMPLICATED?
In some other instructions, the pattern writer seeks STATIONARY color changes (the color change should stay in the same place) AND the same number of stitches in every part of every round. The only way to accomplish this is by somehow inserting an extra stitch in the same column as the color change, which can get messy pretty fast.
In other instructions, the jog is evened out--not by slipping the first stitch of the new color as set forth in this post--but by slipping some other stitch or part of a stitch already knitted (typically, a stitch in the row below). The complication isn't really one of execution--it is one of explanation. In other words, the complication arises from trying to explain which stitch or which part of which stitch from the row below should be slipped "up" onto the left needle, how that should be done, and what to do with it once it's there.
CONCLUSION
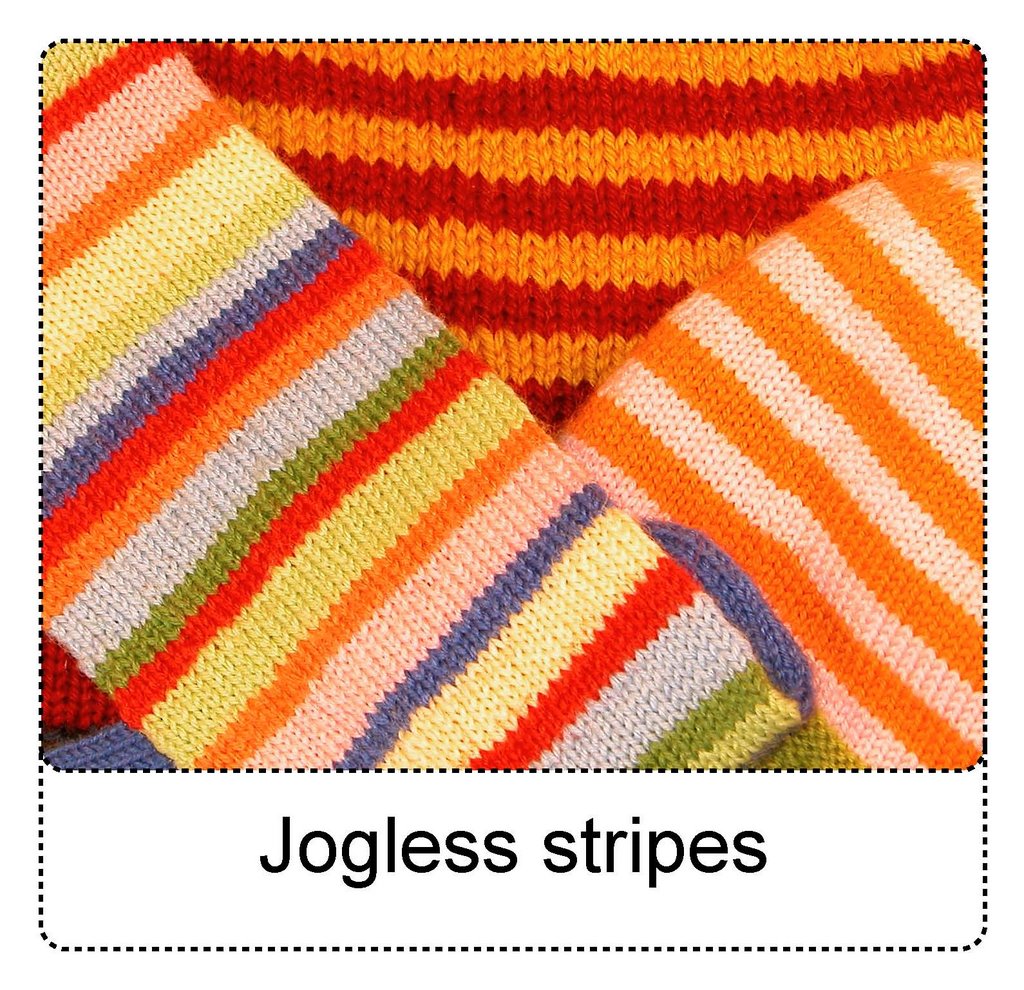
One thing is for sure: regardless of how you choose to stack your color changes, whether with traveling jogless stripes or stationary jogless stripes, your result has got to be better than regular (jogging) stripes--see photo below.
click picture

--TECHknitter
PS: There is a different version of this same information in a newer post with prettier photos, so for a different and prettier view of jogless stripes, here is the link.
 |
| Pretty, aren't they? |