Addendum, June 1, 2010: There is now a VIDEO about the new Tulips buttonhole--click here!
In the upcoming release of Interweave Knits, summer 2010, among the wonderful new designs and terrific articles, there is an article about buttonholes by TECHknitter (that's me!). Some older buttonholes will be reviewed and updated. Also, there will be some information about how to properly sew on a button and about buttonhole placement. But the most exciting thing (for me, anyway!) is that a new buttonhole technique will be revealed which I've been working on for years and years.
Truthfully, after finally figuring out all the parts, it was not clear to me how it could be explained or illustrated, and I was ready to give up on ever bringing it to public attention. However, Eunny Jang, the editor of Interweave Knits, insisted on having a buttonhole article, and would not take "no" for an answer. Under her pressure, I kept plugging away at different methods of explaining it, and finally hit upon one. So, thanks to Eunny and her insistence, this new buttonhole is waiting to meet you all in the summer 2010 Interweave Knits.
One year after this article comes out in Interweave Knits, the copyright reverts to TECHknitting blog, so watch this space in about a year for the complete illustrated details on-line. In the meanwhile, check out the print version, at your local bookstore or supermarket, or in your public library.
I hope you will like this new article and will try the new buttonhole.
Good knitting --TK
PS: Don't forget, the Poll with a chance at a Prize is still running. Get your comments in by May 15 to qualify for a drawing of a prize--$20 gift certificate at the yarn shop of our choice.
In this post are links to ten different methods (all illustrated) for working in ends, eight of which are as-you-go.
1. The Russian Join--this join is well-known as a simple method of joining two colors, but works just as well for same-color joins. An example of where you might want to work in two different colored ends is with stripes or with fair-isle methods. An example of same-color joining is where you run out of yarn and need to switch in a new ball of the same color. This join, like most the others on this page, not only secures the transition stitches, but also works the ends in as-you-go.
2. The back join is an improved Russian join--with the back join, it is possible to exactly choose the spot where the yarns will change--not the case with the Russian join. Another improvement is that the back join is WAY faster than the Russian join--no need to dig out a sewing needle! Like the Russian join, the back join is usually touted for changing smoothly from one color to another, but is also a nifty trick for same-color joins. Also like the Russian join, if you use the back join, there will be no ends to work in at the end--all you have to do is snip off the excess after blocking and you are done!
3. For same-color joins, there is also the overlap method. (scroll at link) This method is probably the very fastest of all. The overlap method will not work (or at least, will not work very well) for changing color, but for same-color joins, there is nothing simpler. With this method, and depending on the yarn used, it may be necessary to leave little tags (tails) on the inside where the yarn changed, but because the stitches are overlapped, these tags will never work free--the transition stitches will remain tight and good looking for the life of the garment. This method can be adapted for lace, also, without the tags.
4. Not to be confused with the overLAP method (above) we also have the overCAST method. For delicate work, or for thin yarn, this trick lets you work in the ends with no added bulk on the face of the fabric. Therefore, this method is to be preferred to the Russian- or the back-join when bulk is an issue: both of Russian- and the back-join add a bit of bulk to the fabric surface, which this overcast method does not. Like the Russian- and the back-join, with the overcast method, the ends are worked in as-you-go. You need only trim off the excess after blocking, and your fabric-finishing is complete.
5. Another great (if slightly icky) method for dealing with ends is the spit-splice, also called "felting ends" (scroll at link). This works best for same-color joins--for different color joins, you would have a length of yarn which had both colors at the same time. Felting ends is not so much a method for working-in ends--instead, felting actually eliminates the ends!
6. We also have two methods of working in ends using a sewing needle--an after-the-fact fix for loose ends. The first of these is the art of weaving in ends. With weaving, the end is worked into the fabric face along the same path as the underlying stitches--it is a species of duplicate stitch. A sub-set of weaving is how to weave ends in ribbing. Weaving is quite, quite secure, but it can add a little bulk on the fabric face, so if this is a concern, consider using the method below, instead.
7. The second method of working in ends with a sewing needle is the skimming-in method. This method is not quite as secure as the weaving-in method, but it avoids bulk on the fabric face, and so is better than the weaving-in method for thin yarns or delicate work. Both the weaving-in and the skimming-in method work with different color yarns OR same color.
9. Another place where ends might be an issue is at the beginning of a circular knit. That tail hanging where the join occurs can work itself loose and get ugly. A trick for preventing this AND working the tail in at the join is the three-in-one TECHjoin. Further, the three-in-one TECHjoin also prevents the nasty "jog" where the first round meets the cast on.
10. We end with a quite-specialized trick for working in your ends on textured stripes. This trick shows how to make jogless stripes in textured fabric AND work in your ends-as-you-go. It's a nice time-saver for those who like to make stripy ribbed hats.
When I knit columns switching from knit to purl (such as a basket weave pattern) one column is always looser-looking--I think the problem is always switching from knit to purl but switching from purl to knit doesn't have the same problem.
My daughter was so frustrated last year with this [same] problem with her 2 x 2 ribbing that she hasn't tried to knit a sweater since. (So sad!)
Giving up knitting? That IS sad. However, this problem is fixable. This post show 4 tricks, and one will surely work.
Solution 1--knit tighter.
The simplest quick-fix is to knit tighter. Simply using smaller needles will put so much less yarn into each stitch that the loose column of stitches will magically fix itself. This is actually an excellent solution for sweater bands--bottom or neck, and also for cuffs and hat brims. Cast on properly and knit very firmly on small needles, ribbing transforms into a stretchy, elastic fabric, with stitches laying in very smooth and even columns. Pros and cons: While this is an excellent solution for cuffs, brims and bands, it is not a good solution for all-over textured fabrics, such as all-over ribs, basketweave, cables, etc. Tight knitting all over the whole fabric would result in stiff, tight fabric, as well as hand cramps--not fun. Further, even for bands, casting on loosely but knitting tightly is also a trick which must be mastered for this fix to work--a tight cast on will result in a nose-scrapingly unpopular and unwearable garment.
* * *
Luckily, knitting tightly is not the only fix. There are 3 further solutions, but before we get to them, let's take a closer look at the problem.
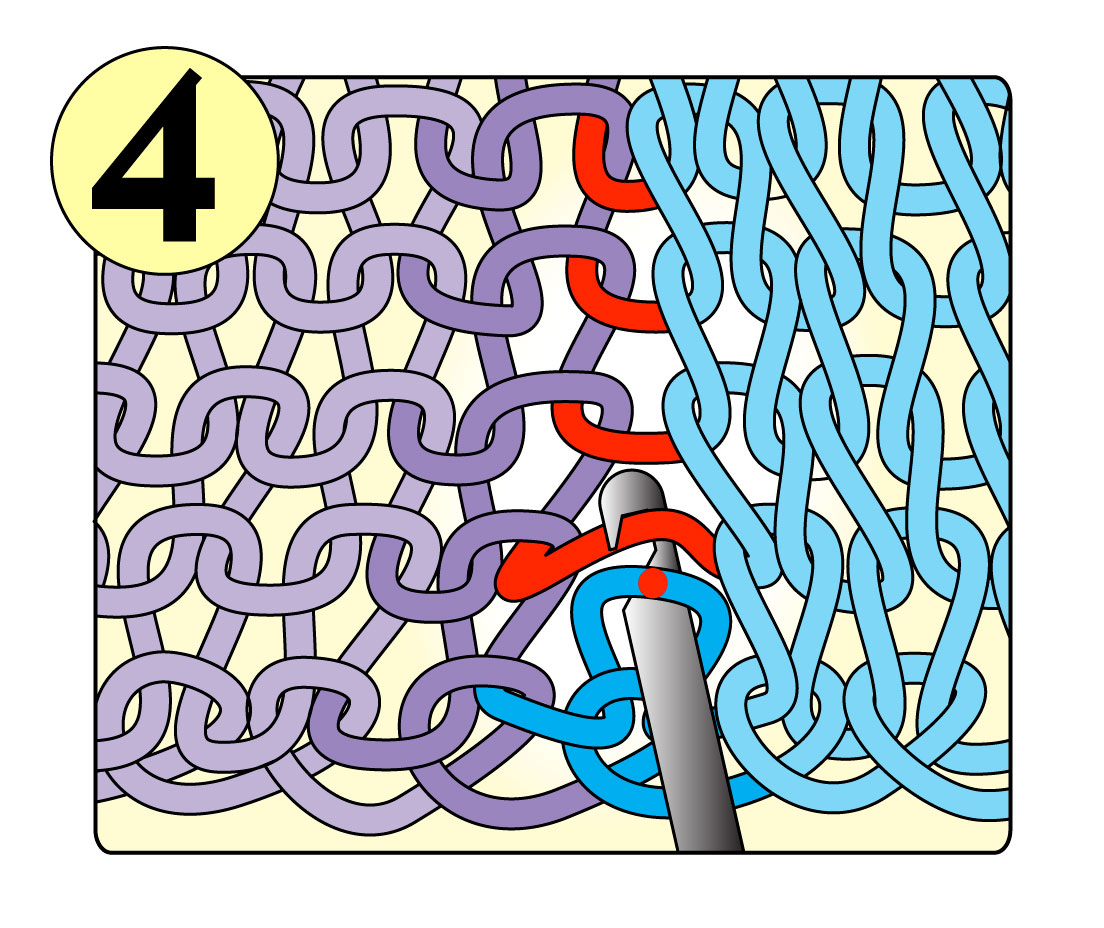
In all the diagrams of this post, purple means the stitch appears as a knit on the "front" face of the fabric--the public side--the side which will be seen when the garment is worn. Blue means the stitch appears as a purl on the "front" face of the fabric. As you know, knitting is very zen-- "what has a front has a back," as the Zen masters say. This means that when the fabric gets flipped over, the purple stitches, although knits on the front, will appear as purls, and the blue, although purls on the front, as knits.
In illustration 1, we are looking at the front face of the fabric. The dark purple column is the last knit column which appears just before the column of purls. These dark purple stitches are where the problem lies: This is the column of stitches which get all stretched out and floppy looking.
The first column of purls next to the knit column is dark blue. The red dots on the dark blue stitches in the first purl column show that these purls are the ones we are going to operate upon to fix the problem. That's right: The problem is with dark purple KNIT column, but in the remaining three solutions below, we are going to fix it by operating on the dark blue PURL column.
* * *
Solution 2--run out, then latch up
The idea of this solution to make your project working the purls and knits without doing anything different than you normally would. When the project is done, the fix comes in, and here's how.
Slip the stitches between one needle and the next until you are right over the dark blue column. Let down a giant (scary looking!) runner.
Once the ladder has been let out to the bottom of the fabric, it will be latched up again, using a crochet hook (you could also use a latch hook). As you latch the darker blue column back up, give a mighty yank on each rung of the ladder. As you can see in Illustration 2, the fabric has been flipped over for the latching process, because it is easier to latch up a knit column than purl one. By giving a mighty yank on each rung of the ladder as you latch it back up, the loose stitches in the dark purple column will tighten up nobly as the excess yarn gets yanked out of them into the stitches of the dark blue column. It is, of course, true that the dark blue column will become distorted from the excess yarn being yanked into it, as well as from the act of yanking itself, yet this is actually not so bad. The dark blue column ends up being a purl column on the front face of the fabric, which means it recedes into the fabric, and therefore will not be noticed.
A note about the illustration: The illustration shows the runner let down all the way to the bitter end, to the cast on stitch itself, then latched back up. However, it might be safer to stop a row or two above the actual bottom edge, to avoid the problem arising from the cast off untwisting. Pros and cons: This trick is very easy and requires nothing to remember as you work on your project. However, it has three major limitations.
First, it works best in "sticky" fibers like the various types of non-superwash wool, because in those fibers, the stitches will stay pretty much as you yanked them. However, in slick fibers such as acrylic, cotton, bamboo, superwash wool, alpaca, silk and the like, this trick will not work very well because the fibers will slide around as you wear the item, and the excess yarn will be yanked back out of the dark blue stitches, eventually to spread out again. For slick fibers, solution 3 or 4, below, are better.
Second, this trick is not very good for reversible items like scarves and afghans--the distorted dark blue column of stitches will hide on one face of the fabric, but will show on the other. Solutions 3 and 4 solve this problem.
Third, this trick really works only if the columns to be run-out-and-latched-up stay in place, so that one column can be let out all the way to the bottom. If the loose dark purple column of stitches travels across the fabric face--traveling cables, for example--solution 4 is best.
Solution 3--latch up out of the fabric
This solution is very similar to the first, but will work on slick fabrics. Here's how:
The base stitch for the dark blue purl column is placed on a safety-pin or other holder at the very bottom of the work, as shown in Illustration 3. You then work the garment, decreasing the stitch count by one, and remembering not to purl that column.
When the knitting is all finished, turn the work over, so that you are working on the back fabric face. Now go back down to that lonely stitch on the holder waiting at the bottom. Per illustration 4, latch up the whole dark blue column, taking the rungs of the ladder right out of the fabric itself--shown in red. The red dot on the dark blue stitch just above the cast on shows that that stitch was latched up out of a ladder rung--the same ladder rungs that were red on illustration 3. Latching the whole dark blue column of stitches out of the fabric absolutely tightens up the adjoining dark purple column of loose stitches.
Pros and cons: Like solution 2, this trick works well for cables or ribs running lengthwise (not traveling). Unlike solution 2, however, you must remember to alter your pattern. Specifically, you must remember to delete the dark blue column from your work, then remember to latch it in afterward. When using this method, be sure to swatch and measure a fully-latched-up sample, as the latching pulls quite a bit of yarn up, making the fabric narrower. For a single cable, this might not make a noticeable difference, but for multiple cables/ribs it certainly would.
Solution 4--Slipping
Unlike latching, slipping is done as-you-go. This trick is is slow to work at first, but once up the learning curve, you can knit this trick as fast as any other knitting. Unlike Solutions 2 and 3, this will work splendidly on any sort of columnar-based fabric, even short columns like basketweave, and even columns which wander, like traveling cables.
The essence of this trick is the same as solution 1--knit tighter--but with this trick, the tighter knitting is confined exactly to the point it is needed: the dark blue purls alongside the dark purple column of loose floppy knits. Here's how, assuming a 2x2 ribbing in circular knitting already cast on your needles:
Round 1, step a: place marker * K2 (light purple, dark purple). Per illustration 5, Slip next st (first purl stitch--darker blue) with yarn in front. Slip the stitch "open," that is: purlwise, not twisted. Step b: P1 (second purl stitch--lighter blue). Repeat from * all the way around first round. The slipped bar which results in front of the dark blue first purl stitch is shown in red in illustration 6.
Round 2: starting from marker *K2.Move the running yarn out of the way. In illustration 7, it is shown pulled straight up. Once the running yarn is pulled out of the way, fish around with your right needle and draw the bar (bar=red yarn slipped on the last round) through that first purl stitch, in a manner which purls the stitch with the bar (ie: do not twist the stitch OR the bar, just draw the bar through the purl from front to back as shown). Next, bring the running yarn back into play, and use it to purl the second purl stitch in the normal fashion. Repeat from * all the way around. If you look at your fabric, you will see that by using the bar to purl the first stitch in the purl column, rather than the running yarn, you have set up the running yarn to be the bar for the next round, as shown in Illustration 8. In other words, in every round, you use the bar remaining there from the slip in the previous round to actually purl the stitch, and you set up a new bar for the next round by simply slipping running yarn across the dark blue column rather than purling with it as is normally done. One more note: the red dot on the dark blue stitch in illustration 8 shows that stitch was created out of the bar illustrated red in illustrations 5, 6 and 7.
Repeat round 2 over and over again for the rest of the ribbing.
For the very last round of ribbing before bind off, draw the bar through each first purl stitch of each purl column AND THEN PURL it with the running yarn (2 st worked in dark blue purl column).This corrects the row count so that the dark blue column has the same number of rounds as all the other columns.
Bind off or continue in a different pattern, as desired
After you work this sample, you will see how to adapt it for ribbing other than 2x2 and for cables, etc.--basically, the first stitch in the dark blue purl column the one being operated upon by slipping as set forth in the instructions for round 2.
The idea is to avoid putting excess yarn into the fabric in the first place. By slipping the stitch, the resulting bar puts into the fabric only a small portion of the yarn a full stitch would add to the fabric. Pulling this short length up into an full stitch on the next round tightens the adjoining knit stitch by permanently yanking the excess yarn out of it. Pros and cons: For improving all-over ribbing or for all-over cable or basketweave patterns worked in the round, this is the best trick I know. Although this requires close attention to go up the learning curve, this slipping trick can become quite fast--second nature, actually, if you work at it. However, even this nifty trick has its limitations.
First, in thin or splitty wool, or in poor light, or on dark colors, catching the slipped bar below can be frustrating.
Second, in back-and-forth knitting, the bar of the slipped stitch is on the back fabric face (away from you) on the return trip, because the purl column, as seen from the back face of the fabric, is a knit. Catching a bar from the back and leaving a new bar back there is frustrating, and isn't ever going to be as fast as catching a bar stranded across the front. Therefore, this trick really only works in circular knitting. For back-and-forth knitting, solution 2 or 3 will work better.
Geek notes
For those that want the nitty-gritty.
Combining techniques: solutions 2 and 3--latching--are bad ideas if the column to be latched up is going to tangle with the garment shaping. However, on a sweater with cables running up the length, where the cables first become involved in the garment shaping at the neck or armhole edge, you can work your project as far as the shaping, then latch, and then switch to solution 4--the slip method--once the shaping starts.
In all the solutions except for 1, the excess yarn is yanked out of the loose floppy stitch once the the knit stitch concerned is off the needles. This removes excess yarn in a manner impossible if that stitch was prevented from shrinking by being forced to stretch over the barrel of the needle. In other words, neither yanking hard on the loose knit stitch nor on the following purl stitch will work to eliminate the excess yarn, because the barrel of the needle prevents either from shrinking down past the size dictated by the barrel's diameter. Once released from the needle, however, giving the loose knit stitch a mighty yank (whether delivered by latching or slipping) will tighten it up tidily.
Other solutions are possible through changing the stitch mount and also through twisting the dark blue purl stitches. However, stitch mount, twisting and the related subjects of combination- and other alternative types of knitting are being put off a future series of posts, so those solutions are not included here.
A BIGthank-you to Carol (Rududu) and to Jane (Maidenhair) for test-knitting Solution 4.
Addendum, Jan 2016: have a look at the edges of the ribbingin the photos at this blog postfrom a knitter who found method 4 useful. You have been reading TECHknitting on: purl after knit, tightening up the loose stitches.
On March 2, the Spring 2010 Interweave Knits will hit the newsstands, and, among the interesting patterns and fascinating articles will be an article by TECHknitter (that's me!) about Kitchener Stitching (also called grafting).
TECHknitting blog has already shown how to Kitchener stitch stockinette in an easy way, using a knitting needle rather than a sewing needle, but this magazine article covers different ground.
Specifically, article shows how to use a tapestry needle to Kitchener stitch any fabric according to a formula, whether garter stitch, stockinette, reverse stockinette. In addition, there will be a new "unvention:" a method for grafting ribbing without the dreaded half-stitch jog (could also be applied to grafting seed stitch in pattern).
There will be scads of illustrations and a handy chart summarizing all.
Every so now and then, TECHknitting strays into the kitchen. Last time there, it was no-mess muffins, and this time, it's peach crumble. (Click to enlarge the photos)
This idea is from a blog, and the finished product looked so good. The orignal recipe called for a box of yellow cake mix, a stick of butter, and a full cup of brown sugar. That's out of our league, so the recipe got tweaked. Still, the result is recognizable and makes up as easy as the original. As a plus, kids'll eat it too.
To make, you need:
round or square glass baking pan, 8 or 10 inches
1 15 oz can of peaches in juice
1/3 cup cake mix--any kind of vanilla cake mix seems to work, OR--you can use the no-mess muffins mix previously posted on this blog.
1/3 cup regular (long-cooking) oatmeal
1 1/2 tablespoons cooking oil--we use canola around here
1/3 cup chopped pecans
Heat oven to 350 degrees.
Pour the peaches + their juice into the ungreased pan. Cut them into bite sized pieces with a pair of kitchen shears (no need to get your fingers wet!)
Sprinkle the dry cake or muffin mix evenly over the peaches, then the oatmeal on top of that. Drizzle the oil as evenly as you can. There will be large areas with no oil, but that's OK--you're shooting for a little oil in each serving, not necessarily each bite.
Plunge a table knife through the dry topping, then twirl in place. This makes a little "well" where the liquid can bubble up through the dry ingredients while baking. Make about 8 or 10 of these wells, mostly in the middle of the pan. Top with the chopped pecans, spread evenly.
Bake 40 minutes. Yield: 4 servings
Eat hot or cold, good with coffee.
--TK
PS: If it turned out a little dry? Next time, add a couple of tablespoons of water to the peaches.
In today's post on I-cord from a mill, I forgot to add: You can mill off a length of cord and just keep it laying around. Then, when you want to start a project from the center, you cut off a length, pick the little scraps of yarn out of the loops, unravel until the running yarn is long enough to not work itself loose and then put the 4 stitches of I-cord onto two small dpn's. This bit of I-cord is used as waste yarn: it is the umbilical cord for the belly-button trick for starting projects in the middle. Keeping a length of I-cord around for this purpose makes starting in the center go 1-2-3, and gives less trouble than trying to cast a very few stitches and work them. Neat, ay?
--TK You have been reading TECHknitting on starting projects in the center with a waste scrap of I-cord.
Some time ago, TECHknitting posted on "how to knit I-cord." Since then, however, a nifty new tool (machine?) has become indispensable here at ChezTECH--an I-cord mill.
My recent love of these gadgets surprises me. From reading reviews and talking to knitters, I-cord mills seemed expensive and prone to malfunction. However, as more and more projects demanded I-cord, another look was in order. So, when a German-made I-cord mill jumped into my basket at the LYS, I didn't put it out again despite the expen$e, but paid and took it home.
Once home, I read the instructions, threaded the mill and started cranking. Disaster! The stitches skipped. The needles snagged. The end result was a terrible, loopy mess. Changing yarns did not help. Although sock yarn made a better result than anything heavier, the results were still un-usable.
If one project after another hadn't called for I-cord, the mill would have stayed in the reject basket along with the snapped bamboo needles and the bent dpn's. Yet laziness eventually won out: each time an hour or three was spent mindlessly churning out I-cord by hand, I would think "there HAS to be a better way." Out would come the mill for another try.
After several months, experience showed how to make a few inches of passable cord. Frustratingly, however, just at that point, the whole business would usually start skipping. Long story short: the mill never really worked right, and one day, it pretty much broke. Towards the end, however, it did seem that if the mill had been a little heavier and better made, further experimentation would have eventually made it possible to actually produce usable I-cord.
Fast forward in time, and trip to a big-box fabric store revealed a better-made, heavier-duty (and cheaper!) mill (Embellish-knit) perched on the check-out counter. What do you know? This mill too somehow jumped into my basket and after being paid for, made the trip home. This time, the machine was made of clear plastic. Being able to see what was going on was a huge plus. Close attention eventually lead to success, and the point of today's post:
How to Use the Embellish-Knit I-cord Mill
The first part below is the theory. If all you want is the plain how-to, skip down to part 2: tips for using the machine.
Part 1. The Theory of the I-cord Mill.
The I-cord mill is basically a tiny knitting machine. Now, knitting machines often seem very mysterious to hand knitters. Why do knitting machines use crochet hooks for Pete's sake, and what's with the little latches? And how in the world can you knit with so darn MANY of those hooks?
As you know, in hand knitting, the stitches waiting to be knit, as well as the already-knit stitches are parked along the shaft of the knitting needles. Each stitch is slid along the shaft in turn, until it is perched on the tip of the left needle. At that point, the knitter operates the right needle to pull a loop through the waiting stitch thus creating a new stitch. (Mirror image knitters reverse these directions.)
It would be difficult for a machine to duplicate these motions: The work would have to slide in exact increments to a precise spot so the knitting mechanism could draw the new loop though each old loop in turn. Then, each already-worked stitch would have to be slid away again. At the end of each row, the work would somehow have to be turned, somehow without tangling the yarn, and the process repeated. Easy for the human hand, but the very devil for a machine.
Needles
To knit by machine, a different kind of needle has to be used: a "latch-hook." Although it looks mysterious, the name pretty much says it all: a latch-hook is a hooked needle which can be latched shut. The parts of the latch-hook needles in the Embellish-Knit mill are the hook, the partially-grooved shaft, the knob and the latch.
HOOK: The hook part consists of a curved end, like a crochet hook.
SHAFT: The hook perches atop a shaft. The shaft has a slot or GROOVE along part of its front. This shaft-groove is where the latch inserts.
KNOB: Towards the bottom, the shaft has a knob on the front. As explained below, the knob runs in a track around the inside of the mill.
LATCH: The latch is a little arm which swings up and down. It is held into the shaft-groove by a pin which acts as a hinge. In the most upright position, the latch smacks the hook on the nose, thus "closing" the needle--latching it shut.
Before we leave the needles to look at the mill itself, does it worry you that the latch doesn't close smoothly onto the hook? It did me. Coming from a hand-knitting background, that latch looked like an accident waiting to happen: one false move and that clumsy-looking latch would snag the yarn. But, as clumsy as the whole set-up looks, it works. The secret is that yarn movement along the latch is directional. The yarn never comes down onto that nasty latch top from above. Instead, the yarn slides along the latch: either up over the top of the closed latch or down off the bottom of the open latch, thus sliding smoothly right past that dangerous-looking little lip.
Mechanism
The I-cord mill features two tubes, one inside the other. Each tube, made of plastic, has some stuff molded into its walls.
The outer tube is the casing of the mill. One main function is to hold the mill together. The other main function is that it has a track molded into its walls--a circular track which is high on one side and low on the other. The knobs of the needles sit in this track.
The inner tube also features molded plastic: into its outer walls are molded slots, and the latch hook needles slide into these. This method of connecting the latch-hook needles to the inner tube is quite clever: the needles are held at a fixed distance from one another, but they remain free to slide up and down.
At the bottom of the inner tube are the mechanical guts of the mill. The inner tube rests on a gear wheel, and this gear-wheel connects to the handle-gear. When you crank the handle, the interlocking gears make the inner tube spin. As the inner tube with its attached needles go around and around, the knobs at the base of each needle are forced around the circular track. Since the track is high one side and low on the other, and since the needles are free to slide up and down their slots on the inner tube, the needles following the track are forced first up, and then down, then up again. Interestingly, spinning the inner tube with its attached needles is the only thing that requires mechanical energy, the rest of the knitting is actually done by gravity.
How the knitting happens
If you look down on a mill, you will see that there are four needles. As it happens, there are 4 stages of knitting each stitch. This means that as each of the four needles passes a certain position, it is performing one of the 4 stages of mechanical knitting. In order to make the illustrations easier to follow, the needle occupying the first stage position is always marked with a big red asterisk * in all of the illustrations of this post.
The four positions (one for each stage) are labeled on the illustration below.
First stage: The needle is poised in the air, high above the lip of the inner tube with the latch open (ie: in the downward position). Wrapped round the shaft of this needle, and disappearing down the throat of the inner tube, is some yarn put there on the last go-around. As the needle passes through stage 1, the hook catches the running yarn and begins to descend. (The arrows on the two below illustrations indicate the direction the needles are moving as they pass through those stages.)
Second stage: As the needle passes the second stage position, the sinking needle is forced against a loop of yarn which was put there on the previous round. As the needle begins to sink below this loop, the loop catches the underside of the latch and swings the latch shut, thus trapping the yarn which the hook just caught in the previous stage.
Third stage: The needle reaches its lowest point, far below the rim of the inner tube. The yarn from the previous round slips up over the latch hook, pulled upwards by the path of the yarn through the inner tube. Meanwhile, however, the yarn caught back at stage 1 remains under the hook of the needle, trapped there by the closed latch.
Do you recognize this? The fact of the yarn sliding up over the needle is, in effect, the pulling of one loop through another: this is the act of knitting, and stage 3 is where it happens.
Fourth stage: The needle starts to rise again. However, the yarn trapped under the hook ever since the latch closed on it back at stage 1, does not rise with it. This is because all the yarn is being pulled down the throat of the inner tube by a weight hanging on the finished I-cord as the cord exits the machine. The weight forces the loop to stay near the rim of the inner tube. As the needle slides upwards, the yarn, staying low, forces the latch open, and, as the needle rises higher, slips free of the latch to stay wound around the shaft. Now we are back to the beginning: we have a needle high in the air, with the latch open. This needle has a turn of yarn around its shaft, and this needle, poised and ready to hook on, is about to pass by the running yarn being fed in at stage 1.
As stated above, these stages depend on one important thing: the yarn disappearing down the throat of the tube must be exerting a pull downwards at all times (this is the gravity part). This yarn (which is actually the I-cord) must always have a weight hanging from it. If there is no weight, there is nothing to keep the yarn headed down the tube, nothing to prevent the yarn from rising into the air as the needle goes up at stage 1; nothing to prevent a horrible, horrible mess from developing. Also, it is the downward tug of the yarn which flips the latches open and shut.
Part 2: Tips to make the mill work smoothly
Getting started: Run the yarn through the little arch on the front of the machine, over the notch in the rim, then down the throat. Clip the weight onto the protruding tail and rest it on a table. Trap the yarn being fed it with one finger against the outer barrel of the machine. You can now control the yarn feed by barely lifting the weight free, while barely lessening the pressure of your finger. There must be some weight to pull the yarn downward, but until you get some yarn on the needles, you have to manually control the feed.
Turn the handle until the first hook catches the yarn. Turn further until the second hook is just about to catch. With a crochet hook, lift the yarn up so the second hook passes under the yarn. Turn the handle and allow the third hook to catch the yarn, lift the yarn and allow the fourth hook to pass. From here on in, you let every hook catch the yarn, and you do not need to control the feed any longer.
The big three tips are:
hold the FEED YARN LOOSE,
KEEP the WEIGHT ON, HIGH UP, and
make sure the LATCH has cleared.
Loose Yarn: Tip number 1, the most important tip of all, is that, once you have the machine started, keep the yarn being fed in LOOSE. If there is any tension AT ALL, the mill will skip. This means you have to pull out swoops and lengths of yarn as you go, piling it somewhere safe as you work. This really cannot be overstated: ANY amount of tension is too much--even pulling yarn out of a center-pull ball is too much, even feeding yarn into the mill directly from a yarn swift is too much. The mill will not work correctly unless the yarn being fed in comes off a LOOSE PILE of yarn. Put the cats out, and pile up the yarn.
Keep the weight clipped on high up, near the machine exit: Next most important:as stated above, keep the weight on the cord being knit. The mill comes with a handy weighted clothes pin you simply clip onto the tail. Keep moving this clip up to the very top of the cord--just where it comes out of the mill. The thicker/heavier the yarn, the more often the clip has to be repositioned. In any weight yarn, if you let the clip get too far from the machine exit, it starts swinging around in wild loops as you turn the crank, and the needles start skipping.
Loop over latch: The last of the big-three tips is to make sure the latch comes open EVERY TIME a needle moves into the stage 1 position AND that the bottom of the latch rise up CLEAR of the loop.
If the latch does not rise up high enough to come free of the loop around the shaft -- illustrated above -- you will get a horrible loopy mess. Best practice would be to start off very slowly, holding the mill to eye level and watching the latch on every stitch that goes by. If the yarn is not sliding down below the bottom of the latch, you must poke it down. Then, tug the I-cord coming out at the bottom and re-position the weight so that there is sufficient tug to hold the loop down as the needle rises, thus opening and freeing the latch as the needle rises into the stage 1 position.
Some additional tips
Yarn guide: Feed the running yarn in under the yarn guide (the little arch on the front of the outer tube), otherwise, skipped stitches.
Tangling: The feed yarn wants to tangle with the I cord. To prevent, feed the yarn in from up high, like a shoulder-height bookshelf. Coming from above, the feed yarn cannot tangle with the I-cord coming out of the bottom.
Excessive cord length: The cord gets long fast and starts sweeping the floor, a bad idea. It'll get dirty, and the drag makes the mill want to skip. Double the cord back on itself (knot it, use a bobby pin, safety pin, whatever). When the cord gets to an uncontrollable length, I cut it. It is easy enough to graft the cord together: just put each of the 4 stitches on a dpn as if it were a tiny row and graft as usual. Also, if the cord gets too ridiculously long, the excess weight starts to cause problems.
One-ply yarns present a special problem: You can mill these, but they're hard to start because the yarn keeps wanting to break when you first put the weight on. Mini Mochi is like this, so is Brown Sheep single ply Lamb's Pride worsted. Instead of starting with a single tail of yarn, crochet a chain of yarn long enough to hang down the throat and clip the weight onto the chain. Hook one of the crocheted loops around the needle in the first stage position, skip the next needle, catch the yarn on the next needle and skip the last needle. Hang the weight and carefully start turning. Sometimes the yarn will still break, but usually, the crocheted chain means that several strands are holding the weight, not just one, so there is less tearing.
Weight and kinds of yarn: The real issue is not so much the designated weight of the yarn you want to mill. Rather, the FLUFFINESS of the yarn makes the most difference. The hook might split a fluffy yarn so that the yarn doesn't stay caught under the hook as it should, and this makes a horrible mess. If you use a smooth yarn and keep a sharp eye on the latch of the needle at stage 1 you can mill worsted weight yarn (the kind of yarn usually knit at 5 stitches/inch). However DK is less nerve-wracking, while baby or sock yarn goes along a mile a minute.
Limber up the machine: When you first get it, ithe lubricant has been globbed on in one or two spots, rather than being spread around. Also, the gears are a bit stiff. So, before trying to mill yarn, take the mill out for a little test-run: without threading in any yarn, just crank the handle maybe 50 or 75 times and admire the gear mechanism which makes the needles go up and down. Also, if the hinges don't swing freely, consider a drop of plastic-safe lubricant on the end of a Q-tip, wiping up the excess so you don't grease up your yarn.
Cleaning: The space between the first and second tube is open. After milling out a bunch of i-cord (?? guessing here--maybe 50 yards? maybe more?) the dust from the yarn will have mixed with the lubricant on the track to make the mill hard to spin. Needles will start to skip and the whole mill will feel rough. I myself simply took the machine apart--there are screws all over--cleaned it, lubricated the track and the hinges of the latches and reassembled. (I wiped everything down pretty well, too, so as not to grease up my yarn.) To keep track of what everything looked like and where all the pieces were supposed to go, I took photos and notes at every stage of the process.
Here is a photo showing I-cord milled in all weights.
The gray yarn to the left is 1-ply Brown Sheep worsted weight. This is the heaviest yarn the mill is capable of working, and it took some doing: three tries to get started, and use of the crocheted chain trick to prevent tail breakage. This relatively fluffy yarn required to be pulled down by hand every single turn for the first six or eight inches because the weight was not initially equal to the task of holding down yarn of this bulk. As the I-cord got longer, its added weight helped with the correct operation of the mill, and after a foot or so had been made, the working went much faster. However, it was clear that the closest attention would have to be paid for the entire length of cord: the yarn was at the very outer limit of the mill's capability, and it often seemed that the hook would split the yarn. The point of milling this was to show the machine's capacity: this isn't really a yarn for milling under ordinary circumstances.
The red yarn is 4-ply Cascade 220, a worsted weight, the gold colored yarn is Dale of Norway Heilo, a DK weight, the yellow is Dale of Norway Baby Ull (Baby/sock weight). All three were easy to start and easy to mill, although the Cascade had to be fed carefully and have the latch cleared a few times by pushing down the loop around the shaft.
The last yarn--the white yarn to the right--is Knitpicks Merino laceweight. This yarn is quite thin, and also required the use of the crocheted tail trick. It was easy to mill, but the final product is so thin and so very much like string that I can't imagine using it for much except shoelaces (hmmm...)
Good knitting--TK
ADDENDUM, November 2012: A lovely commenter, Lynne, sent along a link to this WONDERFUL You-tube video of trick for churning out I-cord faster than you can imagine, turning the mill at high speed with a POWER DRILL. I am in awe.
Thank you Lynne for the link, and thanks to Dutch Hollow Acres for the video!
You have been reading TECHknitting on "Using an I-cord mill: tricks and tips."
Fleegle's brilliant genius has been celebrated on this blog before, and there is cause for celebration again, today. Fleegle has figured out how to garter stitch in the round without purling or seaming or wrapping or turning. Curious? Go to the how-to now.
Thank you Fleegle!
--TK You have been reading TECHknitting blog on: Fleegle's method of garter stitch in the round
Part 1 of this series talked about uneven fabric due to "rowing out," which is fabric uneven from row to row. In this post, we have the related problem of knitting which is uneven from column to column. Sometimes, this problem is easy to identify, expressing itself in bunchy vertical columns across the face of the fabric, per photo below. Sometimes, however, this problem expresses itself mysteriously: just a few enlarged stitches across an otherwise perfect row.
Unevenness is unavoidable when you first start knitting. But some knitters remain plagued with this issue. In my experience, this mainly results from a positioning problem called "too-long runs."
To explain: In knitting, we have two needles--the holding needle and the working needle. (For most knitters, the left is the holding, the right the working, but for mirror image knitters, this is reversed.) To knit a new stitch, three things have to happen, and two of them concern positioning.
The stitch about to be knit has to be pushed or drawn away from its neighbors, onto the tip of the left (holding) needle--positioning issue #1
The stitch has to be knit
The newly-made stitch has to be parked on the right (working needle) far enough out of the way to permit the next stitch to be made without falling off in its turn--positioning issue #2.
For smooth knitting, each of these things ought to happen the same way each time. Stitches about to be made should be drawn forward from the waiting pack by the same distance, new loops drawn through ought to be the same size, and each new-made stitch ought to be parked out of the way by the same distance from the working-needle tip.
The problem of the middle stage--drawing the same amount of yarn through each time to make consistent loops--is dealt with in this post about gauge: the TLDR is this is a problem of feed tension. For today, we are only looking at the positioning issues of moving the stitches toward being knit, then out of the way afterwards. These are the positioning issues which cause the problem of fabric uneven across the columns. There are two roots of the problem
In knitting, you're in the odd position of trying to slide stitches around while also holding--clamping, actually--those very same stitches in one place as you grasp the knitting needles to operate them. You're trying to hold and slide at the same time.
Knitting is complicated: positioning your hands just right is a bit of a chore.
The natural tendency is not wanting to shift the hands too often, therefore making as many stitches possible before re-positioning the hands.
I've observed that knitters who create smooth fabric overcame this tendency. They re-position their hands every few stitches, or even, every stitch. But knitters whose fabric is not-so-smooth tend to hang on to the needles, shoving forward a bunch of stitches at a time, knitting all these--perhaps as many as 10 stitches or even more--without repositioning their hands on the needles. In other words, there's no repositioning until it becomes absolutely necessary because no more stitches are reachable on the left needle, while on the right needle, the newly-made stitches are so crammed together, they're about to fall off the needle tip.
In bunchwise knitting, the first stitch to be knit is separated from its left-hand neighbor by very little distance, while the last stitch of the bunch is drawn very far from its neighbor--a neighbor being held back to be the first stitch of the next bunch. Similarly, the first stitch of the bunch to climb aboard the right-hand needle is held a fair distance away from its right-hand neighbor--the last stitch of the old bunch--while the last stitch to climb aboard is jammed and crammed up against the other stitches newly-made in the same bunch.
The evil is that the running yarn--the yarn coming from the skein--has to run a further distance between stitches in widely-separated bunches than between stitches of the same bunch.
If this is a one-time random event--maybe trying to get in a few last stitches before running for a delivery at the door--the result is the mysterious set of too-big stitches in the middle of an otherwise good row. This sort of problem can usually be blocked out: as the knitting flexes, the small amount of excess yarn stretches from one place to another.
However, when the distortion is systemic, the fabric can't recover. If the hand routinely bunches up roughly equal numbers of stitches, the fabric soon begins to distort into vaguely vertical columns, each column representing the width of the bunch-wise knitting. Fabric knit bunch-wise, where uneven amounts of yarn routinely lays between stitches in adjoining columns, is unlikely to ever lay smooth, not even when properly blocked.
One reason why the old-time production hand-knitters used knitting sheathes or belts to hold the needles was to separate the holding function from the knitting function. If the needles and fabric can be supported without the hand clamping the stitches to the needle, the hand becomes free to guide the stitches, smoothly and evenly sliding each stitch to the working tip, then taking it away again, always moving the stitches by the same amount.
In machine knitting, this problem of uneven runs has been solved by having an entire bank of needles, one for each column. These needles are in fixed position, so the running yarn always travels an identical distance between adjoining stitches.
For the modern hand knitter, the cure is to reposition the hands and the stitches often, keeping the runs short--a few stitches, at most. Slower initially, yet soon the hands take the situation in stride. Keeping runs short by moving the stitches evenly up to the left tip and away from the right becomes one more automatic gesture among many made by the knitter's hand, a smoother fabric resulting.
Now we come to that part of the year when knitting shows its true value. Frenzied gift-knitting is past. The sun never truly lifts overhead--setting early, rising late, it merely tracks along the southern horizon. Sometimes dawn brings white snow reflecting blue shadows, blue skies. Some days trees crack and cardinals mob the feeder. But most days dawn to low gray monotony, sparrows scrabbling under the lilac bush.
Indoors, maybe, something good is in the oven. Each kid is plugged head-first into a glowing entertainment rectangle. The knitter sits down for a little while in a comfy chair with two mismatched needles and some scrap yarn. "A swatch? A baby cap?" asks the spouse carrying another cup of coffee. "We'll see how it goes" says the knitter, the mind's eye instantly crowded with caps become swatches; swatches, caps--a knitted bridge to winters past.
Or maybe cabin fever has gripped everyone and the knitter takes refuge in mindless stockinette: 4 different socks worked leg-tubes only, the fifth on the needles, all shaping waiting for that day (Lord, let it come soon) when the kids head back to school. Heels stack up, waiting to be knit in silence.
The knitter alone has a different rhythm: winter solitude blossoms into complex cables, endless counting, immense projects. One bright winter's day, the knitter hunts out the afghan pushed aside by last spring's daffodils. Silently counting the squares still to work, optimism swells--why it's more than half done!
Photo: Elizabeth Shoshany Anderson
This bright optimism lasts the evening through. Needles flash. The moving luminescence in the hand commands close attention. Dark thoughts flit away from the lit circle of work.
It may seem the knitter moves the knitting forward, stitch by stitch. Yet in these short days, it is knitting which moves the knitter forward little by little towards a time surely coming. In our hands, the gray days transform into a summer camisole, perhaps, or a baby swaddled in color, a baby not yet timely, yet kicking to get out nonetheless. Knitting carries the knitter the long winter along, towards the life of spring.
 Truthfully, after finally figuring out all the parts, it was not clear to me how it could be explained or illustrated, and I was ready to give up on ever bringing it to public attention. However, Eunny Jang, the editor of Interweave Knits, insisted on having a buttonhole article, and would not take "no" for an answer. Under her pressure, I kept plugging away at different methods of explaining it, and finally hit upon one. So, thanks to Eunny and her insistence, this new buttonhole is waiting to meet you all in the summer 2010 Interweave Knits.
 One year after this article comes out in Interweave Knits, the copyright reverts to TECHknitting blog, so watch this space in about a year for the complete illustrated details on-line. In the meanwhile, check out the print version, at your local bookstore or supermarket, or in your public library.
I hope you will like this new article and will try the new buttonhole.
Good knitting --TK
One year after this article comes out in Interweave Knits, the copyright reverts to TECHknitting blog, so watch this space in about a year for the complete illustrated details on-line. In the meanwhile, check out the print version, at your local bookstore or supermarket, or in your public library.
I hope you will like this new article and will try the new buttonhole.
Good knitting --TK  Truthfully, after finally figuring out all the parts, it was not clear to me how it could be explained or illustrated, and I was ready to give up on ever bringing it to public attention. However, Eunny Jang, the editor of Interweave Knits, insisted on having a buttonhole article, and would not take "no" for an answer. Under her pressure, I kept plugging away at different methods of explaining it, and finally hit upon one. So, thanks to Eunny and her insistence, this new buttonhole is waiting to meet you all in the summer 2010 Interweave Knits.
 One year after this article comes out in Interweave Knits, the copyright reverts to TECHknitting blog, so watch this space in about a year for the complete illustrated details on-line. In the meanwhile, check out the print version, at your local bookstore or supermarket, or in your public library.
I hope you will like this new article and will try the new buttonhole.
Good knitting --TK
One year after this article comes out in Interweave Knits, the copyright reverts to TECHknitting blog, so watch this space in about a year for the complete illustrated details on-line. In the meanwhile, check out the print version, at your local bookstore or supermarket, or in your public library.
I hope you will like this new article and will try the new buttonhole.
Good knitting --TK 


