Tuesday, August 30, 2022

What is a cable, anyhow? (Cable crosses and how to knit them)

the heart of the matter
"Cables look hard," beginning knitters say, and "what is a cable, anyhow?"

Gorgeous and complicated-looking, yet the concept is simple. Leave the paraphernalia and procedures aside for now. Start at the heart of the matter. 

The heart of a cable is its cross-over, and that cross-over is nothing more and nothing less than stitches switching order along the row.

Suppose six stitches are on a needle. Labeled 1-6, they'd appear in this order as you knit (remember, per the arrow, knitting generally proceeds right to left). 

 6-5-4-3-2-1 

<--------------<

After you've made these stitches switch places (and never mind how, for the moment) the new order would look like this:

3-2-1-6-5-4 

<---------------<

The group of stitches in pink-bold and the group of stitches in green-italic have switched position. The green-italic group used to come first, but now comes last. Similarly, the pink-bold stitches used to come last but come first. The direction of the knitting (arrow) hasn't changed: that remains from right to left. What's changed is the order of the groupings. 

Look closer. WITHIN each group, the stitch order hasn't changed.  The 1-2-3 group still goes 1-2-3 after the switch, and the 4-5-6 group retains its internal order as well.  In the end, our six stitches have been divided into two groups of three, each group retaining its original internal order, but the two groups have switched places. And that's your first cable knit! (Well, conceptually, anyway.)

Here it is again, in stitches, rather than numbers. Remembering that the <---direction of knitting is right to left, here are the six stitches labeled by number.


Now let's cross them. The 4-5-6 group which used to come last now comes first.  The 1-2-3 group which used to come first now comes last.  The exact spot where the two groups switch places is the cross-over, marked with red arrows. 


(Preview--we'll see this illustration again in variation because there's something else happening where those arrows are.  More below.)

As to knits and purls, here's what to notice:
  • As seen from the front fabric face, all six cable stitches are smooth stockinette stitches. 
  • The opposite of a knit is purl and the opposite of a purl is a knit, so if you've knitting flat (side-to-side) then when you flip the fabric over so the back fabric face is towards you, the cables would appear as purl stitches. A corollary is that ordinary cable fabrics are not reversible. 

the cable express
Now leaving the realm of theory. Next stop on this train: knitting a cable.


A first cable
Materials:
Here's what you'll need to make a cable by a very simple and intuitive way.  (The "real way" used by most knitters is at the end of this post, but we'll start with this simple method.) 
  • scrap yarn
  • needles in the right size for the yarn
  • something capable of holding 3 knit stitches for a few moments so they don't run out and don't get out of order, something like an unbent paper clip, or a bobby pin (or a safety pin or a piece of spaghetti broken off short, or a piece of scotch tape, or twisty-tie bent into a U shape, or really any darn thing you can think of.)

cable crossing gizmos

Procedure
The goal is a 6-stitch cable, as in the illustrations. But we'll cast on 12 stitches, allowing for a 3-stitch border on each side for ease of handling. Onto this 12-stitch cast-on, knit a few rows of stockinette. End with a wrong-side row, so that the next row about to be worked is the smooth front knit side of the stockinette fabric. Knit 3 stitches for the border, and you're in position. The cable will be worked on the next six stitches currently parked on your left needle.
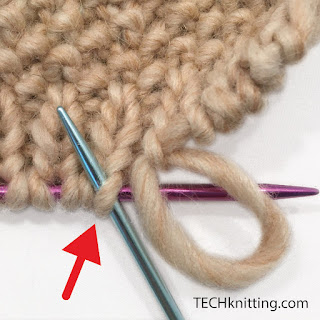
  • Here comes the fun part. With your unbent paper clip (or bobby pin or tape, or whatever) catch the next three stitches as shown below. This first group of green stitches (1-2-3) will form one-half of the finished cable.

  • Let the paper clip fall to the front of the work (towards you) making sure the three green stitches stay aboard. These stitches will form one half of the cable.
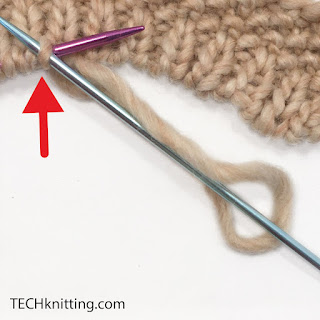
  • Now, slip the next three pink stitches (group 4-5-6) from the left needle onto the right needle, one stitch at a time, preserving both their order and orientation (right stitch-arm forward). This group  will eventually form the other half of the finished cable.
  • Next, replace the first group of green stitches (1-2-3) from the paper clip onto the left needle. Again, stitch-orientation should remain right-arm-forward after the transfer.
  • Last, replace onto the left needle, the second group of pink stitches (4-5-6) previously slipped onto the right needle, once again preserving order and orientation.

  • Counting from the tip of your left needle, the pink 4-5-6 group will be first, though it will be crowded and squeezed together by the second group (green 1-2-3) leftwards on the needle.  
  • Next, knit across the top of all these stitches in their new order.  
  • Lastly, finish the row by knitting the three border stitches remaining on the needle. Ta da--a first real-life cable cross. 
A row knit into the top of the cable cross.
Note: border stitches are not shown


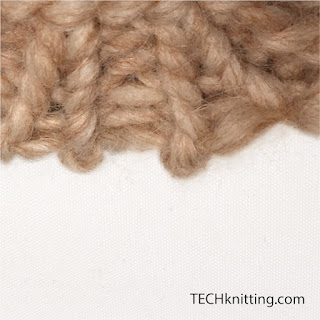
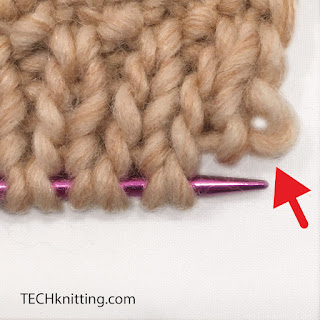
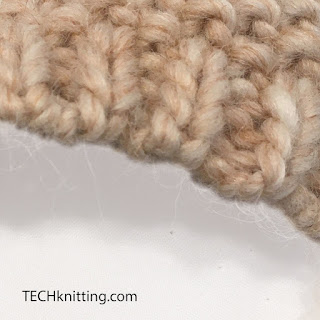
When the row is finished, turn the work, purl the back, turn the work again, knit the front. Now let's look at this scrap as it looks in actual knitting. The  six stitches are highlighted in thin red stripes. The cable cross is at the red arrows. 
 

If you poke around with your fingers, you'll notice there's a sort of a hole on either side of the cable cross. As previewed earlier, here's that illustration from above for comparison, and you'll see that the holes, just where the arrows point, are due to the cross itself. Such holes are normal, a structural artifact of the cable cross.  


If you think about it, the stitches of the crossed row aren't connected to their directly neighboring stitches any more, but have been yanked out of order by the cross. It is true that the very next row--the one knitted into the switched stitches--re-establishes the connection between every stitch and its neighbor, all the way down the row, but that only closes the hole, rather than eliminating it. On the yanked row itself (the row of the cross-over) the loss of neighborly connection means there are unavoidably holes on both sides. 

So, yes there are holes. But no, you didn't do anything wrong. It's the nature of the operation.  
The wider the cable (more stitches) and/or the chunkier the yarn, the bigger the hole. Yet however significant those holes may come to seem to you as the knitter, the reality is no one else will ever notice.   

Refinements

Borders / background stitches: the scrap we knit doesn't quite look like a classic cable, because the edges of the cable and the borders all merge together. If the borders were worked in purl stitches, the edges of the cable would be much easier to see: a continuous knit column on a purl background stands out clearly. 

purl-bordered cable (left); unbordered cable (right)

Here's that same same 6-stitch front cross cable. However this time, it's knitted side-by-side with the same kind of cable on a purl background. By working the border-stitches in purl, the left cable looks more defined.

Left and right front crosses: In cabling, there are only two ways the cable can "lean" or slant: left or right. Therefore, cables are classified as left or right front crosses. 
 

Note that in both crosses the stitches are in the same order, so what dictates the lean? In the sample scrap we knitted, the green 1-2-3 stitches on their paperclip holder were dropped to the front of the work when the pink 4-5-6 stitches were slipped to the right needle. After all the stitches were re-arranged and knitted, the green 1-2-3 group formed an arm of stitches crossed over on top, while the pink 4-5-6 group formed a cable-arm which squeezed behind. 

With the green-stitch arm on top, the cable appears to rise UP to the LEFT (the top arm of the cable slants upwards and to the left). For this reason, this type of cable are often called a left front twist, or a left front cross, sometimes abbreviated "LFC".

Geek-note: a cable which slants UP to the LEFT can just as well be said to slant DOWN to the RIGHT. However, the naming convention has evolved to describe which direction the UPWARD slant points. If confused, think "upwards and onwards" as your motto. (An excellent motto for all kinds of knitting, really.)

Now...what if you had dropped those green stitches on their paperclip to the back of the work in the re-arranging process? Well, the green stitches would still be drawn upwards and to the left in the re-arranging process BUT that green arm would now be at the back, hiding. Instead, on top would be the arm composed of the pink (4-5-6) stitches, drawn UP and to the RIGHT.  With the right-leaning pink arm forward, the entire cable appears to slant upwards to the right. Therefore, such cables are often called a right front twist, or a right front cross, sometimes abbreviated "RFC."

Below, a graphic summary.

Left and right cables and their method of construction
First group (green sts) placed on holder, holder dropped to front = left front cross
-->green stitches wind up in front<--
First group placed on holder, then holder dropped to back = right front cross
-->pink stitches wind up in front<--

The take-away here is that once crossed, the first group of stitches in any cable (green) always slant upwards to the left, and the second group of stitches in any cable (pink) always slant upwards to the right. The apparent direction of the cable cross is determined by which arm is on top, and which arm is on top depends on which way the first group was dropped when on the holder.

---> Drop to front, left cross. Drop to back, right cross <---

 
Repeats and direction:
Cables get their characteristic look by repeating at certain intervals. So, on the six-stitch-wide cable we've been knitting, the cross would typically repeat every 6 or 8 rows. Further, cables typically cross in the same direction each time.  If you think about it, you're actually knitting •two side-by-side stitch-columns (the arms) •where these two arms spiral around one another in the same direction (the cross) •at the same frequency (the same number of rows between the crosses). It's like two snakes intertwining. 

Shortcuts to re-arranging the stitches a.k.a the "real way" to knit cables.

As promised, the "real"way to knit cables. This method shortcuts slipping and re-arranging stitches on the left needle before knitting.  

So far, we've been making cables like this:
  • step 1: slip green stitches 1-2-3 onto holder, drop to front (left cross) or back (right cross)
  • step 2: slip pink stitches 4-5-6 from left to right needle
  • step 3: return green stitches 1-2-3 to left needle from holder
  • step 4: return pink stitches 4-5-6 from right needle to left
  • step 5: stitches are now rearranged into a cable cross, and parked on the left needle.  Complete by knitting all stitches. 
Step 4 is now going to be eliminated, and made part of step 2. 

New procedure ("real way")
  • step 1: slip green stitches 1-2-3 onto holder, drop to front (left cross) or back (right cross)
  • step 2: KNIT pink stitches 4-5-6, one half of cable cross completed
  • step 3: return green stitches 1-2-3 to left needle
  • old step 4: eliminated because pink stitches 4-5-6 are already (knitted!) on the right needle.
  • new step 4: knit green stitches 1-2-3, second half of cable cross completed.

Cable needles
Cable needles are the original way to cable. By using a cable needle, it is possible to further streamline cable knitting.  


Old-style cable needles were short double-pointed needles. These easily fell out of the work. Newer style cable needles feature a dip to better hold the stitches.  By using cable needles, the above procedure collapses down to only three steps. 
  • step 1: slip green stitches 1-2-3 onto CABLE NEEDLE, drop to front (left cross) or back (right cross)
  • step 2: knit pink stitches 4-5-6, one half of cable cross completed
  • step 3: RATHER THAN returning green stitches 1-2-3 to left needle, INSTEAD, knit them directly off the cable needle, second half of cable-cross completed.
Using a cable needle eliminates a step, but has certain drawbacks. Not only does it have more of a chance at falling than do most holders, but you have to switch your grip from the left needle to the cable needle to work the second half of the cable cross, then switch back again to the left needle to knit further. For these reasons, I find it slower, and do not cable this way. Yet use makes master, and you may find it faster. This traditional method has been time-tested and is certainly worth a try. 

J-hook
A  J-hook cable needle is not to be confused with a size-J (6 mm) crochet hook.  They're both called "J-hooks" but are different tools.

J-hook for cable knitting.  Not to be confused with a size-J (6 mm) crochet hook

Cable J-hooks are made of anodized aluminum or plastic and slide easily. They're a sort of hybrid item. They hold that first group of stitches as well as a paper clip or a bobby-pin, but you can knit the stitches off the long end as you would with a cable needle, if you're inclined to try that method. The only disadvantage I find is never having one at hand.  By contrast, a box of paperclips or a card of bobby pins will last a long time, and no crying when one disappears.
 
Still another shortcut
There is one final shortcut worth mentioning, and that is "cabling without a needle." With this trick, the group of stitches which would normally be transferred to a paper clip or other holder are instead pinched in the hand of the knitter while the other group is being knit.  I've not found this method faster for myself, but it certainly is clever, many knitters prefer it, and it's an excellent trick to know for a cabling emergency. Here are links to two different blogs with instructions. 
* * *

Before we leave the subject of cables, it would be a mistake to think all cables are six stitches wide. There are whole BOOKS of different cables, a quick internet image search reveals hundreds, and stitch dictionaries usually have a cable chapter as well.

Another mistake would be to think there are hard-and-fast rules.  Every convention mentioned here can be broken. Cables need not have two arms--they can have three, four or more. Cables need not always be made in stockinette--and even if one arm is stockinette, the other(s) need not be. Cable arms need not be of the same stitch court--one arm can have more stitches than the other(s). Cables need not have a border or background, and if they do have a border, it need not be purl stitches. Cables need not repeat at regular intervals.  Cables arms need not spiral around one another like snakes, but can wave back and forth like seaweed, keeping the same arm always on top.  Further, cables are not always confined to the same set columns of stitches, but can "travel."  

The one thing which cables share, however, is the "cross." The cross is the heart of the cable, and what this post has been about. 

* * *


Til then, good knitting! --TK kn

PS: This blog is not about my life, but if you want to know where I have been, a family member has been ill. 

Friday, April 1, 2022

TECHknitting April Fool's edition: More time for knitting

Here's a neat April Fool's trick. More time for knitting, less cleaning up!

Once the dishes are unloaded, your dishwasher can help keep things tidy. (Not to mention, offer more work space in a small kitchen.) 

The door is the perfect (self-cleaning) spot for messy projects like re-filling the flour. 

The top shelf is the perfect place for messy projects like slicing the bread. Another plus: the board goes straight into the dishwasher without traveling across the kitchen. 


Modern dishwashers have a food disposer built right in, so (within reason, of course) no fears of plugging the drain. 

The door and shelves are also handy for resting meat packages without contaminating the counter, bringing cold items to room temperature, breading fish, filling oil dispensers. Anything, really, you'd otherwise wipe up after. 

Less clean up = more time for knitting.
--TK
____________________________

Archive: Previous food- and April fool's posts

No mess muffins

Peach crumble

Knitting crossword


Friday, February 11, 2022

Shortening knitted ribbing--part 3: alternative tricks for bind off

So far in this series, we've shortening ribbing knit bottom-up by 

  • removing the unwanted excess ribbing (which we're calling waste fabric) then
  • catching the live loops, and then
  • operating on the caught live loops to bind off a new bottom.

  Part 1 shows shortening and binding off K1, P1 ribbing (also called 1/1) and part 2 shows shortening and binding off K2, P2 ribbing (2/2). 

The bind off in both cases was done with an ordinary chain bind off--links here to the chain bind off on shortened K1, P1 ribbing, as well as shortened K2, P2 ribbing

Today we'll step back one pace to just before that chain bind off. Here is what the situation looks like with the excess removed and the loops caught on the needle, but no bind off yet worked.

1/1 ribbing with excess ribbing removed. 

(Recall that in the samples, I knit the excess fabric on purpose in two colors so it would be easy to see what was going on. Ordinarily, the excess [waste] fabric removed would have been knit in the same color as the rest of the ribbing.)

2/2 ribbing with excess [waste] ribbing removed

See, chain bind off is sturdy and reasonably flexible, but it is not the only choice. There are other alternatives to bind off the caught loops or shortened ribbing, and that's today's post. 

* * *

The two main categories of alternative edge treatments are these:

  • Added edges. This works on 1/1 OR 2/2 ribbing. This class of tricks avoids chain bind-off by adding a different kind of edge. Because TECHknitting has posted about these various edges in the past, I'm not going to repeat all that here. Instead, I'm just putting in the links, and those links make part 1 of today's post. 

  • Self-edges. Ta da! This (new!) trick works only on 1/1 ribbing, but it works a treat. With this trick, the actual loops on the needles become a new bottom edge without adding any more yarn. Yes, strange as it may seem, it is possible to get a new non-raveling edge on your shortened ribbing working only with the loops you've caught on your needles in the shortening process--no extra yarn added.  


Part 1: alternative bind off for 1/1 and 2/2 ribbing, three links


You've removed the excess ribbing from your project as shown in part 1 and 2 of this series and now have live loops on your needle as illustrated above. You can't bind off in pattern as you normally would because, just like a provisional cast on,  the stitches you've picked up are 1/2 stitch off the original pattern--you are picking up the tails of the stitches, not their heads. As we have seen, chain bind off does work, but if you don't care for that look, try these three alternatives.

A. Curled edge

An easy alternative to chain bind off at the edge of the ribbing is to simply work a few rows or rounds of stockinette, and THEN bind off using the same chain bind off featured in the two previous posts of this series. Adding a few rows of stockinette before the chain bind off makes an edge which curls up and hides the chain bind off--a mysterious sort of curled up edging with no bind off visible. This  "stockinette curl," is an undefeatable force of nature, the curl is permanent and will never flatten. Attractive in appearance, it looks a lot like an I-cord bind off.  

Here are the instructions for this curled edge, and here are more illustrations of a curled edge on various fabrics.

B. Fake I-cord (FICBO)

Another alternative is  FICBO--Fake I-cord Bind off.  This trick IS actually worked on a chain bind off, but then MORE edging is added afterwards. Here are the FICBO instructions.  There is also a link to a short video. The linked video shows FICBO on 2/2 ribbing. (Click & skip the ads as soon as you can! You-tube put those there, not me.) 

C. (Real) I-cord bind off

The third alternative to binding off shortened ribbing is to work a real I-cord bind off. The linked post shows that alternative.

Which added edge where?

As between a curled edge and FICBO, the stockinette curl edge is stretchier and lighter. The FICBO and knit-on I-cord look more polished, but are heavier: great for a hat edge or a front band, FIBCO and I-cord may be too heavy for a bottom band. As ever, swatching is your friend. 

Part 2: Self-edge for shortened 1/1 ribbing--a new trick


On 1/1 ribbing shortened in the opposite direction from that in which it was knit, it is possible to make a self-edge along the bottom. Self-edge means that, without adding any new yarn, a new bottom edge is made up of the loops already caught on the needles in the shortening process. In fact, with a self-edge, not only do you *not* add yarn, but actually have the opposite problem: you have to subtract yarn. 

When a K1, P1 ribbing is shortened by removing the excess rows from below the new bottom row, the new bottom row will not run out. As odd as this seems, it's true: the released bottom edge of 1/1 ribbing cannot and does not form ladders like ordinary stockinette fabric, and the edge simply will not run out.  

So, hmmm....if these stitches are not able to run out into a ladder, is it possible to simply pull the needle out of the newly-caught loops of a shortened ribbing, or even not bother catching loops in the first place? Can you really leave the newly exposed bottom row alone, and NOT bind it off? 

Technically, the answer is yes. Once you've snipped a stitch and unraveled a row of ribbing in the opposite direction from that in which it was knit, 1/1 ribbing's non-running feature yields a structurally intact fabric. Therefore, no need to bind off because a shortened out k1, p1 ribbing isn't going anywhere.

Aesthetically, however, there's a problem: the tension's all wrong. Unless tightened, the target row features a ruffled, wavy, messy, loose-looking edge. This is what the new bottom would look like if it were not on needles, with the loops left wild and loose in the new-shortened ribbing.

If you take the needle out of shortened 1/1 ribbing, the loops won't ladder out, but the resulting edge will ruffle and spread

Putting this all together, theory dictates that an attractive edge can be had by simply moving the slack out of that bottom row. But...with a trick this conceptually simple, you just know there are catches, and here are three: 

  • First as noted above, this works only in 1/1 ribbing, and only if the ribbing is being shortened in the opposite direction to that in which it was knit.  (The knitting-geek reason is because when you're working upside down in 1/1 ribbing, each column you pick up is technically composed of the tail connecting 1 knit arm and 1 purled arm.  When each arm "points" a different way, the fabric is impossible to run out. With 2/2 (or higher) ribbing, the edge column of each rib is also half-and half, but the middle column of each rib is not.  Instead, the middle columns are one knit arm + another knit arm (which equals one whole knit column) or 1 purl arm + another purl arm (which equals one whole purl column). As we know, knit columns and purl columns  run out very well, so simply tightening a column like this does nothing to prevent running.) 
  • Second, the loops still have to be on the needle for this trick to be worked.  If the loops have fallen off, it's unlikely you'll re-seat them prettily, so you'll have to get new loops by catching the stitches of the row above the fallen-off loops. 
  • Third, if there's a split stitch or a halo-snag anywhere along the run, the slack in the yarn can't be transferred from one loop to another. This trick works only in a smooth yarn, smoothly knit. 


A "halo-snag" is when you're knitting a yarn with a halo, like mohair, and you knit through the "halo," or fluff of an already-made stitch while you're knitting.  With fuzzing yarn like this, the error is usually to catch the running yarn not just under the loop of the stitch you're knitting into, but also to catch the yarn through the halo of that stitch, or sometimes through the halo of a neighboring stitch.  If you're lucky, you can see where the halo-snag is located and cut loose the fluff of the halo without cutting into the underlying yarn, but generally the trick of pulling slack out of a snipped ribbing is harder to do with a halo'ed yarn.

With a split stitch, you could, theoretically, cut loose one or the other halves of the split, but this weakens the yarn.  If the split is minor--one ply of a four ply yarn, for example, or a small fraction of a robust single-ply yarn like a lopi, you may choose to CAREFULLY cut the split loose, but if the split is major, your best bet is to re-target: move up a row, remove the row with the split and hope the new target row doesn't also have a split. 

However, once you've gotten past these problems: once you have the 1/1 ribbing loops on your needle, and you've examined each and every loop to make sure it moves freely, here's how to pull out the slack and make a nifty self-edge along the bottom of the now-shortened ribbing.

Step 1 (below): locate the lowest edge stitch which is FURTHEST from the tail.  The red arrow shows this loop located and dropped off the needle, waiting to be operated upon. 


Step 2 (below): pull the loop of this stitch out until it becomes larger, as shown by the red arrow. How much to pull out is a matter of trial and error. You do not want the edge too tight, so when going up the learning curve, err on the side of too loose: you can always return and pull more slack out. 


Step 3 (below): Switch to the next stitch (red arrow) then repeat pulling out the slack (blue needle).


Step 4 (below): As you work your way leftwards along the stitches of the target row (red arrow) you can see that the loop of slack gets bigger and bigger, and the tightened edge begins to look mighty fine.


Step 5 (below): The final result--looks a lot like a tubular cast off, doesn't it?  (And, although there is no "tube" has been made, this self-edge yarn does take a very similar path along the bottom edge as it would in a tubular cast off.)


--TK

--For the record: this situation in Ravelry's techniques forum (a knitter popped off ribbing without catching the stitches) is what inspired this series of posts. 

__________________________________

--To shorten ordinary knitting (non-ribbed) check out this post:

Length reassignment surgery: lengthening and shortening knitwear

__________________________________

Monday, July 5, 2021

Shortening ribbing: K2, P2 (part 2 of 3)

Supposing you want to shorten bottom-up ribbing. Just as there are two ways to pick up the loops in K1, P1 (1/1) ribbing, so there are two ways to pick up the loops in K2, P2 (2/2) ribbing. 

The first way is to snip a single stitch, then pick out the yarn, catching the ribbing stitches one-by-one as they pop loose. The second way is to insert a slim double-pointed or circular needle ahead of time, then do the snipping and the picking. Let's look at these in order.

One-by-one method

On this sample, I've knit a 2/2 ribbing topped with a few rows of seed stitch, to represent the bottom part of a sweater with a too-long ribbing.  The part of the ribbing to be removed is worked in orange.  

The process of cutting a single stitch, teasing out the cut end and catching the loops on a slim needle is virtually identical to that shown in the previous post about 1/1 ribbing.  Below it is illustrated for 2/2 ribbing.

Decide where you want your ribbing to end.  This soon-to-be bottom row is called the "target row." The target row in this sample is the bottom-most oatmeal-colored row, and the  row BELOW the target row was knit in a different color to make thing easy to see.

One stitch in the row BELOW the target row is carefully snipped

The unwanted fabric excess is going to be separated by picking the cut end of the yarn out of the fabric--unraveling--using the pointed end of a slim knitting needle. As each stitch pops loose, it will be caught on a slim dpn


In the above photos, the waste fabric is separating below the target row as the cut end is picked out and the loops of the target row are caught as they pop free.  This process is repeated all along the row until all the loops are caught.

Shortcut, picking up all the stitches ahead of time: the all-at-once method

For the one-by-one method, above, there's no significant difference between 1/1 and 2/2 ribbing. However, if you want to try the all-at-once method, below, there is a difference. 

With 2/2 ribbing, you can't just insert your dpn down the arms of the stitches on the fabric surface in the target row.  If you try it that way, you'll miss some of the loops you need. Instead, you must re-adjust your eyes to see not the arms, but the  BOTTOM loops of the target row--the TAIL of the stitches, rather than the arms leading to the tails.  (For a quick review of the parts of a knit stitch, this link shows the parts, labeled.)

If this sounds confusing, it'll all come clear in a moment. 

I find that for this trick, it helps to think about these bottom tail loops in a series of four, with each of the four in the series being named after what percentage of the stitch shows on the surface of the fabric from the side you are working. Another way of saying the same thing is that only partial tail loops show on the target row, and it is into these partial loops that you have to thread your slim dpn, as illustrated below. 

  • the first tail loop of the series is not too hard to see: it is a one-quarter (1/4) loop, which can be found where the stitch in the second KNIT column segues into the stitch in the first PURL column. 
  • The second tail loop of the series is a half-stitch (1/2) loop, which is easy to see, it's found right in the middle between the two PURL columns.
  • The third tail loop, like the first, is a 1/4 stitch, which is found where the stitch in the last PURL column segues into the first KNIT column, 
  • The final tail loop of the series is the hardest to see: it is a one-eighth (1/8) loop, hiding almost completely between the two KNIT columns. 
(Geek note: if you think about it, all the loops are actually half-loops, because, regardless of position, structurally speaking they are all the same thing: the bottoms of the tail between the stitches.  What distinguishes them from one another and makes them partial like this is how much of the loop is exposed on which fabric face.  Thus, the 1/4 stitches are equally exposed on both fabric faces, while the 1/8 stitch is actually the back of the 1/2 stitch, meaning, if you flipped the fabric over, the 1/8 stitch--located between the knit columns--would show as the 1/2 stitch located between the purl columns.)

Click to enlarge. In the schematic (right) as well as the photo (left) the series details are highlighted. It is along these partially-visible tail loops that you would insert a slim dpn for pick-up when using the shortcut all-at-once method

As to where to start and stop with your pick-up: you DO have to pick up every single tail-loop, but you DON'T have to start with the first loop of the series as I've described it (and in fact, you probably won't).  If the first tail loop to pick up doesn't happen to be the 1/4 loop which starts a series, you just start with one, two or three "introductory loops," being those loops from a previous partial series which lay on the needle ahead of the first full series. Once past the intro loop(s), the pattern remains consistent all the way down the target row, and that is the use of it. By chanting "quarter-half-quarter-eighth" to yourself, you'll be that much less likely to miss a tail loop or become confused as to to which loop to grab. 

Just to really fasten this concept down tight, here's one more run at it. On this extreme close-up, you'll see that the first tail-loop to be picked up is one of these intro loops.  It is a 1/8 loop, although in actual practice, it could be any of the loops of the series. It is after the intro loop (or loops) that the regular progression of the series develops. 

Close-up: after picking up this introductory loop, the rest of the pattern follows in regular sequence.


This is what the shortcut method looks like in real life, with the needle inserted into the tail loops, all the way down the row. Note that as soon as you insert the needle, the tail loops all stretch to become the same size: the fractional appearance is only how the loops lay in the fabric before the needle is inserted

Once the needle is inserted, all the tail-loops swell to the same size. 

Bind off

Whichever way you got the tail loops on the needle (whether one-by-one, or all-at-once) after the yarn of the row below has been snipped and picked out, this is the end result. The orange waste fabric has been removed and the shortened ribbing ends in loops on the needle.

Now remains only to bind off, and here is the bind off in progress.

This post and the previous have illustrated the conventional method of shortening ribbing which was knit bottom-up.  In sum, so far in this series, you snip a single stitch and pick out the row below, catching the tail-loops of the ribbing on a needle either as you go or beforehand.  Once all the tail loops are on your needle, you bind off.  

Ordinarily, ribbing is bound off in pattern, meaning to knit the knits, and purl the purls.  So you may wonder: why wasn't that done on these samples?  

The short answer is, the loops on your needle, being the tails, don't line up with the loops of the ribbing: the loops on the needle are 1/2 stitch off the ribbing above them.  Because of this offset, you have to use a more general-purpose bind off, and a good all-a-rounder is the ordinary chain bind off

The ordinary chain bind off makes a good workmanlike finish--sturdy and attractive.  Further, with chain bind off, you can easily pull back if it's turning out too tight or loose, so you can mess around until the bottom edge is just right--neither tightly puckering nor loosely flaring, which is an advantage, for sure. 

However, chain bind off is not the only choice.

In the last post of this series you'll see that there are several other alternatives to approach the bind-off problem. 

--TK

PS: To shorten ordinary knitting (non-ribbed) check out this post:

Monday, June 28, 2021

Shortening ribbing: K1, p1 (part 1 of 3)

Suppose you have a sweater which you have worked bottom-up, and you decide you want to shorten the ribbing. Suppose further that the ribbing is K1, P1 (1/1) ribbing. You're in the right place: that's what this post is about.  (Iif you have K2, P2 ribbing, check out the second post in this series.)

shortening ribbing in knitting, overview sketch TECHknitting.com
Shortening ribbing, overview sketch.
This is the cartoon version.
** 
📺😺📺 **
In real life you don't actually hack off
many columns of ribbing with a scissors!  Read on...

If this were stockinette you wanted to shorten, this would be easy to do.  You'd simply snip a stitch free, then unravel that row, catching each now-loose stitch from the row above onto a knitting needle.  You'd then bind off these new loops.

The conventional way to shorten 1/1 ribbing

The conventional way to shorten ribbing is nearly the same, but with a few variations. Here's the illustrated how-to for 1/1 ribbing (K1, P1). 

Suppose, on this two-tone fabric sample, that the maroon-colored fabric is the excess length to be removed. 

shortening ribbing, knit sample overview TECHknitting.com
Like the opening sketch, the bottom ribbing is shown in a darker color--maroon. The seed stitch represents the first few rows of the garment-body.  The maroon-colored ribbing is the excess to be removed. When we are done, the ribbing will be all oatmeal-colored, and much shorter (5 rows only).

shortening ribbing, closeup of stretched fabric TECHknitting.com
Close up of above, with the fabric stretched out

Here's the removal in four steps

Step 1: Somewhere along the target row, and at least a few stitches away from any edge, carefully snip a stitch.  Although the opening sketch showed the scissors cutting off a bunch of ribbing, that was only the cartoon version. In fact, after snipping this one stitch, put away your scissors, you won't need them any more.  Instead, the fabric is going to be separated by picking the cut end of the yarn out of the fabric--unraveling-- using the pointed end of a slim knitting needle. 

shortening ribbing, step 1: snipping a stitch TECHknitting.com
One stitch in the target row being carefully snipped 

shortening ribbing--after snipping there is a cut end TECHknitting.com
After snipping, there will be a cut end.  Locate the loop adjacent to the cut end in the row above the snipped stitch.  This is the first loop to catch.

Step 2: Once you've identified the loop to catch, insert a slim, pointy needle into the loop. Best to use is double-pointed needle (dpn) or a circular needle. 

shortening ribbing, the first loop caught on a knitting needle TECHknitting.com
The loop identified in the previous step has been caught by inserting a slim pointy dpn.

Once the loop is caught, begin to remove the cut yarn.  The easiest way to do this is to fish around with a second dpn, teasing and picking the cut end out of the fabric. 

Step 3: As you tease and pick out the cut end, and as further loops pop loose, catch them on the needle. Pretty soon, you'll see the waste fabric coming away from the loops caught on the needle.


A short-cut way to accomplish the same thing, especially with 1/1 (k1, p1) ribbing, is to pick up the entire row at once, by inserting a slim needle along the row.  Below is what that trick looks like. 

Instead of picking the cut ends loose and picking up the loops one-by-one, you can choose to insert a needle all the way down the row, and only then cut loose a single stitch.

Once the needle is inserted, the process is the same as stitch-by stitch: you carefully snip free one loop of the row below, then remove the excess by picking. 

Regardless of how you caught the loops--whether as they popped free, one-by-one, or whether you took the short cut and inserted a needle down the whole row--once the cut end has been picked loose all the way down the row, the result is the same. The waste length of fabric is separated, and the stitches at the bottom of the ribbing are on the needle, waiting to be bound off.

The final result before bind off: the loops are all caught, the waste fabric has been removed.

The picked-out loops of 1/1 ribbing do not sit on the needle in the normal configuration of right-arm forward.  Instead, the right stitch of each pair  lays left arm forward, while the left stitch lays right arm forward.  This is a normal artifact of picking out 1/1 ribbing: the topology (path of the yarn) is complex. (There will be more about the topology of the yarn in the second post of this series...stay tuned!) Further, even if your stitches lie in some other configuration, all will still be well as long as there is no obvious twist at the loop-top where the needle meets the yarn, per below photos.

The ordinary way that picked-out 1/1 ribbing sits on the needle is as shown in the above closeup: the right and left loops of each stitch-pair lie with different arms forward.  However, even if yours looks different, just as long as there is no twist where the loop meets the needle (blue arrow), you're fine to go on to the next step.

Step 4: the final step is to bind off the stitches on the needle.  Below is the bind-off in progress. 

Note that this is ordinary chain bind off, NOT in pattern.  "Binding off in pattern" means knit the knits & purl the purls as part of the bind-off process.  This makes a nicer edge for binding off ribbing.  Unfortunately, here you can't actually do that.  The reason is that the unraveled loops sitting on your needle are the tails of the stitches, not their heads, and the tails of stitches are offset 1/2 stitch from the heads.

As to where to get the yarn for the bind off, that's easy. I knit my ribbing in two colors for illustration purposes, but your ribbing is almost certainly one-color.  This means the waste fabric which you've separated off will contain all the yarn needed to unravel and re-use for the bind off. Note that when you go to unravel ribbing in the OPPOSITE direction from that in which it was knit (which you will be doing with the waste fabric) it readily unravels: one tug and out it comes, easy peasy. 

* * *

The second post in this series illustrates shortening 2/2 ribbing (K2,P2). The third and final post in this series shows alternatives for binding off, with a new trick which doesn't even require any bnding off at all! 

Until next time...

--TK

PS: To shorten ordinary knitting (non-ribbed) check out this post: